[Stephen Carey] had previously relied on an Insteon garage door controller, only to have it perform poorly and fail at integrating with Alexa properly. Thus, he did what any good hacker would do, and built his own system instead.
The garage door was first outfitted with a pair of reed switches to sense when it was fully open or fully closed. The drive sprocket of the garage door was also set up to be monitored with magnets and Hall effect sensors, essentially creating a rotary encoder. This allows a ESP32 to monitor the door’s direction of travel, it’s position, and when it has hit the end stop in either direction. Using Micropython, [Stephen] whipped up some code to tie the garage door controls in with Home Assistant, complete with a neat visual display of the current door position.
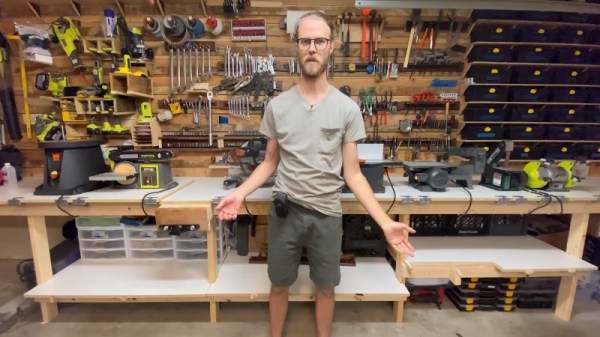
In a recent video, [SomeSkillStudio] created a tidy tool storage system for their slim garage workbench. We have seen the “five knuckle” 270 degree hinges used here before and knew they’d enable some cool hacks. Here you’ll see how he puts this unique type of hardware to work building a densely packed work surface. For anyone who’s set up shop in a garage that’s somehow also supposed to still regularly host vehicles, you’ll know how important it is to have a place to put everything away and make it easy to do so.
The video has several great tips on making sure everything fits together, something key for anyone reproducing this with their own tool collection. If you have even less space, we have some great past workshop builds from portable, to tiny, to elaborate. Even if you’ve already established a place to work, we have tips on organizing your shop, giving each tool a home in a shadow board or across an infinite grid. Clearly, making a work space is one of our favorite kinds of projects.
Plenty of potential, but a cozy hacking space it is not
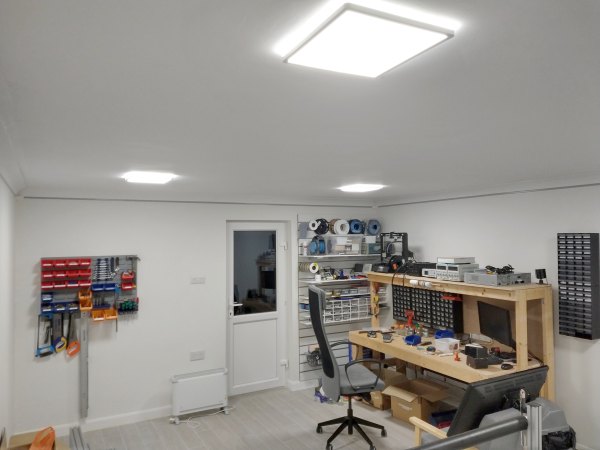
To us hackers and makers, the tools of our trade are often as important and interesting as the details of the hacks themselves, but what about the most important tool of all — the very space you use to make your magic happen? That may be your bedroom, a nearby hackerspace, and if you have the resources, you may even own a place of your own, and get to build your perfect workspace.
The latter situation is what [MichD] and partner [Brittany] found themselves in, having moved into their first place. Many couples focus on getting a hot tub in the garden or sorting the nursery, but these two are proper electronics nerds, so they converted a free-standing double wide garage into the nerdhub, learning as they went along, and documenting it in excruciating detail for your viewing pleasure.
Door fitted, framed up, and insulation in place. All ready for plasterboarding.
The building structurally is a single-skinned brick-built box, with a raw concrete floor. Pretty typical stuff for the UK (we’ve seen much worse), but not ideal for spending an extended amount of time in due to our damp, cold climate, at least in winter.
The first order of business was partitioning the front section for bike storage, and screeding the floor. Once the floor was solid, the walls and ceiling joists could be framed up, ready for fitting insulation material and covering with plasterboard.
Electrics were next in order, with the wires clipped to the brickwork, well away from where the plasterboard would be, therefore making it less likely to accidentally drill into a live cable when adding external fixtures.
Since the front part of the room was to be partitioned off, another access door was needed. This involved cutting out the bricks to fit a concrete lintel. With that installed, and the bricks above supported, the area below was cut out to the required shape. A somewhat nerve-wracking experience, if you ask us!
As any self-respecting hacker will tell you — no room build is complete without a decent amount of RGB bling, so the whole room was decked out with APA102 addressable LED strips. Control of these was courtesy of WLED running on an ESP32 module, with LedFX used on a nearby PC to perform music visualisation, just because.
It’s getting into the hot summer months for those of us in the Northern Hemisphere, and for many Hackaday readers, that means its time to get the old window air conditioner out of storage and lug it back into position. But what if you’re trying to cool a space that doesn’t have a convenient window? In that case, this clever conversion that [Infrared] came up with to keep his garage cool might be of interest.
Basically, he’s taken the classic window AC and turned it into an impromptu ductless unit. By rotating the evaporator coils into a vertical position and lengthening the compressor wires, he was able to make the center of the AC thin enough that he could close his garage door over it. The back of the unit looks largely untouched, but the front side has a real Mad Max vibe going on; with sheet metal, exposed wiring, and a couple of fans thrown in for good measure. Fine for the garage or workspace, but probably not a great choice for the kid’s room.
[Infrared] says the hacked up AC can get his garage 18 degrees cooler than the outside air temperature in its current form, but he hopes the addition of some high CFM computer fans will not only improve performance, but let him make the new front panel look a bit neater. Though even in its current form, this is far from the most ridiculous DIY AC project we’ve seen in recent memory.
[TheStaticTurtle] built a custom controller for automating his garage doors. He wanted to retain the original physical button and RF remote control interfaces while adding a more modern wireless control accessible from his internet connected devices. Upgrading an old system is often a convoluted process of trial and error, and he had to discard a couple of prototype versions which didn’t pan out as planned. But luckily, the third time was the charm.
The original door-closer logic was pretty straightforward. Press a button and the door moves. If it’s not going in the desired direction, press the button once again to stop the motor, and then press it a third time to reverse direction. With help from the user manual diagrams and a bit of reverse-engineering, he was able to get a handle on how to plan out his add-on controller to interface with the old system.
There are many micro-controller options available these days when you want to add IoT to a project, but [TheStaticTurtle] decided to use the old faithful ESP8266 as the brains of his new controller. For his add-on board to work, he needed to detect the direction in which the motor was turning, and detect the limit switches when the door reached end of travel in either direction. Finally, he needed a relay contact in parallel with the activation button to send commands remotely.
To sense if the motor was moving in the “open” or “close” direction, he used a pair of back-to-back opto-couplers in parallel with the motor terminals. He connected another pair of opto-couplers across the two end-limit switches which indicated when the door was fully open or closed, and shut off the motor supply. Finally, a GPIO from the ESP8266 actuates a relay to send the door open and close commands. The boards were designed in EasyEDA and with a quick turnaround from China, he was able to assemble, test and debug his boards pretty quickly.
The code was written using the Arduino IDE and connects the ESP8266 to the MQTT server running on his home automation computer. The end result is a nice dashboard with three icons for open, close and stop, accessible from all the devices connected to his home network. A 3D printed enclosure attaches outside the original control box to keep things tidy. Using hot melt glue as light pipes for the status LED’s is a pretty nifty hack. If you are interested in taking a deeper look at the project, [TheStaticTurtle] has posted all resources on his Github repository.
There are a lot of things in our everyday life that are holdovers from an earlier time that we continue to use simply because of inertia even if they don’t make a lot of sense in modern times. Examples include a 60 Hz power grid, the spacing between railroad tracks, and of course the self-contained attic ladder which is made to fit in between standard spaced ceiling joists. It’s not wide enough to get big or heavy stuff into an attic, and building standards won’t change just for this one inconvenience, so if you want to turn that space into something more usable you’re going to need to build a custom elevator.
This attic elevator comes to us from [Brian] who recently moved into a home with about half the square footage as his previous home, but still needed to hold all of his stuff. That means clever ways of using the available space. For the elevator he constructed a platform out of 2x lumber held together with bolts and steel supports. The carriage runs up and down on a track made out 1 5/8″ super strut and is hoisted by a winch motor rated for 550 pounds, which is more than enough to hoist up most household items including a large toolbox.
The only thing that we would have liked to have seen in the video is how the opening was made. Presumably this would have involved cutting into a ceiling joist to make the opening wider than the standard attic ladder, and care would have needed to be taken to ensure the ceiling/floor wasn’t weakened. Either way, this is a great solution to a common problem, and could perhaps be made to work on more than two levels with a custom controller. Continue reading “Build Your Own Custom Elevator”→
Vertical storage is often underused in the garage or workshop as it can be tricky to get bulky objects off the floor safely. So we stick a few shelves on the wall, put boxes of screws and components on them, and call it a day. Meanwhile, you end up playing a game of horizontal Tetris with all the big stuff on the ground.
Looking to free up some floor space in his garage, [Chris Chimienti] recently decided to design and build his own hoist to lift his bicycles off the floor. While his design is obviously purpose built for bikes, the core concept could potentially be adapted to lift whatever it is you’ve been kicking across the garage floor as of late; assuming it doesn’t have any strong feelings on suddenly being tipped over on its side, anyway.
A simple modification allows for operation with a drill.
Before he started the actual build, [Chris] knocked together a rough facsimile of his garage in SolidWorks and started experimenting with the layout and mechanism that the hoist would ultimately use. While we’ve all felt the desire to run into a project full-speed, this more methodical approach can definitely save you time and money when working on a complex project. Redesigning a component in CAD to try it a different way will always be faster and easier than having to do it for real.
We’ve become accustomed to seeing projects include sensors, microcontrollers, and 3D printed components as a matter of course, but [Chris] kept this build relatively low-tech. Not that we blame him when heavy overhead loads are involved. Even still, he did have to make a few tweaks in the name of safety: his original ratcheting winch could freewheel under load, so he swapped it out for a worm gear version that he operates with an electric drill.