Of all the methods of making big pieces of metal into smaller pieces of metal, perhaps none is more interesting than electrical discharge machining. EDM is also notoriously fussy, what with having to control an arc discharge while precisely positioning the tool relative to the workpiece. Still, some home gamers give it a whirl, and we love to share their successes, like this work-in-progress EDM machine. (Video, embedded below.)
We’ve linked [Andy]’s first videos below the break, and we’d expect there will be a few more before all is said and done. But really, for being fairly early in the project, [Andy] has made a lot of progress. EDM is basically using an electric arc to remove material from a workpiece, but as anyone who has unintentionally performed EDM on, say, a screwdriver by shorting it across the terminals in a live outlet box, the process needs to be controlled to be useful.
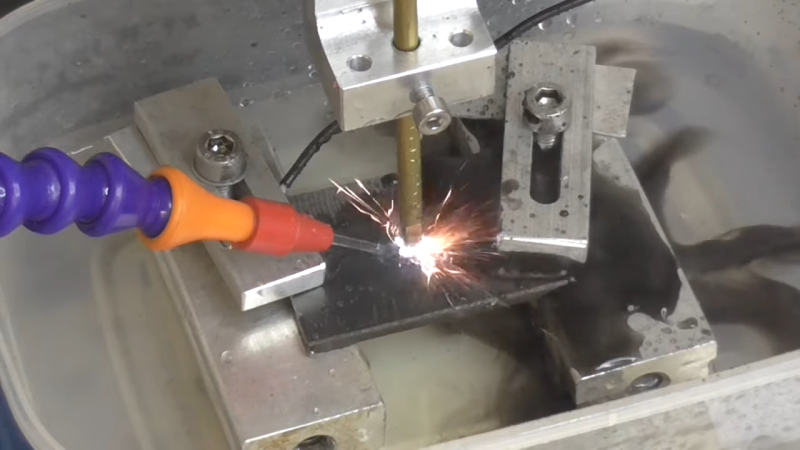
Part 1 shows the start of the build using an old tap burning machine, a 60-volt power supply, and a simple pulse generator. This was enough to experiment with the basics of both the mechanical control of electrode positioning, and the electrical aspects of getting a sustained, useful discharge. Part 2 continues with refinements that led very quickly to the first useful parts, machined quickly and cleanly from thin stock using a custom tool. We’ll admit to being impressed — many EDM builds either never get to the point of making simple holes, or stop when progressing beyond that initial success proves daunting. Of course, when [Andy] drops the fact that he made the buttons for the control panel on his homemade injection molding machine, one gets the feeling that anything is possible.
We’re looking forward to more on this build. We’ve seen a few EDM builds before, but none with this much potential.


I really have nothing other to say than “This is awesome!”
What you said, but in spades!
I need me one of these
I’m trying to make a jaw crusher for prospecting
I was planning to use 20mm x 20mm x 20mm triangular bastard files as chewing teeth
But drilling holes & cutting threads in them is harder than a really hard thing that just gets harder
So this looks like a good option
I’m still not sure how to mount the teeth to the plates
But at least EDM would let me cut the mounting holes in the teeth
And I could weld thread rod into those holes
In the final burn you should have supported the workpiece with something non-conductive and stiff, e.g. wood or plastic. You were burning deep enough, but the workpiece was bending away from the electrode. You’d need to redesign the pin element (or separate it to another electrode and op), but CNC makes that easy enough.
Project looks really good.
I made a home-built EDM about 40 years ago. Good times!
Don Lancaster published a simple circuit that uses 2 capacitors and an incandescent bulb as ballast, no switching circuit needed. If the electrode touches/welds itself to the workpiece the light would go on and not blow out the circuit breaker.
Mine had a coil around the wire leading to the electrode and routed to a signal conditioner (voltage limiter) and thence into a 68HC11 micro (way before arduinos) to count sparks per second. It then controlled, via serial port, the position of an old chart recorder that the electrode was connected to.
The system would continue to lower the electrode until it gave 200 sparks/sec, then adjust height as needed to keep this rate. If the sparks stopped it meant the electrode touched the workpiece completing the circuit, so it would withdraw the electrode and start over.
It was a closed-control loop system and worked well enough, but I really had no application for it at the time. It’s still in my basement somewhere…
You can get a fair bit of filtering by taking the fluid return and routing it sideways into a large plastic flask (such as an orange juice container you get for the fridge). The returning fluid spirals around and down the inside of the flask, and you take the return from the top middle. Most of the soot settles to the bottom, and you only need to filter a little bit of what remains.
I have(or used to have) that book by Lancaster. I’ve yet to find time to build it though I’ve considered it recently. The filtering process you’re referring to sounds like the method used for doing Drill-Your-Own wells that use a mud pump. For those though you push the return into a huge vat usually with the return sitting on the bottom with the output at the top on the other side draining to another larger vat with a drain on the other side going to your “source” water. That lets the big heavy stuff build up in the first vat, then the mud filters out in the second vat since it’s moving much slower at that point.
If I understand both posts correctly, they are slightly different. I think that you describe a gravity pre-filter where the heavy sediment cannot rise to the outlet, whereas PWalsh desribes a centrifugal “spin-down” filter where the inlet shoots in at a tangent, thus setting up a rotational vortex. The fluid and contaminants rotate around the canister as they move downward such that centrifugal force keeps the contaminants outside. Eventually at the bottom of the vortex, the contaminants drop out as sediment and the fluid returns up the center of the vortex.
The same principle is used in Dyson (and now other) vacuum cleaners, and also in industrial and commercial dust collectors (e.g. Dust Deputy), where air is the fluid. It is remarkably efficient since it keeps the vast majority of contaminants from ever reaching a filter screen so very little clogging occurs.
When used for fluid filtration it is common to have a ball- or solenoid- valve at the bottom of the canister allowing for easy flushing of collected sediments.
“commercial dust collectors (e.g. Dust Deputy),”
You made me think of dust collection as you described the vortex. I didn’t like the price tag of the Dust Deputy so I made one with a Thien Baffle and a large garden bin from the garden store. An engineer friend was impressed with the efficiency. The shop vac is still almost empty after the 200 L bin has been emptied a few times.
Nice results. My impression has been that EDM electrodes hava an insulating film on the sides so that discharges are only from the ends. I wonder.
Nope- ram edm electrodes will arc to anything within their spark gap range- which depends on the settings of the machine.
If you imagine the tube going down into the aluminum straight, the bottom is seeing the most spark action, and also thus wearing the fastest- but it will arc to the sides too. There’s no insulation layer on electrodes. if he moves it sideways after it gets through (or even before), it will burn sideways too. Often on round electrodes, the head of the EDM has a spin mode- that makes the spindle spin at a slow speed (it was 50rpm for my Agie Charmilles SP300), to act like basically an electrical endmill, and it will remove material in any direction the electric moves without cutting pressure.
This is why ram EDM is so cool- you can do a lot of complex things that would be impossible otherwise with one. If you cut threads on the end of a graphite rod, and you burn a hole into the top of something you can put a threaded electrode into that hole and even orbit out words and copy the thread pattern into the item, like an electrical tap. I’ve done it, it’s amazing the thread you get in the end is perfectly smooth like glass with no play. You can blow on the screw and it will spin in with just air pressure if you get it just right. To do thread copying, you need an EDM that can do orbiting features in 2 axis- a little more complex is all. 3D Isometric orbit is pretty standard now.
I’m recalling from a long time ago. Maybe there was an electrolysis based similar system? I thought it made very precise finished holes in the shape of the electrode.
“but none with this much potential” – punny, very punny !
I wonder if a weak EDM would be useful in making a PCB for the DIY person. Paint your board and blast away the “resist” you don’t want. Similar to using a laser but with electrons vs photons.
I could see it used for short-run boards of heavy copper plate that you can’t exactly get from the usual fab houses. and the Resist only exists in your Gcode file. one thing you’d have to watch for and deal with is dynamic trace de-isolation. as a trace gets cut away from the rest of the cladding, it stops being a conductive path, so you have to reposition the grounding electrode. One solution I could see is a pogo pin on a mini SCARA arm that moves to touch onto the other end of a relevant trace
Indeed, I can see how it could be done, and on heavier copper I can see why it might be done.. But it seems like the DIY PCB is still so much easier with acid etch and resists… I can’t really see a great reason to EDM over acid, even thick copper can be acid etched just fine, perhaps you will need to change the resist sizes a touch to account for the longer etch time and the undercutting that implies but its not that impossible…
Ignoring the availability of high quality PCBs for not much money in about a week…
By properly ordering where you process the PCB, trace isolation (not de-isolation, btw) can be avoided. Do the innermost voids first and work your way to the outer edge. It should work as long as your electrode/tool is thinner than the minimum trace separation. I think that leads us to wire EDM.
By the way, you don’t need to paint anything. Generate GCode to position the electrode on the parts you want “milled” away. This is exactly what the various PCB milling plugins for EDA tools do. Just need to add ordering to make it work with EDM.
I do wonder how well FR4 holds up to the arc.
Edm using chemicals have been known to sink a half inch hole within 2 tenths diameter at over 22 inches per minute. That is as fast as a carbide drill with tool thru coolent
EDM is basically using an electric arc to remove material from a workpiece, but as anyone who has unintentionally performed EDM on, say, a screwdriver by shorting it across the terminals in a live outlet box, the process needs to be controlled to be useful.
I hear the EDM that takes place when an uninsulated spanner finds itself across the bus-bars of a 48V telephone exchange battery bank is rather dramatic. A loud bang, a bright flash, a momentary twitch in the volt meters, then a dozen or so startled engineers scratching their heads, one of them looking for the now vanished spanner.
And the smell of ozone. Don’t forget the smell of ozone.
My father was an electrician in the navy and tells a story about the time he had to train a new guy on some maintenance procedures on an aircraft carrier. The first step was to discharge the massive capacitor banks using a controlled load, but the new guy insisted he knew a better way and reached out to stick a wrench across the terminals.
My father could see the flash through the meat of his hand and the silhouette of his bones. He spent a few days with his eyes bandaged before his vision came back. The new guy was sent home with one arm less than he came on board with.
One would think any “new guy” that’s made it that far in the process would know better, plus it’s not good on the equipment.
Oh my! That’s horrible and hilarious at the same time.
… and a nickname of “bright spark”.
I’d imagine anyone with their own injection molding machine I likely to find an EDM handy sooner or later.
May get better results with copper electrodes, think we used oxygen free, poco graphite is also effective,, flush through electrode if at all possible
I came here to learn about the new Electronic Dance Music machine going into production.
Thank the lord I wasn’t the only one sadly disappointed.
Here you go. Well, from 2016…
https://youtu.be/Ov28C3QF6D0
Seems crazy wasteful even if it is effective
What an excellent project.
The use case I see for this is where you want do do a bit of heavy duty machining. The conventional machines are big and heavy because they have to be strong and rigid to withstand the tool forces. They’re expensive and they take up a lot of real estate. (Actually, you can get a used Bridgeport milling machine for a few thousand dollars but I’m still not letting one into my basement.)
EDM and ECM machines have basically zero tool force and as such could be relatively small, light, and inexpensive.
ECM is a different process- ElectroChemical Milling. It’s main advantage is whether you do one part or a thousand the time that it takes to finish is basically the same.
ECM is pretty neat if you’ve never heard of it- look up the Precision Microcast by Josh Hacko & Adam Demuth if you want to learn more.
I ran ram EDM like this for a couple years- I really want a desktop wire EDM like BaxEDM channel on YT makes.
This is cool too. Brass btw gets eaten up as an electrode really fast- it’s almost never professional used. Most ram EDM electrodes are either medium to high density pure graphite, copper, or cupro-tungsten.
Very complex electrodes are even made using wire EDM first for the tool, and then placed in a ram EDM. Look up Mike Sabotech on Instagram for a great example.
Thanks for pointing to the Hacko & Demuth podcast. Episode 5 gives the perspective on ECM as seen by a couple of industry professionals.
The point Hacko & Demuth make is that the electrolyte is actually the cutting tool. In that light, control of the electrolyte makes the difference between single digit micron accuracy and a godawful mess.
I found a way to make old wire edm cut 150% or better the thicker the better and use half the wire. I combined 2 milling methods. A highfeed mill that cuts using 7 degree angle and a method called Dynamic Round Milling profile method. Basicly if spark gap is 0.0015 for 0.01 wire i made a loupe that moves back and 4th 3 to 4 thou and moves forward 0.0003 per pass. In 6inch material i went from 0.01 feed per minute and averaged 0.017 and could controll my wire speed from 16 to 20. The reason my wire could be slowed down is because the spark from wire is now maybe 40 degrees on side of wire instead of 185 degrees around wire. This also let more water flush into wire channel since wire channel was 0.013 wide and went to 0.017 allowing alot more water in to flush. I think Makino is now doing this on their machines
I guess my point to this this method maybe only 2 years old for use on wire edm yet these 2 methods of metal removing on cnc mills has been used for over 3 decades. I am sure there are many more metal removing methods from lathes and mills that could be used in edm metal removing and add even faster metal removing times. I have not ran a sink type edm. But would think if the dies for a sink or electrodes could be remade to remove metal like the high feed mill. To continue i must explain what a high feed mill does. If you know what an insert mill is lets use a square insert. The old school way is the insert is basicly flat with the cutting surface. Speed was like a 0.1 deep of cut 600 RPM at about 12 inches per minute. The high feed mill you will now move the insert or rotate the insert 7 degrees. When you do this to make a 0.007 chip you have to move 0.059 from chip to chip. So this moves your rpm down from 600 rpm to 250 300 rpm. Your feed went from 12 inches a minute to 250 inches per minute still taking a 0.1 deep of cut.
So no back to sink edm method lets make tiny pyramids with 4 sides going to a point rising 7 degrees and instead of just sinking straight down we can put a small vibrate circle patteren while sinking down i would think could create added flush and a faster feed while sinking down.
I try to use 7 degress of the wire which is 0.0005 depth of a side cut moving forward and back and 4th will change the cutting method of wire edm’s for the future. I am sure there are many more methods of cutting to add to edm’s to change the way we remove metal today
I have a mistake on my 1st comment when i mention wire speed from 16 to 20. The 20 should be 10. So wire speed went from 16 to a speed of 10
When it comes to home-built EDM machines, BaxEDM is probably the highest quality out there. The mechanical design is open, but the arc generator is not, and it is quite expensive at 3000 EUR.
Yeah- the arc generator unit is always the black box that makes the EDM a usable device. That price is what is keeping me from making one as well. I still think that’s fair if you’re really serious about getting one, I wish he’d open source it- but given the considerable amount of engineering that must have gone into it I can understand why he hasn’t I just wish it was cheaper
“anyone who has unintentionally performed EDM on, say, a screwdriver by shorting it across the terminals in a live outlet box”
Yep….
B*gger, my text between tags disappeared…
Should be interspersed with: looks at screwdriver right in front of him
I wonder why they didn’t post the BAXEDM Channel, absolutely crazy build.
https://www.youtube.com/watch?v=2dsrLD52Mv0&list=RDCMUCy4kgsAYxcraee8w5SfqXPA&index=1
may be because it is way costy? (compared to this one)
https://www.youtube.com/watch?v=8gjdXbLPsxE
You just need a small milling machine with a fine adjusting screw. A small thinwalled rotating brass tube and pulsed current will do the job. Use distilled water. Have removed a broken threading tap like this. Made also a better version with Arduino controlled electrode. It’s awesome but not tricky.
This DIY EDM machine build is a brilliant example of what’s possible with the right mix of curiosity, patience, and technical skill. Watching [Andy] repurpose an old tap burning machine with a 60-volt power supply and a pulse generator to create a working EDM setup is truly inspiring. From testing electrode positioning to achieving clean cuts on thin stock, he’s already managed to reach a stage many hobbyists never get to. What stands out is not just the technical progress but the sheer determination to refine the process and keep pushing forward. It’s clear this EDM setup has real potential, and we’re excited to see how far it goes!