Anyone who’s ever had to deal with the aftermath of a leaking battery knows how much damage such a failure can cause. Degrading batteries leak corrosive chemicals that eat away PCB traces, clog up connectors and generally leave everything looking nasty. Getting your gadget working again usually calls for lots of scrubbing, followed by patiently tracing suspect connections and restoring any broken ones.
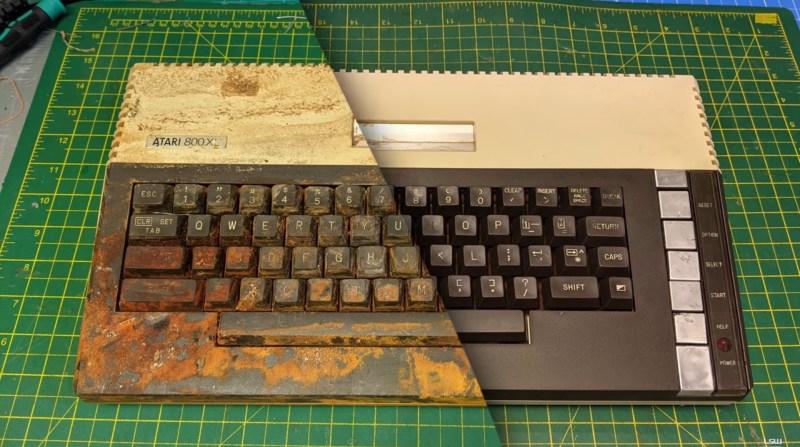
We doubt, however, that anyone has ever gone through as much effort as [Lee Smith] has on his Atari 800 XL. This example was listed on eBay in a severely damaged state, having been stored under an entire box of leaking batteries. [Lee] put in a bid and, to his own bemusement, won the auction. He was now the proud owner of a classic gaming machine which was covered in a thick brown crust of battery residue.
A first inspection showed that the damage was more than skin-deep: even inside the computer’s case it was one big mess of crusty brown junk. [Lee] first spent several hours on the plastic case, using different cleaning agents and an ultrasonic bath, and managed to get the case almost spotless again. The keyboard presented a larger challenge however: not only did it require thorough cleaning of every single switch and keycap, the keyboard’s matrix on the PCB had several connections missing, which had to be restored using bodge wires.
With the keyboard working again, [Lee] turned to the mainboard. This turned out to be an even greater challenge, with several components (including a few custom chips) damaged beyond repair. With the help of a few eBay replacements parts and (again) countless hours of scrubbing, the mainboard started to look healthy again. After a few tests, [Lee] felt confident enough to hook up the entire system and turn it on. And his efforts had paid off: the battered Atari dutifully displayed its BASIC prompt, ready for its second lease of life.
We’ve seen before what kind of damage a leaking battery can do to an Amiga, or faulty caps to an Xbox. But both of these seem minor inconveniences compared to what happened to this poor Atari. Thanks to [Simon] for the tip.


Alkali batteries are so much worse than acidic ones.
HI, This was my project and It was 4 weeks of hard work. I must thank the people who donated the spare part systems that made testing everything so much easier.
Impressive effort!
but I like the first half more
:o)
And you really got it working? (I only saw part one of the video). You’re a friggin’ wizard, you ought to change your name to Merlin!
4 weeks of hard work: those hours are not free, so not worth the investment…
… that’s what people tell me when I do similar projects (I’m a mech eng myself, and I don’t have desoildering station, us cleaner, etc, so I pick easier projects).
However, I always ask those people this question: what did YOU do with those hours? Because if it’s sitting on the couch eating a bag of crisps watching Ant & Dec, Jon Ross, football of F1 (yawn) on the tube, then I actually much prefer the project option! Better for your brain cells, and you have the satisfaction of having accomplished something worthwhile when you’re done.
I have to admit though, when you pried opened this case in part 1, I couldn’t stop laughing. I’m impressed you managed to get this thing working at all, even though you inevitably needed to swap some parts.
Also, you should buy your white vinegar in Costco!
These type of projects have to be as a hobby and take as long as it takes. I spent way more money on nights out in the past. I would not take on for someone else, then it’s not worth it. I never stopped thinking about this for a solid month and loved every moment, although not sure I would do it again and was very lucky in the end. Also surprised it didn’t need more chips replaced. so about £100 for a months entertainment is good value and I learned a few things along the way and still have the dontated 800xl that works and the guy said he I should sell to recover some costs.
did you have a video showing the repair of the keyboard? It’s the one item on my old 800xl I can’t get working.
part 2
danke
Nuts, mine uses a different style keyboard than yours.
is any box to runing atari with LCD HDMI screen?
(or ethernet to apple macintosh se)
Back in the 80’s, I worked on phone company test equipment that used a particularly leak prone cylindrical 9V battery. The test set would go crazy and the field guys would see the clear liquid insided and soak the insides with LPS thinking it was water (since this worked on their wet distributor caps). Shorting continued and the sets would corrode protected by the lubricant.
My solution was to completely disassemble the set and soak all the parts in white ammonia overnight. The next day, a good water rinse and a few days of drying in a warm spot fixed almost all the problems and cleaned the parts. The only part that needed further attention was a 10 layer, 12 position “Grayhill” switch that had to be desoldered, disassembled and cleaned. After that, a mount for a rectangular 9V battery was installed and the test set was good as new.
Since we were the only ones that had this process, we had all the business in the east Texas area and it was quite profitable.