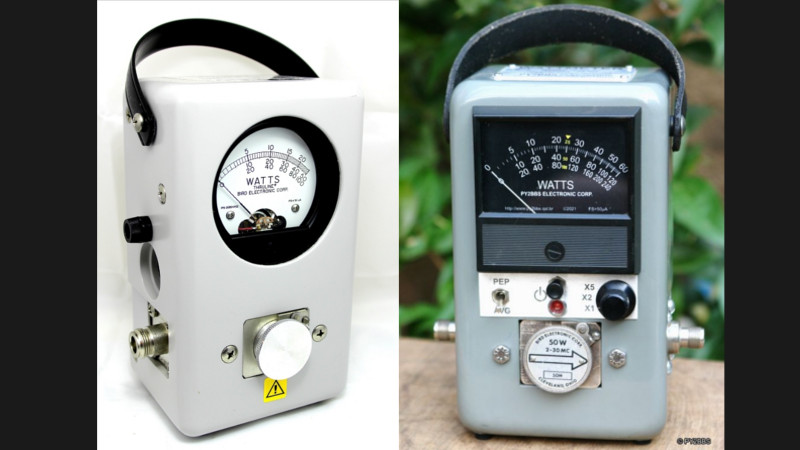
If there’s one instrument that hams and other radio enthusiasts covet, it’s the venerable Bird 43 Thruline wattmeter. The useful RF tool has barely changed in the nearly 70 years since it was first introduced, and they’re built like a tank. This makes Bird meters highly desirable, and therefore quite expensive either brand new or on the swap-meet circuit.
But radio amateurs are nothing if not resourceful, and building a homebrew version of the Bird wattmeter (in Portuguese; Google translate tool at the bottom of the page) as Brazilian ham [Luciano Sturaro (PY2BBS)] did is a good way to get your hands on one. Granted, [Luciano] had a head start: a spare line set, which is the important bit from a Bird wattmeter. The machined metal part is in effect an air-insulated section of coaxial cable that the RF signal passes through on its way from transmitter to antenna. A “slug” is inserted into the cavity in the line set to sense the RF and couple it to the meter electronics; the slug can be rotated to measure RF traveling in either direction, allowing the user to determine how much RF is getting reflected by the antenna system.
[Luciano]’s version of the meter is faithful to the sturdy construction of the original, with a solid steel case that mimics its classic lines — the case even sports the same color scheme and stout leather carry handle. There are some changes to the electronics, and the meter movement itself is different from the original, but all in all, the “Buzz 50” looks fantastic. We especially love the detailed nameplate as an homage to Bird.
The thing about Bird — and Bird-like — meters is that the slugs are like potato chips; you can’t have just one. Curious as to how these slugs work? Check out this slug repair project.
[Featured image of Bird 43 Wattmeter: Martin RF Supply]
Thanks to [Niko Huenk] for the tip!


Faithful? Those awful things always fail their calibration. You can’t even swap elements between two different meters because they have to be adjusted to the exact deflection current of the meter.
Not to mention they’re built horribly nowadays, the feathering on the meter paint is atrocious and the lines don’t even match up with the needle.
Hug
You can “calibrate” by removing the nameplate from the slug, there is a potmeter below and yes you have to keep the set together. Move the slug a bit and its not calibrated anymore. I hate them, better buy a R&S power meter.
But anyway a nice and creative build by Luciano.
Didn’t want to downplay the build, but I’m just tired of calibrating the units. I’ve never seen them particularly as cost effective anyways, but they’re popular in the mining sector because they’re passively powered.
Coffee shortage in your neck of the woods today?
Congratulations Luciano! Excellent build, faithful to original but with added features. Our estimated SK Capyau shall be proud of you up there in heaven!
“Our estimated SK Capyau shall be proud of you up there in heaven!”
I’m just guessing, but did you mean “esteemed”?
Although esteemed is more often used, estimated is also right, according to the Webster dictionary
This is the first usage of it in this way in 200 years though.
I always had some ire for the Bird model wattmeters as I always found them so much more… fiddly, and needing different slugs made it frustrating to carry around.
https://www.telewave.com/product/rf-watt-meter-model-44a/
My goto was always the Telwave Model 44. (They made theirs ‘one higher’ for marketing, because one more is one better)
The biggest reason I loved this one was the fwd/reverse/off switch, as well as the multiple scale switch. I used mine hundreds of times in the 6 years I needed it, and even though I dont need one as much I still want one. :)
This build is actually pretty awesome.
He home-built the DC connector for the line section (a connector that is known to be hard to source).
And he ended up building a Bird 4410-like meter from his parts bin.
Kudos to him, these are the type of articles I get a joy out of reading.
Très belle réalisation,facile de critiquer quand on et dans son salon Merci PY2BBS.
Jacques