Whether you’re building a product mock-up or a lightweight enclosure, carving your parts out of hard foam is a fast way to get the job done. Unfortunately, the end result can have a bit of a rough finish; a problem if you’re looking to attract investors or get some nice shots so you can send your handiwork into Hackaday.
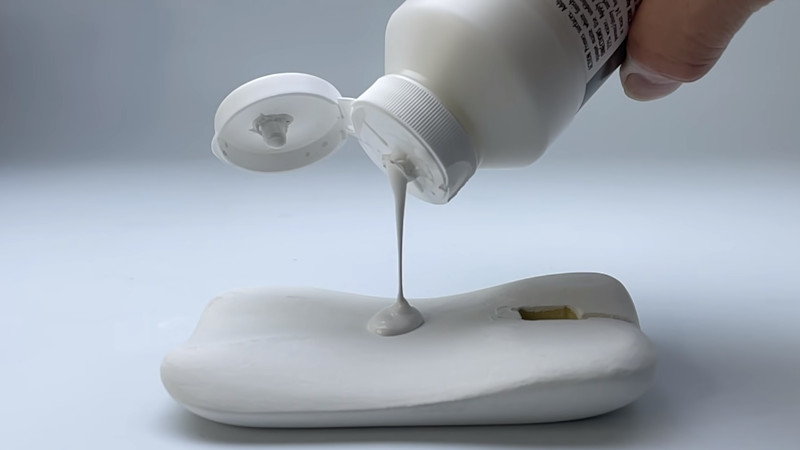
If you ever find yourself in a situation where you need to make a carved piece of foam look like it isn’t a carved piece of foam, this tip from prolific maker [Eric Strebel] could really come in handy. Rather than using some spray-on primer or epoxy coating, things that can be difficult to work with when you’re confined to a small home workspace, he recommends sealing it up with several coats of gesso.
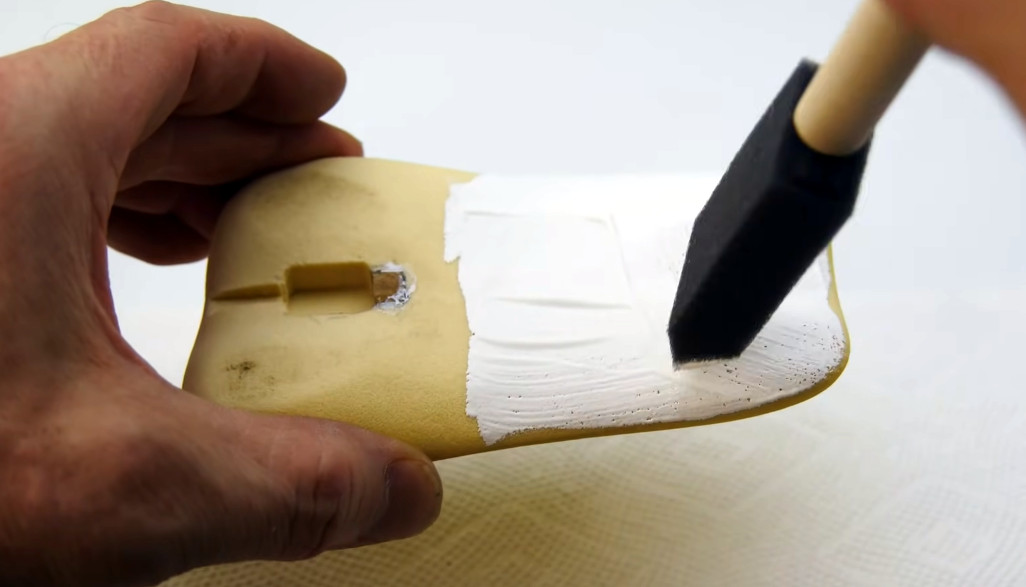
For the less artistically inclined in the audience, gesso is essentially a paint that’s been combined with chalk or gypsum to make it thicker. Gesso is generally used to prepare an absorbent surface (such as wood or canvas) before applying paint. In this case, [Eric] is using it to build up the surface of the foam and seal up all the open pores.
The downside is that the gesso requires several coats to really build up. [Eric] puts six coats on in this demonstration before he starts to thin it out a bit with water. At that point, each successive coat is sanded with increasingly higher grits. After nine coats, he does his finish sanding with 600 grit paper, and the results look fantastic.
To add some color [Eric] dyed the piece and then used a toothbrush to flick on some black and white paint, creating a very convincing granite-like finish. Unfortunately, his attempt to brush on a water-based sealer caused this finish to run, and he had to take it all off. In the end, he had to resort to using spray paint to finish the piece, but at least it was a simple rattle can.
This isn’t the first time [Eric] has experimented with alternative priming techniques. He’s a big fan of two-component primer in a can, which lets you lay down a professional finish without the expense and complication of using a spray gun.


In cosplay circles Mod Podge is the substance of choice for sealing EVA foam so it might work here too. Although I’m guessing the flexibility would go to waste.
Gesso is basically calcium carbonate (chalk) and latex. If you don’t have access to an arts supply store, use baby powder and white PVA glue. Some use plaster of paris and/or baking soda for a cheap DIY version. They all work.
Gesso comes in different formulations for different media and some leave a film-like surface that doesn’t sand down easily. Acrylic gesso is designed to be flexible and soft – it may not work as well as you hope.
PVA glue is also used for “sizing” a canvas before applying gesso on it, so you might as well dip the entire foam block in a dilute wood glue to close the pores and then spread the gesso on top to smooth it out.
I feel like plaster of paris alone would be too brittle for almost any application except an architectural one. And baking soda doesn’t stick together at all. Do you mean in combination with PVA?
Yes. The glue is the binder.
Glue as binder and baking soda as filler/bulker
Hide glues were used historically, but those are hygroscopic and swell up with changes in moisture, which causes the paint layer to crack over time. Modern glues, including PVA, are superior.
For actual painting, baking soda may not be the best option because alkaline substances tend to convert oils into soap and it dissolves in water based paints. Magnesium carbonate from a sports supply store works far better since it hardly dissolves at all. Then there’s fine silicate sand, ground-up old porcelain cups, powdered clay…
This sounds like it may be less trouble and mess than my old standby, Bondo.
considering bondo is a type of Epoxy material (also it annoys me when Restorers over-do the Bondo/other body filler)
Not an epoxy resin, but polyester, which is much more flexible than epoxy, which is good when you’re using it to smooth over the surface on flexible metal panels. Which by the way also makes it suitable for skinning over foam, because it won’t crack if you give it a little impact. I used to use florist’s foam as the structural base, which is an open-cell foam that’s quite stiff for its density, and is very easy to carve and shape, but it can’t be painted at all. Which is where Gesso might be a good match, since it would fill the surface layers of open bubbles in the foam, for very good adhesion.
As a modeler, I also use a lot of Mod Podge and I can confirm that it would be very limiting. Mod Podge is used precisely to make foamcore much harder, for example. Jeremy from Black Magic Craft on Youtube is a pretty good address for Mod Podge. Another problem with Mod Podge is that it shrinks a lot.
I watched the video a few days ago and find that quite cumbersome with gesso. I would rather work the classic method with primer from the spray can. But to be able to make a better statement, I would have to try it myself first.
I can’t find the link now, but I read that good results could be achieved with Vallejo Water Effect model paint. I bought some, but I haven’t tried it.
I’ve watched Eric’s videos on 2K primer, and to me, the elephant in the room here is cost. A 13 oz. rattle can of 2K primer costs about $25. For $20 you can get a GALLON of Gesso. Just thought this might be a factor for some people besides myself.
The 2K paints and primers are really good for when you want to be able to quickly apply a hard, smooth finish that has good durability and chemical/gasoline resistance. The 2K in a can is expensive for the amount you get, but it is much more convenient than setting up a sprayer and mixing a two-part catalyzed paint or primer; especially for something smaller (e.g. motorcycle gas tank). The 2K can is also only good for a limited time after “activation” so you wouldn’t just be able to use a little on a small model and then come back in a few days and use it again for a different one.
So if you really need the benefits of a 2K coating, then the 2K spray can is a convenient but definitely more expensive way to get them. Most applications don’t really need them and less expensive methods may be adequate or even preferable.
Anyone else reminded of how restaurant food pictures aren’t actually pictures of food?
For 3D printing this is awesome. https://www.amazon.com/Bondo-Brand-Company-651-Glazingspot/dp/B002Q1AHP4/ref=asc_df_B002Q1AHP4/?tag=hyprod-20&linkCode=df0&hvadid=312177448019&hvpos=&hvnetw=g&hvrand=4106995930360729395&hvpone=&hvptwo=&hvqmt=&hvdev=c&hvdvcmdl=&hvlocint=&hvlocphy=9007837&hvtargid=pla-570352745005&psc=1&tag=&ref=&adgrpid=61495038909&hvpone=&hvptwo=&hvadid=312177448019&hvpos=&hvnetw=g&hvrand=4106995930360729395&hvqmt=&hvdev=c&hvdvcmdl=&hvlocint=&hvlocphy=9007837&hvtargid=pla-570352745005