Generally, the projects featured on Hackaday actually do something. We won’t go as far as to say they are practical creations, but they usually have some kind of function other than to sit there and blink. But what if just sitting still and blinking away randomly is precisely what you want a piece of hardware to do?
That was exactly the goal when [createscifi] set out to dress a Lite Brite up as a futuristic prop. On a technical level, this project is pretty much as simple as it gets. But we appreciated seeing some of the techniques brought to bear on this project, and perhaps more importantly, really like the channel’s overall goal of creating affordable sci-fi props using common components. We don’t plan on filming our own space epic anytime soon…but we like to know the option is there.
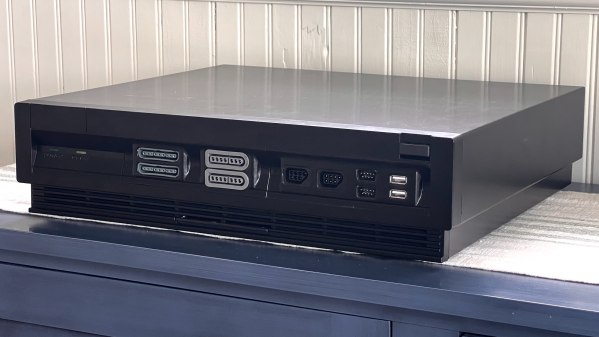
Some careful measuring and a little extra effort can be all that separates what looks like a hack job from a slick end product, and that is apparent in [Eric Sorensen]’s classy retrogaming rig, complete with ports for original console controllers.
Neatly housing these components in a case makes all the difference.
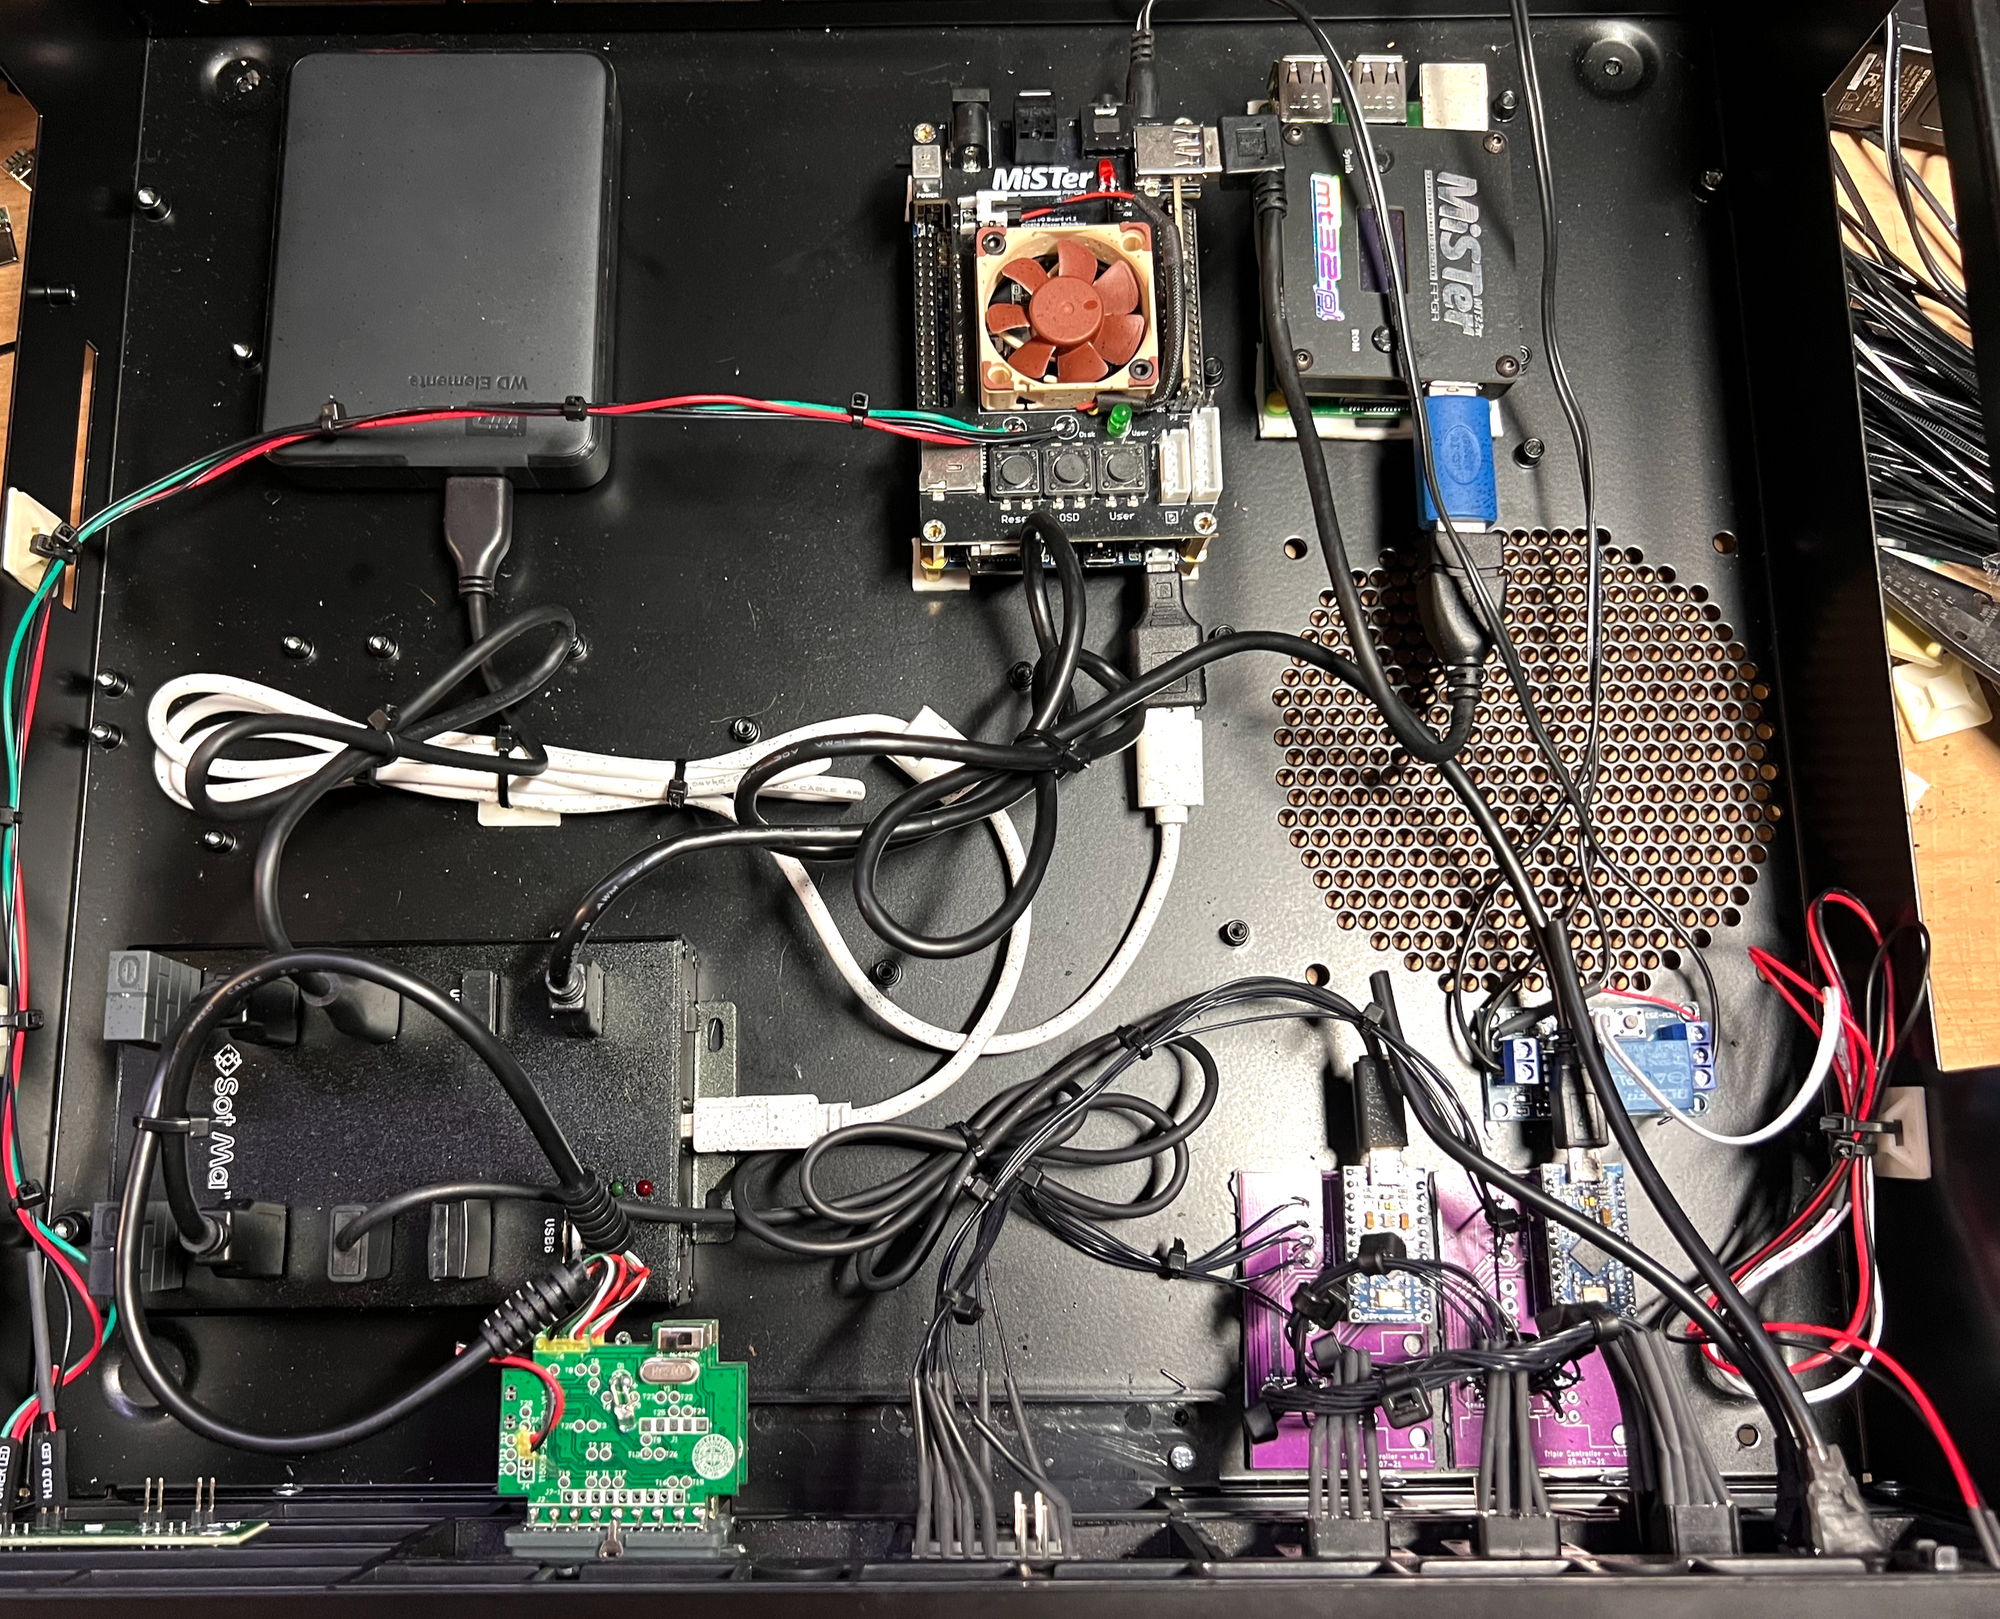
[Eric] likes his vintage gaming, and was terrifically pleased with MiSTer, an open-source project that recreates various classic computers, game consoles and arcade machines using modern FPGA-based hardware. Of course, what makes retro gaming even better is using a platform’s genuine original controllers, which just takes a little extra hardware and wiring.
But [Eric] found that all the required accessories and peripherals started to look awfully cluttered. He solved this issue by packing everything carefully into a specialty PC case called the Checkmate A1500 Plus, which gives off a strong 80s design vibe. As a bonus, the front panels are all removable and that’s where [Eric] decided to house the custom controller ports.
First [Eric] carefully measured each controller connector to create CAD models, then designed matching front panels to house the connectors and 3D printed them. Once that was done, post-processing the panels was a long process of apply Bondo, sand, paint, and repeat as needed. The results looks fantastic, and this project is a prime example of how aesthetics and finish can matter.
We got a tip this week, and the tipster’s comments were along the lines of “this doesn’t look like it’s a finished work yet, but I think it’s pretty cool anyway”. And that was exactly right. The work in question is basically attaching a simple webcam to a CNC router and then having at it with OpenCV, and [vector76]’s application was cutting out freeform hand-drawn curves from wood. To amuse his daughter.
But there’s no apology necessary for presenting a work in progress. Unfinished hacks are awesome! They leave room for further improvement and interpretation. They are like an unfinished story, inviting the hacker to dream up their own end. At least that’s how this one worked on me.
My mind went racing — adding smart and extensible computer vision to a CNC router enables not only line tracing, but maybe smarter edge finding, broken tool detection, and who knows what else. With the software end so flexible these days, and the additional hardware demands so minimal, it’s an invitation. It’s like Pavlov ringing that bell, and I’m the dog-hacker. Or something.
So remember this when you get half done with a project, get to a workable first-stage demo, but you haven’t chased down each and every possibility. Leaving something up to other hackers’ imagination can be just as powerful. Your proof of concept doesn’t have to be the mother of all demos — sometimes just a working mouse will suffice.
This article is part of the Hackaday.com newsletter, delivered every seven days for each of the last 200+ weeks. It also includes our favorite articles from the last seven days that you can see on the web version of the newsletter.
Want this type of article to hit your inbox every Friday morning? You should sign up!
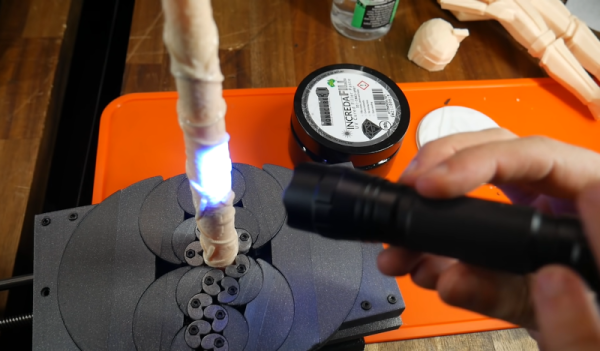
[Teaching Tech] is not alone in hating layer lines in 3D prints and also hates sanding. He recently tried Incredafill putty, a UV-curable putty that you can use to cover up lines in prints. Once covered and cured, you sand the putty smooth. You can see what he thought of the product in the video below.
As many people suggested in the video comments, you can pull the same trick with UV resin thickened with some other substance. We’ve even covered using diluted resin to get a similar effect. The putty has more of the appearance of hair cream or some kind of ointment, so it was easy to spread around with a gloved finger. A brush also worked. UV curing was done by a small flashlight or the handy sun. However, you’ll see later that he used a UV curing station and that works well if you have one.
Of course, even after applying the putty, you still have to sand. We are assuming the sanding is easier than trying to sand the actual layer lines smooth. On the other hand, the resin dust is probably pretty toxic, so there is a trade-off involved.
The results did look good. Of course, since there was still sanding involved, how good it looks will depend on your sanding tools, your technique, and — perhaps most importantly — your patience. Sanding can do a lot for 3D prints. We might not trust it completely with resin dust, but you could get rid of at least some of the dust with a downdraft table.
Whether you’re building a product mock-up or a lightweight enclosure, carving your parts out of hard foam is a fast way to get the job done. Unfortunately, the end result can have a bit of a rough finish; a problem if you’re looking to attract investors or get some nice shots so you can send your handiwork into Hackaday.
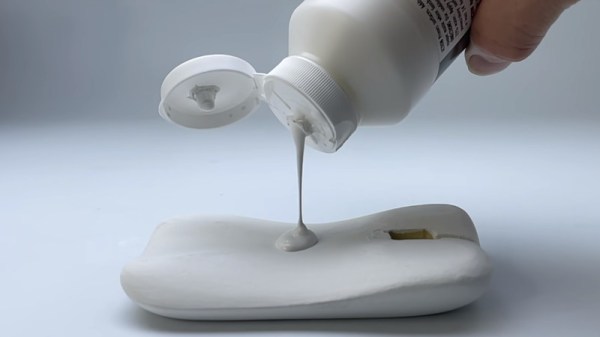
If you ever find yourself in a situation where you need to make a carved piece of foam look like it isn’t a carved piece of foam, this tip from prolific maker [Eric Strebel] could really come in handy. Rather than using some spray-on primer or epoxy coating, things that can be difficult to work with when you’re confined to a small home workspace, he recommends sealing it up with several coats of gesso.
The gesso fills in the tiny voids in the foam’s surface.
For the less artistically inclined in the audience, gesso is essentially a paint that’s been combined with chalk or gypsum to make it thicker. Gesso is generally used to prepare an absorbent surface (such as wood or canvas) before applying paint. In this case, [Eric] is using it to build up the surface of the foam and seal up all the open pores.
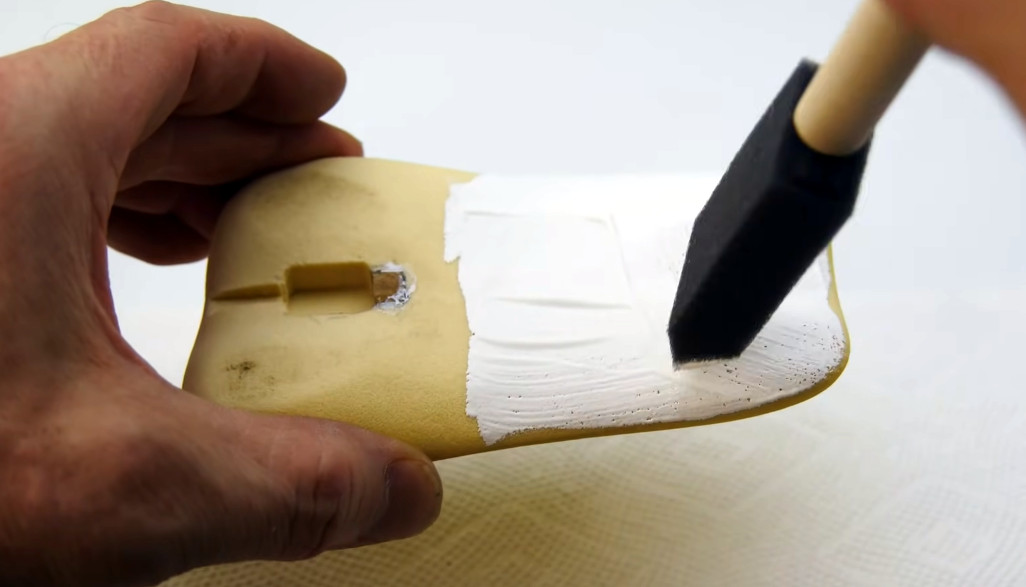
The downside is that the gesso requires several coats to really build up. [Eric] puts six coats on in this demonstration before he starts to thin it out a bit with water. At that point, each successive coat is sanded with increasingly higher grits. After nine coats, he does his finish sanding with 600 grit paper, and the results look fantastic.
To add some color [Eric] dyed the piece and then used a toothbrush to flick on some black and white paint, creating a very convincing granite-like finish. Unfortunately, his attempt to brush on a water-based sealer caused this finish to run, and he had to take it all off. In the end, he had to resort to using spray paint to finish the piece, but at least it was a simple rattle can.
This isn’t the first time [Eric] has experimented with alternative priming techniques. He’s a big fan of two-component primer in a can, which lets you lay down a professional finish without the expense and complication of using a spray gun.
When putting together a home workshop, available floor space is often the deciding factor when it comes time to pick tools and equipment. This ultimately leads to some very difficult decisions, and we’d wager there isn’t a hacker or maker reading this that hasn’t had to pass on a new piece of gear because they didn’t have anywhere to put it.
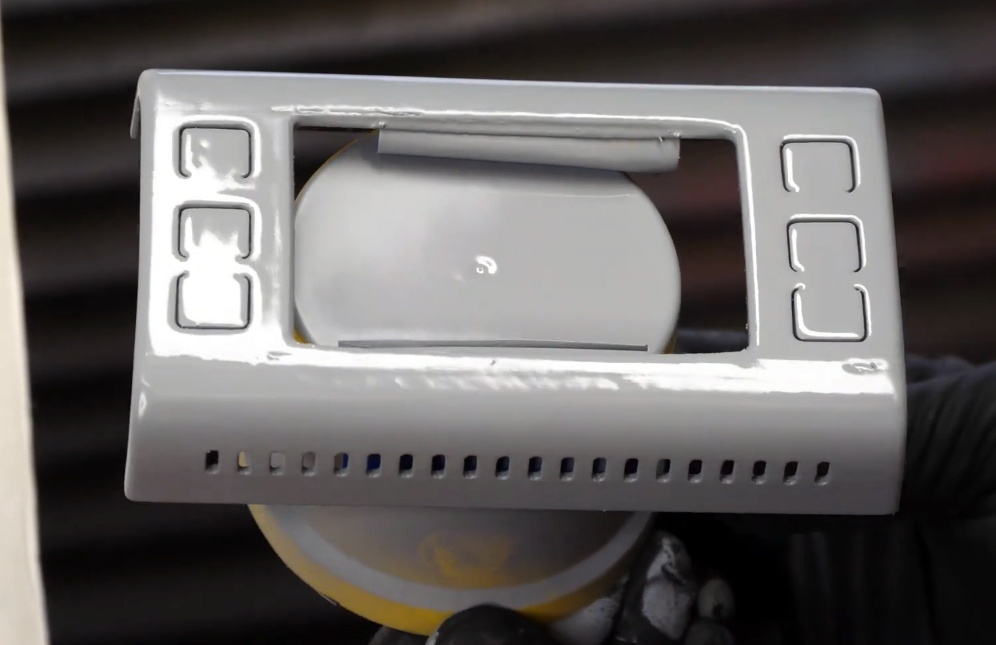
For example, the average home gamer isn’t going to have a paint booth and spraying equipment, so they have to settle for a rattle can in the backyard. Traditionally this has limited the kinds of products you can realistically apply, but as [Eric Strebel] shows off in his latest video, it seems like spray can technology is starting to catch up.
The finish after two coats of primer.
Specifically, he’s been working with a canned two-part primer that doesn’t require any complicated mixing or special equipment to apply. After hitting a plunger on the bottom, a small compartment containing the activator is ruptured and the reaction begins. From that point, you’ve only got 24 hours to use the contents of the can before it cures. But since you only need to wait about 10 minutes between coats, that should give you plenty of time to complete the project.
In the video, [Eric] demonstrates how quickly this high-build primer can smooth out the layer lines on a 3D print. While you’ll still need to sand and potentially break out the spot filler to achieve that perfect finish, it’s clear that the primer works much better than anything we’re used to seeing come out of a can. Even after just two coats, the results are truly remarkable.
If there’s a downside, it’s that a can of this primer will run you about $25 USD. That’s about five times the cost of the Rust-Oleum Filler Primer that usually gets recommended in DIY circles, but the results really do seem to speak for themselves. We wouldn’t necessarily use this on every project, but if you’ve got something that needs an especially fine finish, you’ve at least got an option that doesn’t involve borrowing somebody’s compressor and spray gun.
If you need help shaking your paint before spraying – definitely give this 3D printed paint shaker a look!
In the winter, I hatched a vague plan to learn some of the modern unmanned aerial vehicle tech. Everybody needs an autonomous vehicle, and we’ve got some good flying fields within walking distance, so it seemed like it could work. Being me, that meant buying the cheapest gear that could possibly work, building up the plane by myself, and generally figuring out as much as possible along the way. I learn more by making my own mistakes anyway. Sounds like a good summer project.
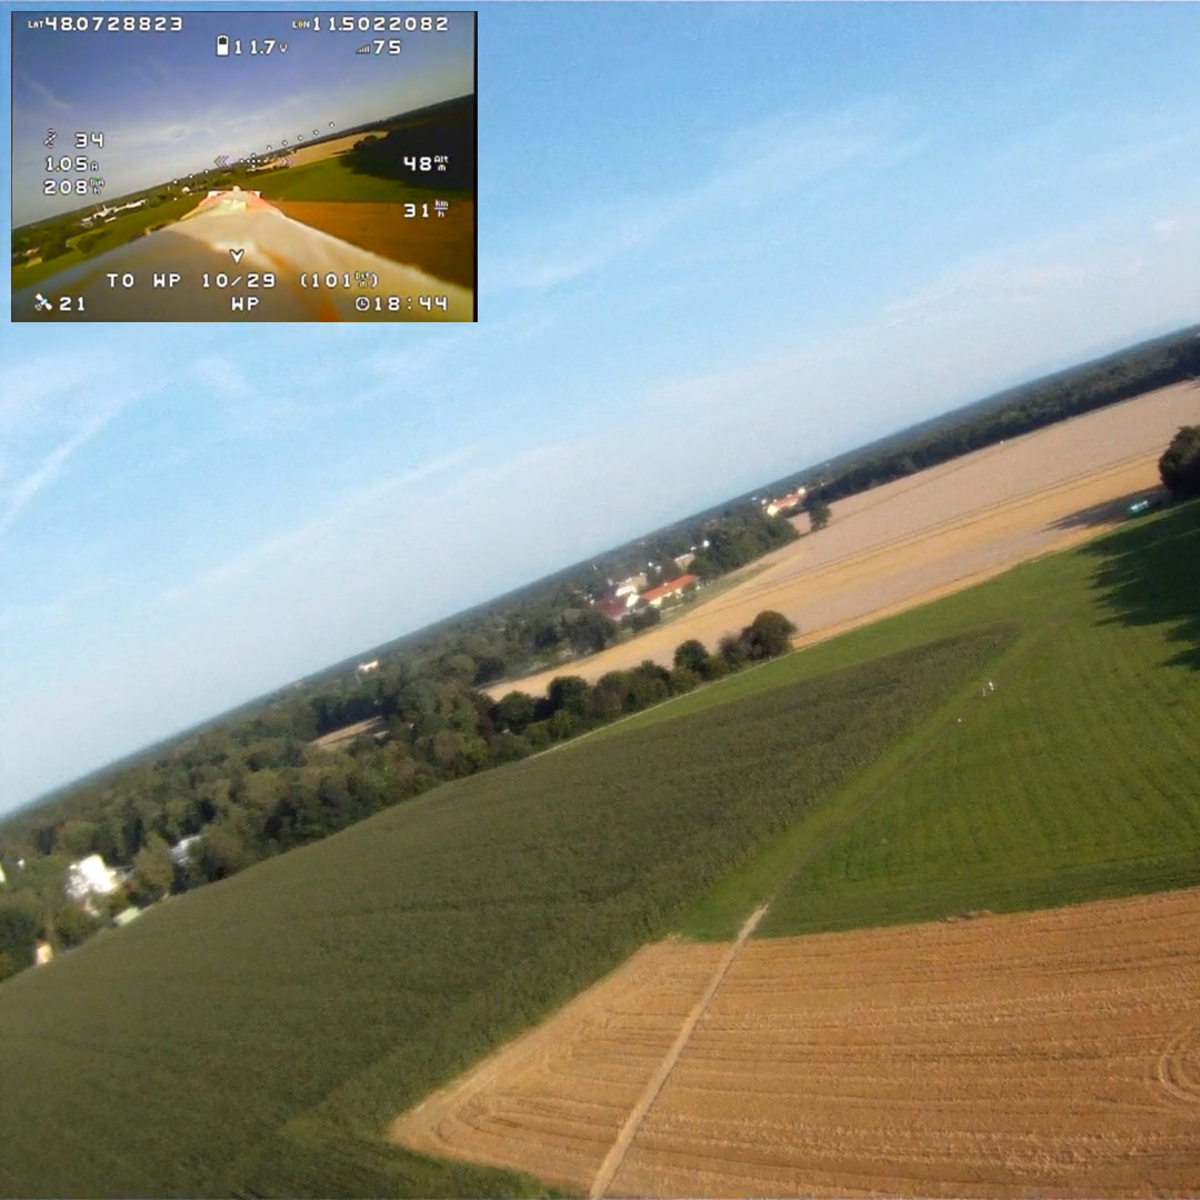
Fast-forward to August, and the plane is built, controller installed, and I’ve spent most of the last month trying to make them work well together. (The firmware expects a plane with ailerons, and mine doesn’t have them, but apparently I’d rather tweak PID values than simply add a couple wing servos.) But it’s working well enough that it’s launching, flying autonomous waypoint missions, and coming home without any intervention. So, mission accomplished, right?
Destination: that furthest red roof
Nope. When I’m enjoying a project, I have a way of moving the goalposts on myself. I mean, I don’t really want to be done anyway. When a friend asked me a couple weeks ago what I was planning to do with the plane, I said “take nice aerial videos of that farm over there.” Now I see flight opportunities everywhere, and need to work on my skills. The plane needed an OLED display. It probably still needs Bluetooth for local configuration as well. Maybe a better long-range data link…
This is creeping featurism and moving-the-goalposts in the best of ways. And if this were a project with a deadline, or one that I weren’t simply enjoying, it would be a problem. Instead, having relatively low-key goals, meeting them, and letting them inspire me to set the next ones has been a blast. It makes me think of Donald Papp’s great article on creating hacking “win” projects. There he suggests creating simple goals to keep yourself inspired. I don’t think I could have planned out an “optimal” set of goals to begin with — I’ve learned too much along the way that the next goal isn’t obvious until I know what new capabilities I have. Creeping is the only way.
What about you? Do you plan your hobby projects completely in advance? Not at all? Or do you have some kind of hybrid, moving-the-goalposts sort of strategy?
This article is part of the Hackaday.com newsletter, delivered every seven days for each of the last 200+ weeks. It also includes our favorite articles from the last seven days that you can see on the web version of the newsletter.
Want this type of article to hit your inbox every Friday morning? You should sign up!