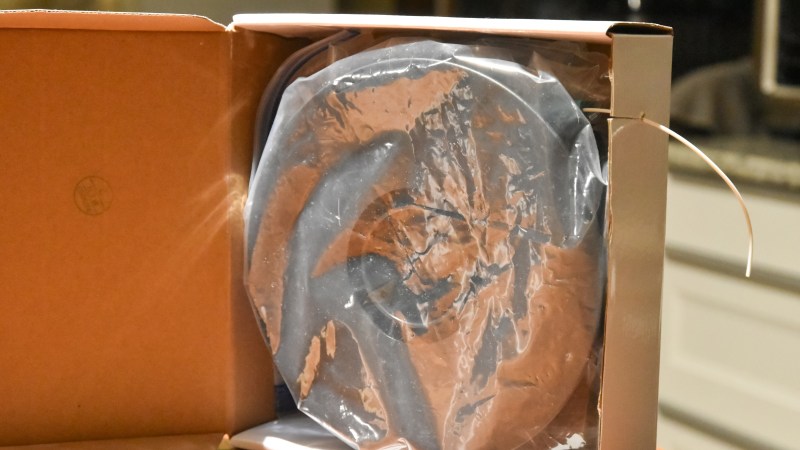
All 3D printer filament benefits from being kept as dry as possible, but some are more sensitive to humidity than others. The best solution is a drybox; a sealed filament container, usually with some desiccant inside. But in a pinch, [Spacefan]’s quick and dirty $0 drybox solution is at least inspiring in terms of simplicity.
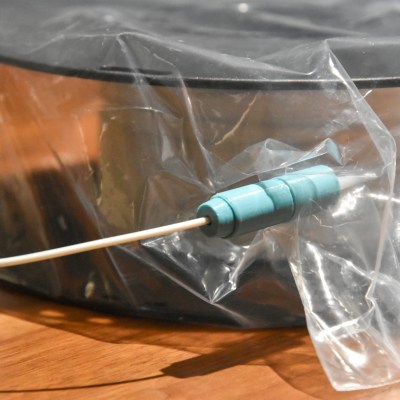
[Spacefan]’s solution uses a filament roll’s own packing materials and a single 3D-printed part to create a sealed environment for a single roll. The roll lives inside a plastic bag (potentially the same one it was sealed in) and filament exits through a small hole and 3D-printed fitting that also uses a bit of spare PTFE tubing. The box doubles as a convenient container for it all. It doesn’t have as much to offer as this other DIY drybox solution, but sure is simple.
While we appreciate the idea, this design is sure to put a lot of friction on the spool itself. It will be a lot of extra work to pull filament off the spool, which needs to turn inside a bag, inside a box, and that extra work will be done by the 3D printer’s extruder, a part that should ideally be working as little as possible. The re-use of materials is a great idea, but it does look to us like the idea could use some improvement.
What do you think? Useful in a pinch, or needs changes? Would adding a spindle to support the spool help? Let us know what you think in the comments.


Looks to me like this design will put a bit of a strain on the extruder and/or filament. Kudos for the attempt though. I hope it doesn’t cause any issues for him. Myself, I’ll use one of the plastic container designs I see online.
Repurpose a cheap hot air rework station to build a 10-20cm filament preheat/dryer tube just before the filament feeds into the print head. Shouldn’t cost more than a buck for a little bit of solid tube and a T, some flex tube and the price of the soldering tool, which should remain functional.
Lowest temp should do to evaporate any water, just has to be above 100C and below the softening temp of the plastic. Might take a temp controller hack, but what site are we on?
The problem isn’t just preventing the plastic from getting wet, it’s drying out already moist plastic. Sucks to live in a swamp.
Injection molders have dedicated plastic dryers for this purpose. Those can be complicated, but at their simplest, just heaters and fans.
Bonus/potential complication, your 3d printer enclosure will run hot, could improve the print quality and adhesion between layers. If it’s too hot, you can put the tube exhaust and filament feed outside the enclosure.
Consider exhausting the waste heat into the spool enclosure, but I’d worry about it getting too hot and turning into a melted mess. Fine filament should dry quickly enough.
100c is for many plastics printed well into the softening zone, and boiling the water out of the filament before it enters the printer so aggressively might ruin the print quality for the same reason boiling it out in the print head does…
Its an interesting idea though, and for some filaments probably would work great. Seems to me the normal dry box approach will be simpler and more reliable for all filaments, but get this method right and it could be really quite compact.
If you heat up the filament to 100 degrees while the extruder is pulling on it, it will probably deform?
Unless you live somewhere cold and you want the heat… All that wasted heat equates to needlessly emitted CO2 from some electrical power plant.
They could put in the bag a pair of these for the spool to roll on and that should help reduce issues of the spool turning
https://crealityupgrade.com/tush-the-ultimate-spool-holder/
Overall not a bad idea IMO
kind of a stupid hack but i only take out about 20-40 meters of filament (a 1-3 month supply in general) at a time, by hand. so most of the roll is sitting in a big rubbermaid box with a dessicant can in it. and it lets me just hang the filament on a bent up coat hanger hanging off of the top of my printer, instead of coming up with a properly-supported axle to let a 1kg spool of filament spin freely
honestly since i switched to easyfil pla, it doesn’t seem to mind sitting in my humidish basement for a long time anyways and i suspect i really should figure out a better way to mount a whole roll. probably go through a roll in a year and a half though so that might be pushing it even so.
This is mostly useless, just like any “drybox” you can print directly from. There is no need for a spool to be in a drybox while printing. Any drybox that allows you to print from is also pretty useless for long term use as a drybox.
Just put your filament in an airtight box when you aren’t using it. Add some desiccant if you want. That is all that is ever needed.
People see issues they think need solving when they don’t. 90% of so called “moisture” issues are usually related to decaying bonds in the filament. People throw their filament in an oven, it magically works later and they assume moisture was the issue. It usually isn’t. The oven is restoring bonds in the filament.
Just store your filament in an airtight container when you aren’t using it. You’ll never see issues related to moisture if you do that.
+1
‘There is no need for a spool to be in a drybox while printing’ – Wrong – at least for some filaments, locations and prints, some filaments only take a few hours even in pretty modest humidity to start printing terribly, so in really high humidity have no change of working well, and even more normal filament choices on long prints can have the print quality vastly degraded.
Not going to be an issue for everyone with every printer and filament, but if you are spending days on a single print having a humidity control on the filament feed is just plain common sense, it takes away one more cause of failed prints, there are enough of those you can’t so trivially banish… And it is very easily possible to print that long, even on the small volume printers when going for a fine finish, which with a filament that is at all prone to moisture related issues is going to show up trouble. Many materials are – you don’t have to throw them in an oven just a room temperature dehumidifier for long enough can revive some filaments – nothing to do with heat)
Here in the UK where its often wet but the humidity generally isn’t high I do get away with being rather lax in filament care, my on the go filament do just sit in a sealed box full of silca when not in use and print in the open, and that has bitten me some times, just not often – So I intend to put a proper dry box type store in place at some point, but probably only when I build a new printer, as that is something I need to do at some point soon anyway – easier to build it all into a compact unit from scratch than find a spot to put a dry box to use filament from.
+1
Some filaments absorb moisture very quickly. PA-6 nylon is known to be unusable in a few hours once exposed to even a low humidity environment.
This is a HackADay worthy trick. I don’t want to buy or make something too expensive or too complicated for the one very “sensitive” spool I have.
The only downside is the friction. But that’s a problem that can be quickly fixed. Personally I don’t use this type of delicate plastic very often. But it is sometimes necessary.
That depends on where you live, and what type of filament you are using. If you live somewhere very arid and never print nylon, I’d agree with you.
If you are printing nylon, you need to do something like this (or use the spool in less than a week). As for the “so called moisture” issues, you can tell your filament has a moisture issue when your hot end sounds like a tiny erratic steam engine, and your prints are potted and cratered from where moisture trapped in the filament became steam causing a tiny explosion.
Personally I avoid printing nylon because it soaks up moisture so quickly…
i have some industrial desiccants in the tote i use to store my filaments. its worked so far in a high humidity environment.
I have a plastic 65 liter box fitted with 16 rolls of PLA filament on roller bearing shafts with each roll having its own feedthru fitted with PTF guide tube. I also have large bags of desiccants in the box and have no printing problems.
Basically my approach too. I use Ikea food containers that can fit two spools side by side suspended on a rolling axle. Filament feeds into PTFE connector and tubing that then screws into my enclosure that has another connector. Nice and simple to connect and disconnect and I don’t have to think about it.
Honestly, you don’t need a drybox. You might need a vacuum box instead. There are many off the shelf solution for plastic box with a valve to vacuum them (for food storage). One can easily put a cylinder in there and bore a hole for a airtight connector for the filament out. Before printing, you’ll have to open the box, push the filament inside the connector, close the box and make the vacuum with the manual pump. The vacuum will hold for days (if not, you can pump once a day to restore it). No air contact means no water contamination. No need to heat the box here, no PID, no electricity, low tech.
Interesting idea, think its probably harder to maintain a vacuum sufficient to do you any good and pull filament through an ‘airtight’ hole in it vs just filling the box with silica, probably end up needing a pump running most of the time to maintain the vacuum though the leaks, where just filling a box with desiccant is very simple, it just works till the desiccant is full at which time you can replace/recycle it.
I also wonder what such an environment would do to those plastics, most plastics off-gas quite badly in vacuum, so long term storage in low pressure could well ruin the filament anyway, with all the plasticisers leeching into the atmosphere…
This is a good idea, here’s some cheap improvement ideas:
-Run a spindle or a skewer through the middle (suspended in the cardboard) so that the roll is running on the spindle, not dragging on the bag, tape the puncture points
-Tape the bag to the box so that it won’t rotate in the box and jam
Alternately, put a bag around the box with normal bearings or spindle, etc inside the box.
About strain on the extruder;
I remember seeing a design for an extruder assist device. I remember it being a very simple printed bracket that held a simple DC motor and a switch, the ones with the lever, the same kind which is often used as limit switches. (The name will come to me right after I hit post (I really should go get my morning coffee)). And the motor shaft had a hobbed gear, just like an extruder.
Anyway, whenever the extruder would pull the filament tight it would tighten against the switch, which would turn on the DC motor which would then help pull the filament from the roll. It was all so simple, just a switch, no brains and no connection to the rest of the printer other than DC power yet it “knew” when to pull and when to stop.
I thought I saw this on Thingiverse several years ago but when I went back for it either I couldn’t think of the right search terms to find it again or it had been taken down.
Better late than never… :-)
A variant of this actually shipped with the UP! printer. Now technology long lost, but not a bad idea really.
https://www.thingiverse.com/thing:3968
https://www.thingiverse.com/thing:11132