A PCjr running an SNTP server

IBM PCjr From 1984 Keeps Today’s Clocks Running In Sync

We’ve gotten used to the fact that the clocks on our internet-connected computers and smartphones are always telling the right time. Time servers, provided by a variety of government agencies as well as tech giants, provide them with the exact time and date thanks to accurate atomic clocks and the clever Network Time Protocol (NTP). But it wasn’t always like this: back in the 1990s when many computers didn’t have an internet connection, we had to adjust our computers’ clocks manually. Go back one more decade, and many PCs didn’t even have a battery-backed clock at all; you either set the proper date and time when the computer booted, or just lived with the fact that all new files were timestamped 01-01-1980.

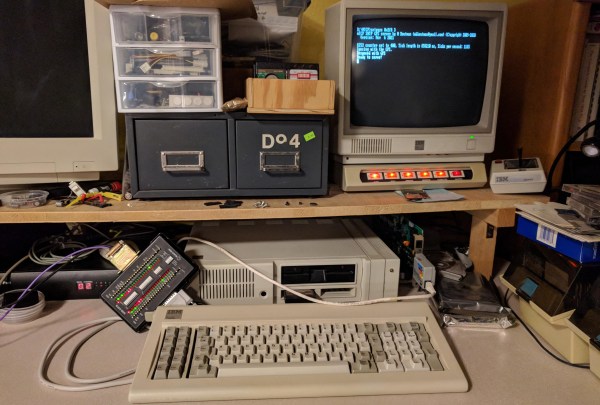
[Michael Brutman] decided to mix today’s world of network time synchronization with the old world of batteryless PCs, and built an SNTP Time Server that runs on a DOS PC. He tried it with two different hardware setups: a 40 MHz 386 PC from 1993, and the (in)famous IBM PCjr from 1984. A standard GPS module serves as an accurate time reference; these units can often be directly connected to old hardware thanks to the eternal RS-232 standard.

Continue reading “IBM PCjr From 1984 Keeps Today’s Clocks Running In Sync”

Faster IPA Recycling For Your Resin Print Workflow

If you’ve printed with photopolymer resins, you know that you need alcohol. Lots of alcohol. It makes sense that people would like to reuse the alcohol both to be environmentally responsible and to save a little money. The problem is that the alcohol eventually becomes so dirty that you have to do something. Given time, the polymer residue will settle to the bottom and you can easily pour off most of the clean liquid. You can also use filters with some success. But [Makers Mashup] had a different idea. Borrowing inspiration from water treatment plants, he found a chemical that will hasten the settling process. You can see a video of his process below.

The experimentation started with fish tank clarifier, which is — apparently — mostly alum. Alum’s been used to treat wastewater for a long time. Even the ancient Romans used it for that purpose in the first century. Alum causes coagulation and flocculation so that particles in the water wind up sinking to the bottom.

Continue reading “Faster IPA Recycling For Your Resin Print Workflow”

Most FDM Printers Are Also Filament Dryers (with A Little Help)

If you’ve printed with an FDM printer, you probably know there are many interrelated factors to getting a good print. One key item is the dryness of the filament. When you first crack your plastic open, it should be dry. Most filament is packed in a sealed bag with desiccant in it. But if you have the filament out for a while, it soaks up moisture from the air and that causes lots of problems. [Design Prototype Test] has built and bought filament dryers before, but now he would like to point out that every FDM printer with a heated bed can act as a filament dryer. You can see the details in the video below.

It turns out that the idea isn’t original, but it doesn’t seem to be one that has caught on. What the video shows though, is to take the idea and run with it. A 3D printed support sits on the bed and accepts a cheap PC fan. The whole affair gets boxed up with cardboard and can dry the filament.

Continue reading “Most FDM Printers Are Also Filament Dryers (with A Little Help)”

Streamline Your SMD Assembly Process With 3D-Printed Jigs

Your brand-new PCBs just showed up, and this time you even remembered to order a stencil. You lay the stencil on one of the boards, hold it down with one hand, and use the other to wipe some solder paste across…. and the stencil shifts, making a mess and smearing paste across the board. Wash, rinse (with some IPA, of course), repeat, and hope it’ll work better on the next try.

openscad window
A PCB jig generated by OpenSCAD

Maybe it’s time to try Stencilframer, a 3D-printable jig generator created by [Igor]. This incredibly useful tool takes either a set of gerbers or a KiCad PCB file and generates 3D models of a jig and a frame to securely hold the board and associated stencil. The tool itself is a Python script that uses OpenSCAD for all 3D geometry generation. From there, it’s a simple matter to throw the jig and frame models on a 3D printer and voilĂ !– perfectly-aligned stencils, every time.

This is a seriously brilliant script. Anyone whose gone through the frustration of trying to align a stencil by hand should be jumping at the opportunity to try this out on their next build. It could even be paired with an Open Reflow hot plate for a fully open-source PCB assembly workflow.

Continue reading “Streamline Your SMD Assembly Process With 3D-Printed Jigs”

This $0 Filament Drybox Needs Nearly No Parts

All 3D printer filament benefits from being kept as dry as possible, but some are more sensitive to humidity than others. The best solution is a drybox; a sealed filament container, usually with some desiccant inside. But in a pinch, [Spacefan]’s quick and dirty $0 drybox solution is at least inspiring in terms of simplicity.

The only added part is this 3D-printed fitting.

[Spacefan]’s solution uses a filament roll’s own packing materials and a single 3D-printed part to create a sealed environment for a single roll. The roll lives inside a plastic bag (potentially the same one it was sealed in) and filament exits through a small hole and 3D-printed fitting that also uses a bit of spare PTFE tubing. The box doubles as a convenient container for it all. It doesn’t have as much to offer as this other DIY drybox solution, but sure is simple.

While we appreciate the idea, this design is sure to put a lot of friction on the spool itself. It will be a lot of extra work to pull filament off the spool, which needs to turn inside a bag, inside a box, and that extra work will be done by the 3D printer’s extruder, a part that should ideally be working as little as possible. The re-use of materials is a great idea, but it does look to us like the idea could use some improvement.

What do you think? Useful in a pinch, or needs changes? Would adding a spindle to support the spool help? Let us know what you think in the comments.

Robot astronaut gazing at the moon

NASA’s New Moon Missions Are Happening Really Soon

NASA first landed a human on the moon back in 1969, and last achieved the feat in December 1972. In the intervening years, there have been few other missions to Earth’s primary natural satellite. A smattering of uncrewed craft have crashed into the surface, while a mere handful of missions have achieved a soft landing, with none successful from 1976 to 2013.

However, NASA aims to resume missions to the lunar surface, albeit in an uncrewed capacity at this stage. And you won’t have to wait very long, either. The world’s premier space agency aims to once again fly to the Moon beginning in February 2022.

Continue reading “NASA’s New Moon Missions Are Happening Really Soon”

Not Your Average Nixie Tube Clock

When it comes to Nixie clocks, we all pretty much know what to expect: a bunch of Nixies with some RGB LEDs underneath, a wooden case of some sort, and maybe some brass gears or fittings for that authentic steampunk look. It’s not that we don’t appreciate these builds, but the convergent designs can be a little much sometimes. Thankfully, this 60-tube Nixie clock bears that mold, and in a big way.

The key to [limpkin]’s design is the IN-9 Nixie, which is the long, skinny tube that used to show up as linear indicators; think bar graph displays on bench multimeters or the VU meters on mixing boards. [limpkin] realized that 60 on the tubes could be arranged radially to represent hours or minutes, and potentially so much more. The length of the segment that lights up in the IN-9 is controlled by the current through the tube, so [limpkin] designed a simple driver for each segment that takes a PWM signal as its input. The job of a 60-channel, 14-bit PWM controller fell to an FPGA. An ESP8266 — all the rage five years ago when he started the project — took care of timekeeping and control, as well as driving a more traditional clock display of four 7-segment LEDs in the center of the clock face.

The custom PCB lives in a CNC-machined MDF wood face; the IN-9s shine through slots in the face, while the seven-segment display shows through a thinned area. It looks pretty cool, and there are a lot of display options, like the audio spectrograph shown in the video below. We’re glad [limpkin] decided to share this one after all this time.

Continue reading “Not Your Average Nixie Tube Clock”