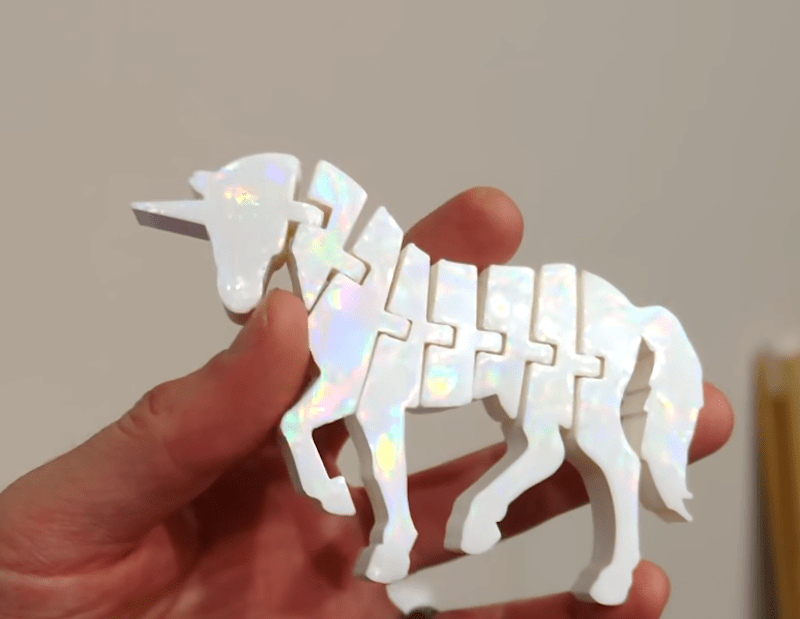
[The Action Lab] had a very serious technical problem. His daughter wanted to 3D print sparkly unicorns. But how do you make a 3D print sparkly? Turns out, he had used a diffraction grating before to make rainbow-enhanced chocolate.
The method turns out to be surprisingly simple. Using a diffraction grating as a print bed, puts the pattern on the bottom of the 3D print and — thanks to how a diffraction grating works — the 3D print now works like a grating, too.
Of course, the science behind the diffraction grating is well-understood, but we never thought of imprinting it on a 3D print. The downside, of course, is you only get one diffracted surface, but the effect is still pretty awesome.
The real test, of course, was the daughter test. Judging from the video, she was pretty happy with the results. The white pieces seem to look best, but the technique also worked with colored PLA. Technically, these are called surface relief gratings, to differentiate them from other kinds of diffraction gratings. In the 1600s, people noticed the effect in bird feathers and a hundred or so years later, they were duplicating the effect with fine hairs. It would be the 1800s before science started to explain what was really going on.
We have seen this technique applied to candy and even chocolate, so it makes sense that it would work with PLA, too.


cool idea!
depending on the material of the diffraction grating it should be possible to iron on the pattern afterwords.
If you can get those steel gratings used for hologram heat pressing I think you could get a really good finish and not ruin the grating – I really can’t see any other form of grating making a lasting print surface or being good for hotter filaments (somewhat surprised it worked so flawlessly with PLA – but then the few times I end up using PLA its turned up above the minimum print temp because I really want good layer adhesion).
But damn is that a neat look, and he must have a rather well mapped or properly flat and level bed to get such perfectly uniform glassy smooth first layers for the tiny effect to be so uniform. Unless I suppose the grating is warping with the heat
More squish than usual on the first layer to make sure they fuse together? Buy yeah. Hella cool.
Why don’t they sell PEI tape with diffraction grating pattern already built in?
Yeah making that first layer ‘worse’ with more over extrusion and tighter layer gap could well be it.
Not that it is that hard to get good glassy first layers, just surprised its so perfect, especially with that loosely taped down grating in the way too.
My guess is that the grating itself is doing most of the smoothing. When I printed on acrylic with blue 3M tape, the first bottom layer looked matte and trashy. When I switched to glass, it got super smooth and shiny. When I switched to carbon coated glass, I finally stopped having adhesion issues, and it looks somewhere in between glass and tape. Smooth surfaces result in smooth first layers, but tend to have adhesion problems. I guess the surface of the film is glossy except for the grooves, and the grooves are probably what cause it to adhere well (enough?). I bet there are a bunch of interesting things that can be done by changing the geometry of the bottom surface. Light diffraction could be the tip of the iceberg here.
Quite probably with all the textured bed materials that have been researched – however that wasn’t what I was thinking of I was surprised at just how perfectly smooth and uniform the pattern is – where are the little voids in the pattern between the lines of filament, that little dip in the bed that means a spot didn’t get pushed in to the bed enough to imprint the pattern at all.
The bottom of prints i’ve done on smooth glass have been smooth and good but there was always some remaining evidence of the printing process (but I don’t have bed leveling of any sort beyond manual even now, and with such a thin sheet I doubt the glass was even close to flat.)
So it only “sparkles” on one side? So why not print a mirror image and glue the two together, twice the sparkle!
Good idea. I wonder if reducing the layer height enough would make the layer lines into their own diffraction grating. Then you’d have it on every surface. It would probably require too much alignment to be reasonably doable on FDM, but perhaps you could squeeze it out of SLA if you designed it into the print. I’ve never played with an SLA printer, so I can’t say with any certainty.
I really have no idea, but there’s only one way to find out.
That looks just like white opal. Except that it is only a surface effect not a 3D structure. But still well done!
I wonder if you could emboss the grating pattern in with an iron after printing?
A great milestone ! Know that we can print some rainbow sparkling unicorns, all we need is the technology to print farts.
This should be built into every heated bed.
Don’t get me wrong this is an awesome effect, but from the original problem, wanting a 3d printed unicorn with sparkles, there is filament out there with sparkles in it. I believe ProtoPasta would even make you some with extra sparkles if you wanted.
Guess I’m just simple. I would have printed it, given it a light spritz with some paint/primer, and sprinkled it with glitter… Although I’m sure that would have gotten me another “oh, dad…” from my artist daughter. :D
Could you use a cd for the pattern?
c
No.
CDs have a flat, clear acrylic covering and protecting the part of the CD that has that diffraction grating like effect.
Oops. I meant a vinyl record!