What do you do when your motherboard bends your CPU? If you’re [Karta] or [Luumi], you 3D print a new retaining bracket to fix the problem. [Karta] originated the design, and [Luumi] also tried it and produced the video you can see below.
We think we find flat surfaces all the time, but it is actually very difficult to create something truly flat. You usually learn this when you try to maximize heat transfer between two surfaces. Getting two supposedly flat surfaces to touch is quite hard. CPU brackets use a combination of pressure and some sort of thermal media or paste to fill in any gaps between the CPU case and the heat sink. Intel’s LGA1700 bracket is an example, but there’s been a problem. Apparently, with recent CPUs, the bracket is a little too tight, and it bends the CPU’s case. It doesn’t hurt the CPU, but it does inhibit thermal transfer.
Others have “fixed” this problem by adding some washers to slightly raise the bracket. In both cases, there has been some very small improvement in CPU temperatures. [Luumi] says part of the problem is his water cooling block is not completely flat and needs to be lapped. [Karta], however, reported a 7 degree drop in temperatures, which is pretty significant.
We love seeing how 3D printing can fix or improve things you own. They talk a lot about lapping in the video, and, in some cases, people actually risk lapping the IC die itself to make it flatter. It can help, but the risk is relatively high and the gain is relatively low.


Hmm, heat, plastic stiffness. Somehow I feel this won’t work forever? Even with water cooling you can get the temps in the low 60C to which certain plastics become soft …
Yep, this is an excellent way how to cook your CPU once the plastic (what looks like PLA, which softens at 60deg. C already) warps.
Stefan from CNC Kitchen did something similar – and almost wrecked his CPU when the heatsink got loose:
https://www.youtube.com/watch?v=nzRb4owDffY
I’ve had PLA warp just letting it sit in the car…
Leave a car outside when it’s 95f outside for just 60 mining inside it’s 136f!
PLA creeps at room temperature and the CF nylon used here creeps at just above room temperature and has sabotaged several of Stefan’s Projects. PET-G creeps as temperatures approach 60C, as is discovered when people put printers in even passive chambers.
ABS is a reasonable choice if you can print it well, the chances are the injection molded parts used on some motherboards to hold cpu fans are abs.
Of course, he means where the plastic bracket only holds down the CPU, not also the heatsink. For every AMD and certain intel’s, the CPU retaining bracket ALSO holds down the heatsink. Thats not good, since when the bracket softens, then the heatsink will get loose.
However, in this case, its about a LGA1700 intel bracket which ONLY holds down the CPU. You can see the cooler bracket holes a little bit away from the plastic bracket alltogether. This means that if the bracket softens or get loose, all that will happen is that now the cooler will be responsible for holding down the CPU. The difference it will make, is that if the cooler isn’t tight enough, the CPU will not connect properly to its pins, AND that it will not be possible to momentarly test the motherboard with the cooler off, as the CPU will not lodge correctly against its pins.
N.B I don’t think this is a great idea, a shim seems like the right solution, however…
With water cooling and not awful airflow you should be able to get away with PLA still (But I’d not suggest it, far to close to the danger zone) – the temperatures around the CPU won’t get as high as the CPU’s own reported temp, and as most of its output is taken away and radiated by the water keeping in the 40’s isn’t difficult, getting it to stay at 30C isn’t implausible if there is a large enough radiator or sufficient airflow over it. Heck a big air cooler can often manage to keep even the high end CPU under PLA’s real softening zone, but those things are really heavy with large leverage so the plastic is bound to creep on its own anyway, even if the PC was never turned on…
Which I think will be the biggest problem with most printed plastics, how easily they creep under the sustained pressure of a good mount, not the temperature (at least while the contact pressure is good enough to transfer heat well and you are not trying to use a 40mm rad with silent fan to cool the 125w+ monster – put sufficiently large cooling in for the target temperature you need and the plastics won’t soften.)
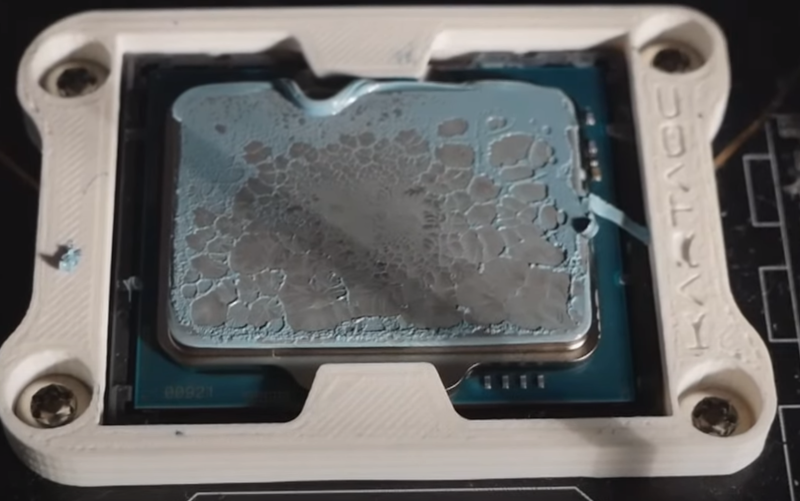
Over-tight heatsinks sound like a nightmare – and one that results in a bubble in your heatsink compound. Is this, I ask, poor design or a misunderstanding of the need for moderation in contact pressure?
A redesigned socket bracket is the obvious way to correct a design flaw, so kudos rwhere it is due.
One thing I discovered several years back was that heatsinks are rarely flat in any case.
A part of my routine with new heatsinks, or whenever I do a strip-down refurbishment and clean, is to lap the heatsink using 120 grit and then 600 grit. I usually finish off with 800 grit, but you don’t want too smooth a surface, otherwise you lose all of your interface compound.
printed plastic and CPYUs…
What you really want is a metal plate adding stiffness on the other side of the board.
^^ This!
My Core i7 (lga1150) and two other computers in my family with the same socket still have CPU coolers from the lga775 area (some Arctic Cooling tower coolers).
Did this by removing the stupid plastic push pin mechanics, mount (glue) proper backplates on the mobos and screw everything tight with spring loaded screws (and plastic washer pieces).
Works splendidly even under full load.
I did something similar with a top-of-the-line Artic Cooling cooler from right around the end of 775 and beginning of 115X, except I used a surplus Asetek based AIO watercooler backplate and hardware store screws.
PLA, like other thermoform plastics will eventually deform under continuous stress. A thermoset plastic is a much better choice. Perhaps using an SLA type 3D printer with a good quality structural resin would work well.
There’s so many high temp options that wouldn’t be an issue under these temps – even standard ASA or ABS would both be perfectly fine and don’t suffer the creep of others like PLA.
Remember just because the cpu is 100c doesn’t mean the areas even 5mm away from the case are going to be 100c.
Not knowing a lot about this I often see dead mobos I assume due to the heatsink being bumped and the thermal paste now hardened leaving gaps and getting cooked. Bumped by taking out a hard drive or dropping the case on it’s bottom and having that giant mass which is spring held breaking the thermal bond. Some of these are from someone I know whose dexterity in a case is break or bend, it will fit.
Take care of that paste-bond or dismount and redo the paste. In general, hands off the CPU heatsink.
I made a number of custom (non-liquid) cooling systems in the days Intel Core2 furnaces. I had a 3.8MHz core 2 quad running flat our at about 40 or 45 degrees Celsius (approx ambient plus 10 to 15). I have also used heatsink compound in a lot of application like high powered audio amps and in kW AM transmitters.
So here are some tips on how to “learn” to use heatsink compound.
With heatsink compound your worst enemy is air between the surfaces, it’s like a thermal insulator and the last thing you want in there. You have to use every available bit of matching surface area with compound (not air) and not any contaminations ans especially not anything that will prevent the surfaces getting close together like a chip of plastic etc. Obviously the surfaces need to be flat and the thickness of the compound need to be as thin as possible.
ok think of the poo emoji 💩 seriously. If you spread the compound over the surfaces you have absolutely no chance of getting it perfectly flat and even and you will end up with air pockets everywhere. The air pockets will compress down is size as pressure is applied to put the heat sink on but the air pockets will expand again when heat is applied (CPU turned on) before the compound has reached it’s firm state.
There is NO good or correct way to spread the compound over one or both surfaces prior to applying the heatsink.
Make sure both surfaces are perfectly clean and free of contaminates with a completely evaporative cleaner like isopropyl alcohol. Never place the heatsink or CPU down on the table / workbench, on contact surface after cleaning and don’t touch it with your fingers. If your a bit touchy feely then get some fresh clean pure cotton gloves. Gloves should be used with the white compound as it’s carcinogenic. I don’t know if the silver compounds are carcinogenic so it would probably be good to use gloves anyway. I always use them because I use the white compound.
Put a single consistently shaped blob in the centre. You will end up with a bit of a spike at the top and hence the poo emoji reference.
As you press the surfaces together (evenly and parallel) the compound with squash and travel to the edges expelling ALL the air in the process.
After a while you will “get” how it flows and you can make shapes in the applied compound so that it fills the square or rectangle shape without too much overflow in the centre of the edges of the surface of the CPU heatsink platform.
Can’t believe it’s 2022 and people are still treating 3d
printers like their primary job isn’t prototyping. Resin seems like the smarter choice here. Or at least make a mold and casting with maybe copper.
3D print isn’t always the answer .
There are macineable HDHMW plastics that can take the heat but aren’t as convenient to use.
If your printer has a cutting option then you can cut an exact fit part that is stiff, temperature tolerarant, and still be an insulator.
Would a three point spring tensioned mount not make it easier to maintain a flat mechanical connection?