Regular readers of Hackaday will know that the projects we feature are generally of the high-tech variety. Microcontrollers, 3D printed parts, embedded Linux, lots of wires, that sort of thing. But that’s not to say we don’t appreciate the somewhat more visceral builds out there; after all, hacking is about creative problem solving and thinking outside the box, and none of that is limited to how complex the fix actually is.
Take for example this quick hack that [R. Preston McAfee] recently sent our way. Looking for a way to check how much fuel was left in his outboard motor’s small portable gas tank without crawling back to look at it, he decided to rig it up with a sending unit. While they’re technically designed for larger tanks which are permanently installed into a boat’s hull, he reasoned there was nothing about the float sensor that would keep it from working in his case so long as it could be safely mounted.
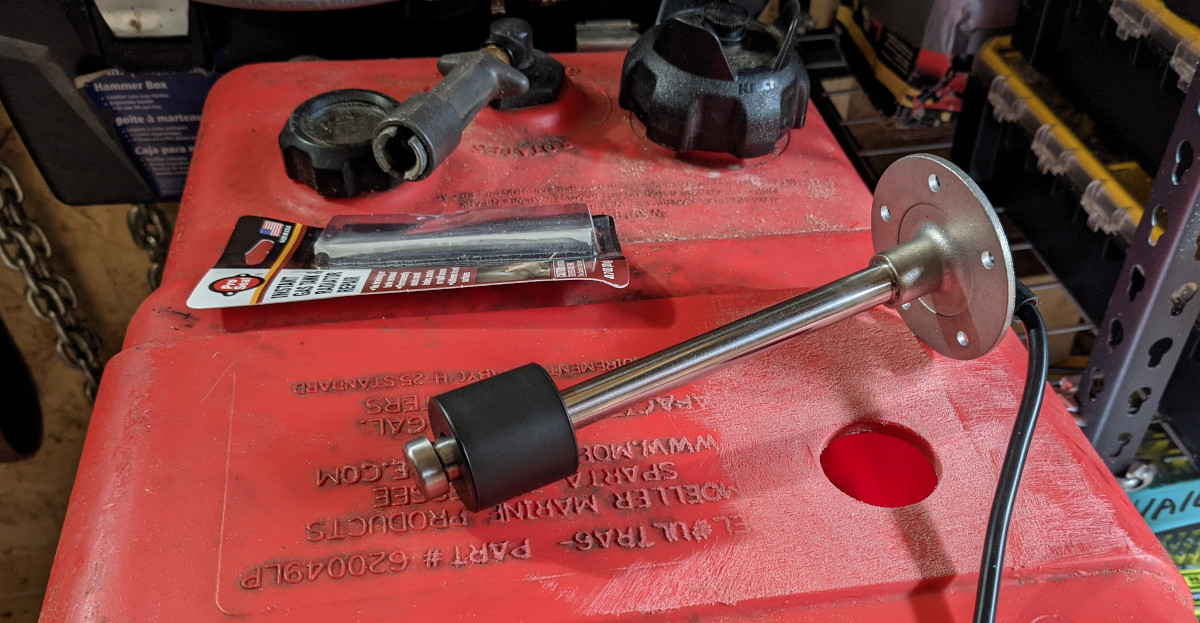 To that end, [Preston] started by cutting a 38 mm (1.5″) hole in the thickest part of the tank, and sanded the area around the opening to smooth things out. He then measured the depth of the tank at that point, and ordered an appropriately sized float sensor. He drilled out the holes for the five mounting bolts, and inserted them through the larger whole so their heads would be inside the tank. By holding the exposed threads with a pair of vice grips he was able to crank the nuts down on each bolt to form a tight seal to the gasket, though it should be noted that the resulting damage to the threads will likely make it difficult to remove the nuts in the future.
Admittedly this is a pretty simple fix, but it’s well thought-out and we appreciate the effort [Preston] put in to documenting the whole process. We’ve certainly covered more elaborate ways of seeing what’s left in the tank, but just because a solution is flashier doesn’t mean it’s necessarily any better.


> though it should be noted that the resulting damage to the threads will likely make it difficult to remove the nuts in the future.
I don’t know how much torque was required for that but maybe cutting slits in the threaded ends of those bolts would’ve been enough for a screwdriver?
I would have just ground a couple of flats on their ends and be done. Making a slot is a pain in the arse, and weak.
I agree. Spin a thread chaser onto the bolt, grind off about a centimeter of threads, spin off the thread chaser; use the grips to hold that part of the bolt.
That would be “Vise-Grip” (TM)
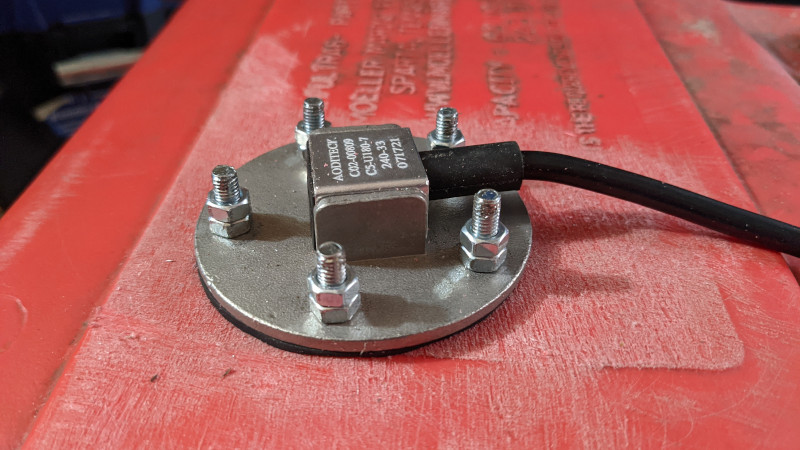
That’s a pretty neat sender unit. Not yer grampa’s float-on-a-potentiometer. That looks like a magnetostrictive widget. Cool.
Ha, fooled. Not magnetostrictive.
Much simpler. It’s a stack of reed switches shorting out a ladder of resistors.
You only get a dozen or so discrete steps of level indications.
Cute.
One way to avoid thread damage is to use the nut jamming or double nut trick. Having two nuts counter-tightened at the top would provide an anchor point needed to fasten a third nut securely to the tank.
In the article they mention this very principle to lock the nuts into their final position. I’m not sure why the trick wasn’t used to avoid thread damage as well.
I have actually managed to stretch a bolt doing that once before. Not that I cared much as it was a grade 5 where a grade 8 should have been, but yah, tis possible.
I wasn’t worried about thread damage because I can hacksaw the damaged portion off to remove, if it won’t unbolt with effort. I didn’t think of using the locknut to tighten but I’ll definitely use it next time, and there will be as next time because some friends want senders too.
There is actually a tool for that.
It’s called a “stud extractor”.
Originally designed for inserting and removing studs (like the ones that hold exhaust manifolds on engines) it will surely work on this thing as well. And being made for that purpose the damage to the threads is minimal (generally you can only see a few faint lines where the rollers inside the tool have grabbed the thing and flattened the outermost points of the threads).
Useful tools. Might be more trouble to make one for this one use than it is worth, but it might not be. I probably would, because me.
Historical note *obscure knowledge edition*: The best ones are threaded for the stud (not roller type) and use a jam bolt to lock. Much more reliable than double nuts. They go roughly 50 years older than IC engines, at least as far back as inserting and removing studs in steam boilers mid 19th cty. The studs were typically tapered on one end (various tapers, including 3/4″, 1/2″, and 1/4″ per foot) to make a seal in the boiler shell, and straight thread on the other end. Used both internally to the boiler, for such things as brackets for feedwater piping and locomotive throttles, and externally, for such things as mounts, grate bearers, accessories, and so on. Several varieties exist, the most useful with differential threads. For install, the jam bolt is one pitch finer than the stud, for removal, the jam bolt one pitch courser. This allows the jam bolt, properly lubricated with tallow or white lead, to tighten just enough for the torque applied, but not so much it can’t be backed off without moving the stud so the tool can be unscrewed by hand. IIRC, I first saw this in either one of the _Shop Kinks_ books or in a Colvin and someone book back when I was still working with old (pre 20th cty) machinery.
So once you have run a nut down you can then lock two nuts together at the top of the screw. once you have tightened the nut you can unlock the two at the top. No damage done. It’s a neat method that works well so long has you have a set of small spanners :)
That’s a really cool sensor. I see there is a 5″ version. Does it work upsidedown? Put it in a beer stein and rig it to turn on a strobe light when the fluid level gets too low.
One I had on my car was rigged like a bridge IIRC, so prolly just have to wire it backwards.
I would love something like this that can withstand fuel, but can measure based on hydrostatic pressure very accurately. I have similar needs for remote fuel level monitoring- in an antique motorcycle. I’d like to add a highly accurate fuel gage.
To add to the already extensive list of non thread-marring options for installing bolts like this, one of my favourites is to make a backup ring to go on the inside, put the bolts through and weld them to the ring. You can then cut a slit in it and thread it through the hole. The advantage of this is you can cut a rubber gasket to match and it’ll get nice even pressure from the ring.
Blind hole fasteners would make it look like it came from the factory with a gage. Love em!
The potential downside of blind hole fasteners in a “soft” material, like a plastic tank, is that the local pucker around the 5 holes may compromise the main holes ability to seal effectively.
This is interesting. How would one use this with an Arduino?
Just measure the resistance: it varies between 0-180 ohms as the level changes (or 33-210 ohms, depending on model). It’s a two-wire device: Connect it between ground and +5V using a 100 ohm resistor. Connect that junction of the level meter and the 100 ohm resistor to an analog input of the arduino. Calibrate. Done.
maybe I’m understanding this wrong but the vise was used to not drop the bolts into the tank right? wouldn’t flipping the tank and letting gravity do it’s thing accomplish this without needing 5 sets og grips in the way
I use rivnuts on blind and thin materials.
The swaged edge of the rivnuts would no longer present a smooth sealing surface on the flange
Nice. Simple and clever at the same time.