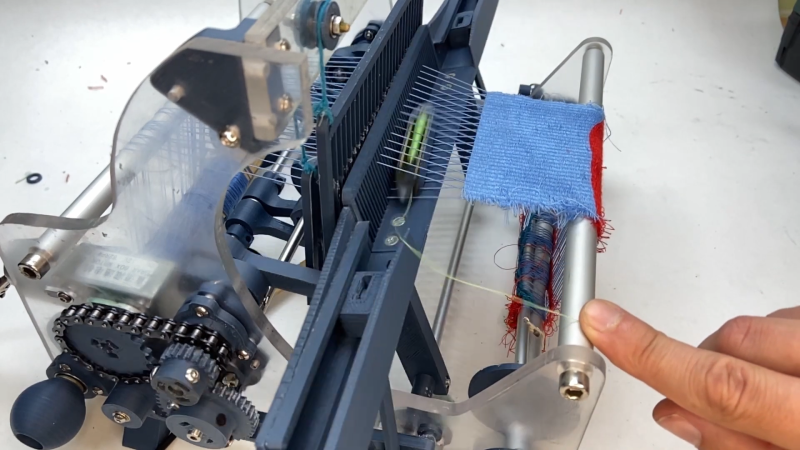
The seemingly humble flying-shuttle loom, originally built to make the weaving of wide cloth faster and easier, stood at the threshold between the largely handcrafted world of the past and the automated world that followed. And judging by how much work went into this miniature 3D-printed power loom, not to mention how fussy it is, it’s a wonder that we’re not all still wearing homespun cloth.
Dealing with the warp and the weft of it all isn’t easy, as [Fraens] discovered with this build. The main idea with weaving is to raise alternate warp threads, which run with the length of the fabric, to create a virtual space, called the shed, through which a shuttle carrying the weft thread is passed. The weft thread is then pressed in place by a comb-like device called the reed, the heddles carrying the warp threads shift position, and the process is repeated.
[Fraens]’ version of the flying-shuttle loom is built mostly from 3D-printed parts, with a smattering of aluminum and acrylic. There are levers, shafts, and cams galore, not to mention the gears and sprockets that drive the mechanism via a 12-volt gear motor. The mechanism that moves the shuttle back and forth in the shed is particularly interesting; it uses cams to release the tension stored in elastic bands to flick the shuttle left and right. Shuttle timing is critical, as a few of the fails later in the video show. [Fraens] had to play with cam shape and lever arm length to get the timing right, not to mention having to resort to a chain drive to get enough torque to move the shuttle.
We’ve seen power looms before, but mainly those that operate at a somewhat more stately pace than this one. Hats off to [Fraens] for showing the true complexity involved in automating weaving.


It’s all fun and games until the cross beams go askew on the treadle.
Or until someone sticks a magnet in your head and hits you with the brain-sayings.
as a child I was taken to see nomadic weavers at work,the looms were built from random tree parts and boys sat on the ground
weaving as an old man sang the knots from a wooden book
the whole operation under a big sprawling tent,also useing random wooden bits,every single thing hand made by them
this sort of thing could still be found in the hindokush and other
places along the roof of the world
another memorable moment was building stairs in a running
rope factory,anybody wants to macrodose and watch a braider
at work is going to have a trip,trippy enough all up strait.
Up your dose. When I was a kid a tab had 250 micrograms or we wanted our dollar back!
A machine like that should get boring quick.
Nothing like the stars, a bonfire, pistol loaded with rounds using slow rifle powder and a thermos half full of LOX. That’s a good time.
what an coincidents: I’m reading this while I’m working on a commercial 32 shaft interface for a Louet loom.
Nice to see someone trying to understand things and replicate the past nowadays. The creativity and skill people provided the world in the past is amazing.
Not really because even a lazy worker on a fussy loom will produce more than your best weavers on a good day which is all that is required to be economical. Add constant machine improvements toward total automation and it’s a wonder that we didn’t make machinery earlier.
For today’s standards, this type of loom is a pretty simple device, and I find it a tad sad that hackaday tries to overly exaggerate the complexity of this thing.
I do sort of like the reproduction of this thing and having the perseverance of making it work, despite the inexperience of the builder with basic mechanical stuff. Things like sowing timing belts together and trying to use timing belts on V-groove pulley’s clearly shows the start of a learning curve in this area. One reason I like this build is because of the combination of techniques. Some people try to make every part with a 3D printer just because they have a 3D printer, but this build has a quite reasonable combination of aluminium and steel axles, acrylic side panels and 3D printed small parts.
I do not get “The cam is used to release the energy stored in elastic bands”. That is not what is happening. @04:50 I see an elastic band and a steel sprint on the other side, but those are only used to pull the levers that move the shuttle back. @07:02 you can see how the rotation of the camshaft uses two levers to get a fast movement to give the shuttle a quick push, and the only spring action I see is some lack of stiffness in the first 3D printed lever.
It did make me curious how long these machines exist. The flying shuttle was patented in 1733.
https://en.wikipedia.org/wiki/Flying_shuttle
Hello paulvdh,
I have been a mechanical engineer for over 10 years and design with belts/chains/gears almost daily. Practically as well as theoretically. So I would say I am relatively far in my “learning curve”.
For the timing belt, I have of course printed a timing belt pulley (not seen in the video so).
Would you have any ideas on how to splice a GT2 timing belt? Sewing them together is a simple working solution that I have used before. V-belt would have been a favored solution. Unfortunately they do not exist in this size.
@4.50-> The springs were removed again and not used. @8.35 you see that the levers remain in the front position. This has the purpose of slowing down the ship.
Unfortunately, it is relatively difficult to show all the problems in a video. I have built on the machine 1.5 months and not every change filmed.
Translated with http://www.DeepL.com/Translator (free version)
Oh snap!
Cassette tape player belts gang up nicely and are readily available in many short lengths. Plus elastic so no tensioner needed. Cheap in the usual consumer places. Don’t carry much power each, but 10 will work, so long as a little slip is OK. Example application, moving a magnetic tape at varying speed over a read head.
Thank dog for hipsters, I suppose.
The shuttle itself is a key problem in this design, with the correct pieces added it would improve the performance.
It could have a central liquid fuel tank and a solid propellant stick each side !
Use a blank 22 short on ether side.
Can’t do in CA, mag limit. Standard size mags not legal, much less belts.
You could have not made that comment, you’re such an asshat.
Please ignore the idiots replying to me, the shuttle is actually missing the parts required to be the right kind of shuttle for this purpose. The shuttle here is alright for hand-weaving, but that is not the same as for this kind of loom.
@paulvhd: I think you might be missing the point a bit there, sir. This wasn’t a competition for recreating most complex machine. But since this was so simple and you obviously were able to critique it down to the second I’m looking forward to seeing your creation, massively complex, designed and engineered to the nanometer, built and in working order in a dimension where you can’t purchase standard parts! Please do share!
What a bunch of hilarious terminology. Not so much stranger than SCSI and thunderport, bunch fun to see. :)
Bunch = but
Just remember, the shuttle carries the thread “weft” and right, and the other threads go straight ahead at “warp” drive!
B^)
This would be a fantastic project for learning in schools. Print out the pieces, assemble. It may not produce the finest cloths but the machine displays a lot of practical engineering. Like that old, see-through mini V8 plastic model I’ll sure many of us have built.
Punch card controlled loom (Jacquard machine) est. 1804
https://en.m.wikipedia.org/wiki/Jacquard_machine
There is a working example at Manchester Science and Industry Museum https://www.scienceandindustrymuseum.org.uk/
( part of a large exhibit demonstrating the process of cotton from plant to fabric.)
If you get to tour the museum, allow up to a day to see/study it, and don’t bring an easily bored child.
Just imagine. Without this we would still either be going naked, wearing animal skins or fig leaves. Thank you loom operators everywhere.
I don’t see this putting any nudist colony out of business.
I feel like nudists are more in the market for sunscreen than clothing… a lack of wanting, not a wanting of what’s lacked.
Thank weavers indeed though.
Judging by your writing style, that was not a micro dose ;)
I wonder how many shuttles he lost to James McEvoy
I want to point out that lacking a properly-built shuttle, the rest of the loom is compromised by having the lever mechanism of the loom, yet lacking the ‘flying shuttle’ to go with it. This shuttle is more like that of a hand loom, which is fine if you’re weaving by hand. It’s also safer than the proper kind of shuttle for this loom, and the shuttle design predates the loom itself as it’s one of the innovations that made automated looms possible in the first place.
That kind of shuttle has parts like pointed metal endcaps and John Kay’s had wheels. You will also see various ways of regulating the warp fabric as it leaves the shuttle, crossing from side to side. This helps the shuttle move smoothly and deposit material consistently. I didn’t focus on the way the bobbin sits in the shuttle, but it feels like something that could be improved by looking at various flying shuttle designs. The shuttle itself being plastic seems less than ideal, considering that after wood shuttles, metal shuttles became common.
I wish I had more technical details on these specific parts and their design to share, but fixing that problem would help the operation of the whole loom considering that it’s a prerequisite to this type of loom design.
Hello,
indeed, the design of the shuttle was problematic. Made of plastic, the mass of the shuttle is much too small. That’s why I made it heavier with brass sheets. Thus it has more energy and does not get stuck at the slightest thread resistance. If the shuttle is too light, it jumps back a little when braking. The correct winding technique is also important. You have to wind from the back to the front. During the winding process, you must always wave your fingers back and forth.
The brass rod on which the line is wound must be conical. It must also not be too long because then the cord does not unwind cleanly.
I think continuing to improve the shuttle design in that direction will really pay off, excellent. As for winding, you could improve that with another machine and get a better wind. I saw you used a drill-driver, but bobbin winders for flying shuttle pirns.
Did you entirely remake the shuttle after adding the brass weights? If so, I didn’t catch that. I had been wondering if it might be worth milling the entire shuttle from metal if you have the means, I assume you have the skills based on your video (regardless of what paulvdh said above).
Changing the way the warp feeds out of the shuttle is something I think would help as well, unless I missed the inclusion of a proper tensioner? The way the bobbin seats in the shuttle is interesting, and is probably another area for improvement. Lastly, the shape and parts of the bobbin might be improved: you mention that pirns need to be tapered, and I wonder if improving that taper would also help.
*I saw you used a drill-driver, but bobbin winders specifically for flying shuttle pirns exist, similar to how sewing machines have bobbin winders.
(Also I kept saying ‘warp’ above when I meant ‘weft’ in regard to the material in the shuttle, apologies for spacing on that and any miscommunication it might have resulted in)
Unfortunately, I do not have a milling machine. With my steam engines, everything was built by hand and file. I have deliberately tried to do without metal parts to be able to build everything with a 3D printer.
You can see the brass sheets in the video.
Would you have concrete tips to improve the ship?
Man! What a labour of love that construction was!
It certainly isn’t perfect, even as a mock-up for a larger machine, but it is well on the way!
I don’t think that I’d have passed my weaving courses with fabric or salvage tensions like that but challenges like those are all part of the hack and learning.
I found it interesting that, although the person tried to suspend the counter-balance rods at the top with a plastic loop, that method was eventually abandoned in favour of string, which is how they have been suspended for hundreds of years.
I had to laugh at the shuttle getting caught in the shed. That happens even to experienced weavers sometimes!