3D-Printed Power Loom Shows How Complex Weaving Really Is

The seemingly humble flying-shuttle loom, originally built to make the weaving of wide cloth faster and easier, stood at the threshold between the largely handcrafted world of the past and the automated world that followed. And judging by how much work went into this miniature 3D-printed power loom, not to mention how fussy it is, it’s a wonder that we’re not all still wearing homespun cloth.

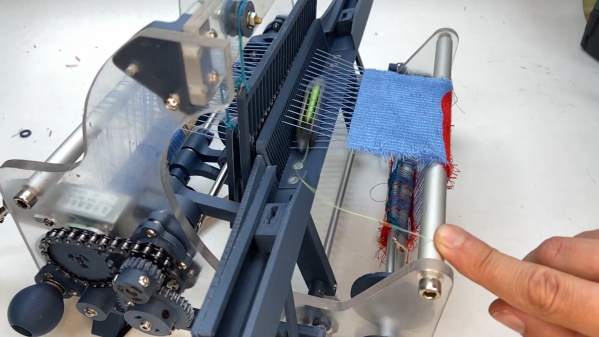
Dealing with the warp and the weft of it all isn’t easy, as [Fraens] discovered with this build. The main idea with weaving is to raise alternate warp threads, which run with the length of the fabric, to create a virtual space, called the shed, through which a shuttle carrying the weft thread is passed. The weft thread is then pressed in place by a comb-like device called the reed, the heddles carrying the warp threads shift position, and the process is repeated.

[Fraens]’ version of the flying-shuttle loom is built mostly from 3D-printed parts, with a smattering of aluminum and acrylic. There are levers, shafts, and cams galore, not to mention the gears and sprockets that drive the mechanism via a 12-volt gear motor. The mechanism that moves the shuttle back and forth in the shed is particularly interesting; it uses cams to release the tension stored in elastic bands to flick the shuttle left and right. Shuttle timing is critical, as a few of the fails later in the video show. [Fraens] had to play with cam shape and lever arm length to get the timing right, not to mention having to resort to a chain drive to get enough torque to move the shuttle.

We’ve seen power looms before, but mainly those that operate at a somewhat more stately pace than this one. Hats off to [Fraens] for showing the true complexity involved in automating weaving.

Continue reading “3D-Printed Power Loom Shows How Complex Weaving Really Is”

A Technique To Avoid Warping On Large 3D Prints

[Jamie Mantzel] figured out his own way of 3D printing large objects without fear of warping. First a bit of background information. When using a 3D extrusion printer like the RepRap or Makerbot, prints that span a large area tend to warp. That’s because these printers lay down one thin layer of plastic at a time. If the first layer cools too much, it will shrink a bit before the next layer is laid down. As that second layer cools it pulls the part toward the center, eventually bowing the part which causes it to hit the extruder head.

After having several prints encounter this issue [Jamie] decided to alter his design so that it wouldn’t cause these stresses. The first thing that he did was to add alternating voids to a layer between the raft and the actual part. You can see these as notches on the bottom the piece pictured above. This takes care of the initial stresses from the first layer. Next, he adds holes wherever he can in the main body of the part. This is especially important on the edges of the piece where the warping forces will be the greatest.

He also moved the starting position of the bed closer to the extruder head. His hope is that this will help the raft bond better, and resist pulling away from the bed during printing.

See his video explanation of his adventure after the break.

Continue reading “A Technique To Avoid Warping On Large 3D Prints”

Removing Fisheye Distortion

fisheye

Reader [alex] had a commercial plugin for fisheye lens correction and wondered exactly what kind of magic was behind it. Was it actually doing line detection? He dropped in a square grid to see what it spit out. The warped result indicated that the transformation was completely independent of the photo’s content. Using this result as a guide he was able to create a similar transform using Warp and save it as a script. The script generates almost identical results and now he knows exactly how little magic is involved.