Mechanizing the production of textiles was a major part of the industrial revolution, and with the convenience of many people are recreating the classic machines. A perfect example of this is [Fraens]’ 3D printed braiding machine, which was reverse engineered from old photos of the early machines.
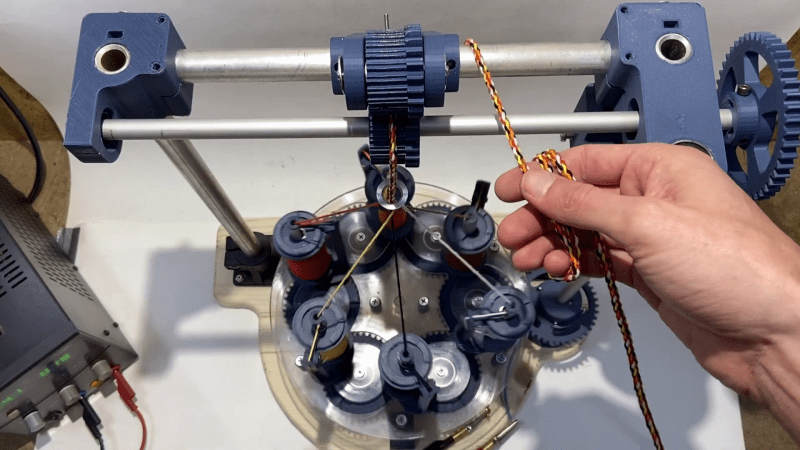
The trick behind braiding is the mesmerizing path the six bobbins need to weave around each other while maintaining the correct tension on the strands. To achieve this, they slide along a path in a guide plate while being passed between a series of guide gears for each section of the track. [Fraens] cut the guide plate components and the base plate below it from acrylic and mounted them together with standoffs to allow space for the guide gears.
Each of the six bobbins contains multiple parts to maintain the correct tension. The strands are fed through a single guide ring, where the braid is formed, and through pair of traction gears. All the moving parts are driven by a single 24 V motor and can produce about 42 cm of a braided cord per minute, and you can even set up the machine to braid around an inner core.
This braiding machine is just one in a series of early industrial machines recreated by [Fraens] using 3D printing. The others include a sewing machine, and a power loom, and a generator.


Oohh. Adapt it to make nice covers for cables!
Amazing! Something right out of “How It’s Made”. This is the sort of application for 3-D printing that impresses me. Well done!
Maybe an evolution of this could be made to make litz wire
Yup… Use it to make Litzendraht (Litz Wire}.[1][2] The best Litz Wire is braided but hard to find and very $$ these days.[3] Good braided Litz Wire used to be made in Ukraine – sigh :-( Ukraine used to make lots of great wire products. God-willing maybe again some day.
* References:
1. Litz Wire
https://en.wikipedia.org/wiki/Litz_wire
2. Rectangular Braided Litz Wire
https://www.newenglandwire.com/product/rectangular-braided-litz-wire/#
3. 100m (330ft) Litz wire 70/38, 0.1mm x 70 strands, for crystal radio coil, $54.00/roll. Warning, likely NOT braided.
https://www.ebay.com/itm/154049318415
There’s nothing to say this can’t be made without a 3D printer. Most of this could probably be made with a jigsaw and some sand paper, especially if it was made out of wood or acrylic sheets. Still, a great project. These things are always fascinating to watch in operation. Especially when the thread count is high or multiple machines are working together to form a rope. A spool with a dancer arm, to take up the slack, would be a great addition. It would be interesting to see, if it were greased, how fast and long it could operate.
These machines are far from outdated, they are an important part of making kernmantle rope.
https://www.facebook.com/watch/?v=1762229377330253
They are also used in braiding a fabric covering when making wire harnesses!
The wire harness is passed through the center of the spools.
IIRC, the braiding machines at a former workplace that made wire harnesses had around 24 thread spools each. (Noisy) Some of the companies we made harnesses for did not allow a spool to run empty while braiding, which left us with a number of partial spools.
And there’s stuff like this: https://www.youtube.com/watch?v=NPpz5jV01z4
“Outdated” is a bit strong of a word but may actually relate to the track design of this unit versus modern “high-speed” braiding machines. The unit in this awesome build has a stack of track/horn-gear/spur-gear. More modern built units tend to be designed as horn-gear/track/spur-gear. This stackup prevents the inevitable detritus from being jammed into the drive spur gears.
And as one other commenter said, kudos for the tensioner design on this build. I agree that’s one of the most challenging aspects and I like the gravity style tensioner. I’d be interested to hear if anyone purchased a batch of commercial bobbins and reverse engineered them, or at least explained how they function. My main uncertainty is how to select the different springs for them.
It’s especially fun to watch this as I used to help man a rope machine at a renaissance fair. One of those “hey kids gather around and let me show you what one of your jobs might be if we didn’t have tons of automation & child labor laws” things, though it did make functional rope (and it’s larger brother made the rope for a trebuchet). So it’s fun to see a snapshot of innovation at a much later stage in the process.
For wire harnesses:
https://www.youtube.com/watch?v=vrvDPKAg1Vc
Okay, I’m sold: I need to build at least one of these contraptions! :-)
How much tension is required for the tensioners? If the reels can be hold down by their mass alone, the guide plate could be eliminated and each reel run on top of a 2D linear motor (or an individual holonomic robot base). Then you can steer the reels i nan arbitrary manner for continuously varying weaves around the circumference and along the length of the woven rope.
I see where he got the idea from another video. I modeled and printed the exact same gears and drafted the acrylic base components also by the same reverse engineering. I got hung up on the bobbin design and never got around to finishing mine. I will have to build this now. Awesome job!
Make your own solder wick. That stuff is way too expensive for what it is!
Use zip cord, or any scrap stranded cable you have lying around. Strip off about an inch of insulation, dip the exposed wire in flux, and twist loosely so it doesn’t splay out.
You can use different sizes of wire and different strand counts for different purposes. 14-gauge 19×27 can pull most of the solder out of a through-hole, 24-gauge 19×36 can go through the hole and clean out the rest.
Oh, sure, do it the easy way…
All of the sudden about 3 years ago this braided stiffer than normal insulation came in in droves and I want nothing to do with it. Fashion? The ends pull out of the molded part there is no proper strain relief. It’s gets dirty and cannot be easily cleaned. Everything on the kitchen counter gets into the covering. Fraying was long gone with dangerous cloth covered power cords. Now it’s back, this stuff won’t slide easily like where a mouse cord needs to glide.
For more detailed information, check out my homepage: https://fraensengineering.com/