When one needs a spring, a 3D-printed version is maybe not one’s first choice. It might even be fair to say that printed springs are something one ends up making, rather than something one sets out to use. That might change once you try the spring design in [the_ress]’s 3D-printed filament cutter with printed springs.
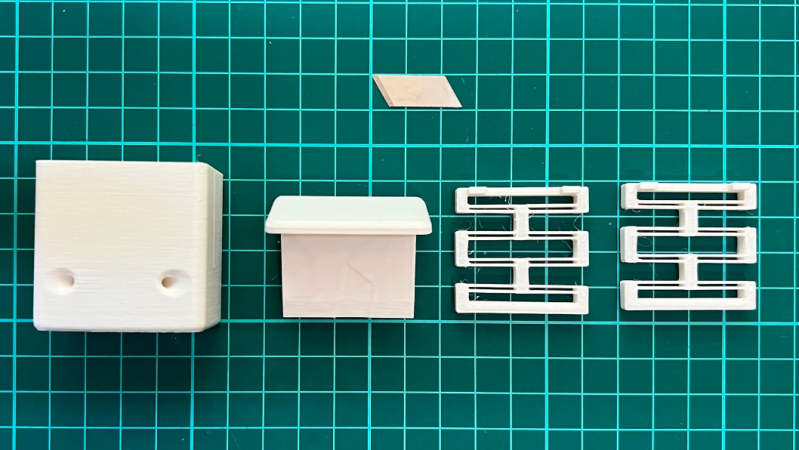
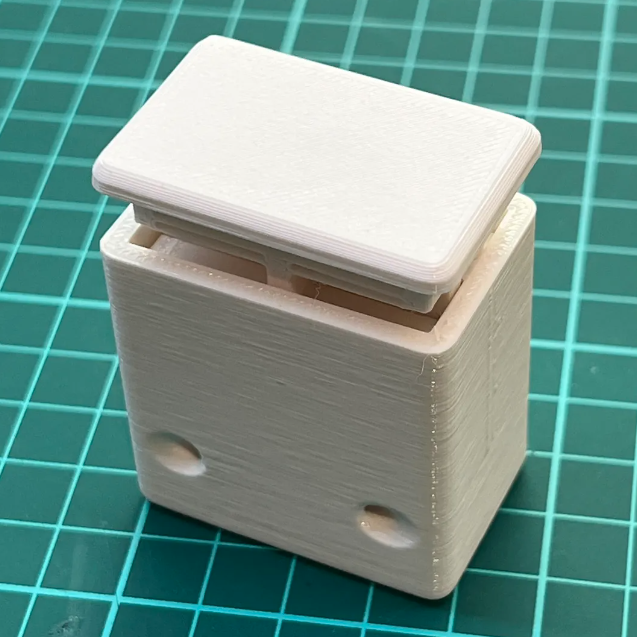 The filament cutter works like this: filament is inserted into the device through one of the pairs of holes at the bottom. To cut the filment, one presses down on the plunger. This pushes a blade down to neatly cut the filament at an angle. The cutter is the device’s only non-printed part; a single segment from an 18 mm utility knife blade.
The springs are of particular interest, and don’t look quite like a typical spring. They take their design from this compliant linear motion mechanism documented on reprap.org, and resemble little parallel 4-bar linkages. These springs have limited travel, but are definitely springy enough for the job they need to do, and that’s the important part.
Want a more traditional coiled spring? Annealing filament wound around a mandrel can yield useful results, and don’t forget the fantastic mechanisms known as flexures; they have clear similarities to the springs [the_ress] used. You can see her design in action in the short video, embedded below.


My god her finger that close to the blade when pushing in gave me horrible anxiety, alas, I will be looking into printed springs more, seems so simple.
Exactly my thought. The design of the cutter itself looks pretty clever and pretty nice too.
One thing I’ve noticed. Looks like you would have to dismantle the machine to remove the waste cuttings. Perhaps some sort of opening for easy removal should be added. Apart from that, fantastic design. Well done.
I have to ask though: For what reason does this exist? The spring is neat, but why does one need to so precisely cut the end of filament?
Some printers (ender 3 among them) have a quite small hole to get the filament into once it’s past the feed rollers. Not a big difficulty, but I’ve had a few cuts that I couldn’t get the point in with. Consistency might be nice.
not a 3d printer so unsure, but isn’t that easier to splice filaments if you have clean repetitive cuts?
The filaments aren’t being spliced; the cut is to get the filament cleanly fed into the print head. As [jonored] said, some printers are finicky so a consistent cut makes it easier to load filament in those printers.
At least for my ender 3 pro, if the filament has a flat cut end it’s nearly impossible to feed it correctly into the bowden mechanism without it jamming, but with a cut at an angle it’s so much easier to get in into the tube. This is a bigger problem when you do a “cold pull” where the end gets pulled out as a big blob. Sure I could just use a pair of flush cutters to manually trim at an angle but having a little doohicky that sits right on top of my printer to do this is very convenient.
Context please! I just see a boxy spring that might pop out a blade at one side. How do you cut (and why) filament with that? Does the boxy think fit somewhere? Or do you hold it in your hand, while cutting?
I don´t get it.
here you go: https://imgur.com/a/tfrVxAS
(doing multiple cuts for demonstration, normally you’d press it just once)
There is a danger with Bowden systems that if there is some filament is left in the tube, and a wedged end is pushed into it, it will wedge up the side of the existing filament and jam in the print head throat or the tube. Sometimes it is just safer to have a square cut end that acts like a piston. Maybe it could be designed to do both, and people choose?
True for definitions of ‘danger’ that amount to ‘slight inconvenience’.
Oh noes you’ll have to remove your nozzle and clean it. (sounds kinky)
I don’t keep single use things around. This thing is no better than an xacto knife.
Spring is kind of cute, but useless in the real world. Much better options exist.