Last time, I’ve shown you how to create a local Git repository around your PCB project. That alone provides you with local backups, helping you never lose the changes you make to your files, and always be able to review the history of your project as it developed.
However, an even more significant part of Git’s usefulness is the ability to upload our creations to one of the various online Git repository hosting services, and keep it up to date at all times with a single shell command. I’d like to show you how to upload your project to GitHub and GitLab, in particular!
Recap
First off, let’s recap what goes into creating a repository. Here’s a sequence of commands you can refer to – these commands have been explained in the last article, so they’re here in case you need a cheatsheet.
# setting up identity - these are public, and can be fake
git config --global user.name "John Doe"
git config --global user.email johndoe@example.com
# initializing a repository
git init .
git branch -M main
# before your first commit, you add your .gitignore file
# then, add files as needed - use 'git status' to check in
git add board.kicad_pcb
[...]
git add README.md
# or, given proper .gitignore, you can just do this:
git add .
# put your added changes into a commit
git commit
# an editor will open to write your commit message
What if you don’t happen to have a PCB project handy? Here’s a repository with a Jolly Wrencher SAO board that you can download it as a .zip archive through the GitHub interface. It’s already a repository – if you’d like to test these commands out but don’t yet have a PCB project handy, you can freely push this repository to your own GitHub or GitLab account as a test exercise! If you’d like to start anew and also practice the “repository creation” part, just delete the .git directory in the project root.
What’s The Difference?
Both GitHub and GitLab act as frontends for your repository. They also provide an extra place to dump your code – you could also just use a flash drive or a server with an SSH account. But hosting gives you a web interface where other people can take a look at your code and its README so they know if your code interests them, ask you questions, share their own code changes with you, download any extra related files (like gerbers) that you might’ve uploaded, and do a myriad of other useful things. You don’t need to use any of these features – you can disable all of them, but they’re there as soon as they might prove useful to you.
GitHub is the most well-known platform, and it’s been a trendsetter in many aspects. A major part of small-scale software and hardware hacking action happens on GitHub, and a lot of repositories you might find yourself interested in contributing to, will be there as well. There’s a lot of tutorials that work with GitHub, and fun tooling like this command-line GitHub UI we’ve covered.
GitLab is a less-known but no less useful platform that you can use for your code, PCBs and documents, and it has important advantages over GitHub. First and foremost, the GitLab software itself is fully open-source, so you can self-host it, and many do. It’s not the only self-hostable service, but it’s one of the most prominent and feature-complete ones. Just like with WordPress being both a software suite and a platform, you don’t have to self-host it. If you want somewhere to host your repositories on, you can go to gitlab.com and register an account, just like people do with GitHub.
There’s a variety of frontends for online browser-accessible repository hosting – Gitea is another one that you will encounter every now and then and can easily self-host, and there’s a slew of other frontends that people have been using over the years. With knowledge of how two of these prominent frontends operate, what they have in common and how they differ, you will quickly find your way around any other frontend.
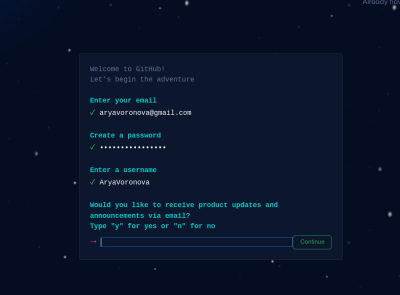
Registering on both websites is kinda similar. GitHub’s signup form is excessively flashy – it’s clear they invested quite a bit of money and effort into making it, but it’s not clear whether that was the right choice. Gitlab’s registration process is way calmer and generally more like what you’d expect out of a regular website. At certain points, both will ask you to confirm your email address – after doing that, your account will be ready to use.
Repository Creation
On both platforms, you’ll need to create a repository and register it with the platform first. You can’t just upload code to your account from the command line at a whim – the corresponding repository has to be created on the platform side before you can upload to it. There’s commandline tools to assist with the ‘creation’ step, thankfully!
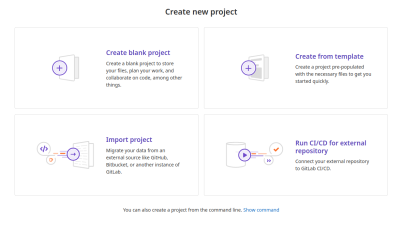
Github’s and Gitlab’s processes are similar, each providing some quality of life features. On both, the “New Repository” button is quite apparent, and clicking it, you’re invited to input repository name – on GitHub, also an optional description. On GitLab, you’ll want to use the “Create blank project” option. The options to add a README, .gitignore and license can be useful. If you don’t have some of these in the repository, feel free to check these boxes or push those buttons; don’t check any of them if you’re using the Jolly Wrencher files as an exercise, unless you’re looking for a difficulty tweak in your Git learning journey.
Both GitHub and GitLab helpfully gives you a bunch of command-line instructions on how to proceed with uploading your local repository. Half of those instructions are about adding a very barebone README and making your first commit. Having a README in your PCB project folder is a good practice, though perhaps having an empty or a single-line one is a bit of a letdown to your repository viewers. If you don’t care about people looking at your repository, however, don’t worry about it.
The important lines are the git remote and git push ones, with git branch being helpful. These are where the upload magic happens. git remote is the command that you use to manage your, well, remote aka non-local Git mirrors for a given repository, and git push is the command that you use to send changes from your repository to a mirror. git branch -M main renames your primary branch to ‘main’ – most tutorials nowadays use ‘main’, which will make your life a bit easier.
A Short Authentication Detour
Before we can push, however, we need to sort out authentication – as in, how do we show the platform that the person executing this commandline is a person entitled to upload data to this repository. The two platforms achieve this in different ways. For GitHub, the usual login-plus-password combo won’t do – being a platform where people share code used by millions of people, mostly verbatim and without checks, they have tightened their defenses, and put more responsibility on our shoulders.
You have two routes when it comes to uploading to GitHub. Either you go the HTTPS route, and then you create a token that you use in place of your password. Alternatively, you go the SSH route, which means you generate and upload a public key you use for authentication. These are both secure options and they’re paramount if someone else depends on your code being malware-free. That said, one could argue they’re overkill for uploading a few PCBs. Both of these options are something you can do once and forget about, GitHub has short tutorials to help you set one of these methods up, and tools like GitHub Desktop or GitHub CLI take care of it for you.
GitLab, however, doesn’t mind letting you upload using the same password that you used to create your account. There’s security benefits to using keys instead of passwords – they’re not bruteforceable, they can be easily revoked, and compromising an SSH key doesn’t endanger your entire account. Plus, you can (and should) passphrase-protect your keys. There’s also undeniable comfort with only using a password – you don’t have to store a token or register an SSH key for every machine you want to work from.
SSH keys are nice. For “your own computer” use, they’re in many ways nicer than password authentication. If you’re on Linux, you get SSH keys for basically free, and I recommend you figure out how to use them – you likely already use your key to SSH into your friendly Raspberry Pi; same goes for MacOS. On Windows, there’s tutorials on how you can generate a SSH key that you can use with Git.
Finally, Uploading
Having sorted the authentication way out, you should be ready to upload your code. Let’s point your local Git repository configuration at the right place. You will tell Git that this local repository corresponds to a remote repository, colloquially referred to as a ‘remote’.
If you have one remote, it’s typically named ‘origin’ – that’s just a convention, you can name it whatever; you can have multiple remotes, but if you name it ‘origin’, tutorial compatibility will be better, again. Both GitHub and GitLab will give you the URL to use as a remote URL, depending on whether you picked HTTPS or SSH authentication – GitLab won’t give you SSH URLs until you upload a SSH key, whereas GitHub will happily give you the URLs but you won’t be able to use them.
Whichever you pick, run the command git remote add origin YOUR_URL, substituting YOUR_URL with the URL that you’re using, of course. This tells your Git repository where to upload, and now you’re one command away from from having your files mirrored online. In the beginning, that command will be git push -u origin main – for all subsequent pushes, it will just be as short as git push.
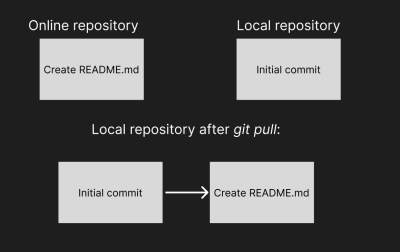
If you decided to add a README, a license file or a .gitignore file, you will actually want to do git pull before git push. This is because those files have been added by GitHub/GitLab as separate commits into your repository, and they don’t exist in your local repository yet, which means you have two repositories with diverging commit history. In this case, your repository will absorb the upstream changes and save them on top of your file.
Having made the first push into your repository, you can now open your GitHub/GitLab repository page in the browser and see your files uploaded there. Whenever you next make and commit your changes, syncing them to your computer is a single git push away.
A Few Reminders
If you push and then use commit --amend to fixup things, you will want to git push --force, since the last commit would’ve been amended, regenerating its hash and making it inconsistent with the last commit you just pushed into the remote repository. That said, doing force pushes is generally ill-advised, and you’re better off making an additional commit afterwards. This is mostly relevant if you’re working with others, because they might have pulled from your repository between you pushing the original commit and the amended one.
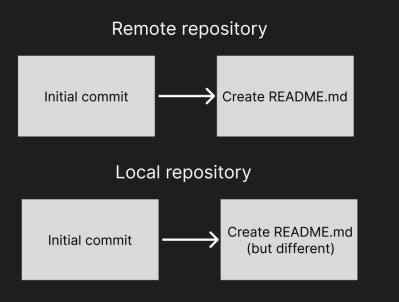
push --force, but typically a different solution is desired.If you ever need to download your repository on a different computer, the command you can use is git clone with the URL after it. The “Download ZIP” option is viable, but you don’t always have a web UI handy – for instance, on headless installs, like a Raspberry Pi you might be setting up with some self-written or helpfully provided software.
For me personally, as I use the command line heavily, I find git clone to be a way faster option compared to ZIP download. If the repository is public, using the HTTPS URL for cloning it won’t need any authentication – in fact, on GitHub and GitLab, you can git clone the repository URL as you see it in your browser. Try out git clone https://github.com/CRImier/jolly_wrencher_sao for example.
Shared For Everyone To Learn From
Both GitHub and GitLab are good options for a hardware hacker looking to keep a few PCB projects online, and you can always spin up a private server if need be. The upload process can be a bit involved to set up, but once you’ve set it up, you’re three commands away from getting the most up-to-date version of your PCB design online and available to all interested. Next time, I’d like to show how two or more hackers can collaborate on PCB projects using Git!



OK, great. I’ve uploaded my KiCad PCB design to Gitlab. How can I merge the changes someone else made?
Let’s find that out.
Email me at stappers AT stappers DOT it the URL of the gitlab URL.
I’ll git clone the project, make a change at KiCAD level and then create a merge request.
But, how do we visualize the changes in the PR?
Plotgitsch, maybe?
Kicaddiff for PCB compare
https://github.com/jorlee99/kicaddiff
I’ve seems for schematics something similar, but don’t remember.
Nice! I bet someone will make a git hosting platform just for electronics work that would have this feature.
Think source code.
Let CI handle the “binary” and run the tests.
Yes, introducing software development technics in the CAD world is in it’s early stage. You are welcome to join the ride.
Join like this? https://gitlab.com/users/EllisGL/projects
I worked at a company, 1993-1998 which did exactly this. Not only change management, but also workflow. We did all kinds of documents, but the software was originally developed to deal with AutoCAD files.
In short: good luck, have fun.
This functionality is usually called PDM/PLM. Git cannot merge anything except text so you will need different set of tools for it.
What would be great is a “build pipeline” which does automated testing just like software build pipelines with unit tests.
This is possible at least to some degree. Kicad does it itself when you submit new part footprints to their library.
It is possible, check out KiBot (https://github.com/INTI-CMNB/KiBot)
Allows you to generate most (all.?) of the outputs provided by kicad (sch, gerbers, bom, etc)
run it in a docker container, connect it to a gitlab ci instance, you’re good to go ! no more “hum should I use protel extensionfiles ? what’s that config I used last time for this manufacturer ?)
Push on develop, go take a coffee while it’s building, checks the outputs, merge on main, make a tag, push it back, go take another coffee, you’ve got gerbers, schematic and assembly files !
(I also imagined that it would be possible to connect the output to pcb manufacturers, inventree and suppliers, but it looks like a bad idea ^^)
https://github.com/INTI-CMNB/kibot
There is KiBot: https://github.com/INTI-CMNB/KiBot
which automatically exports Gerber files, PDFs, BOMs etc.
It can also be configured to run DRC & ERC automatically.
Works nicely with Github Actions as well.
You can; check out KiBot !
Allows you to automate output generation, (gerbers, assembly files, etc) and you can run it in a docker container, which allows you to connect it to gitlab CI….
It works well :)