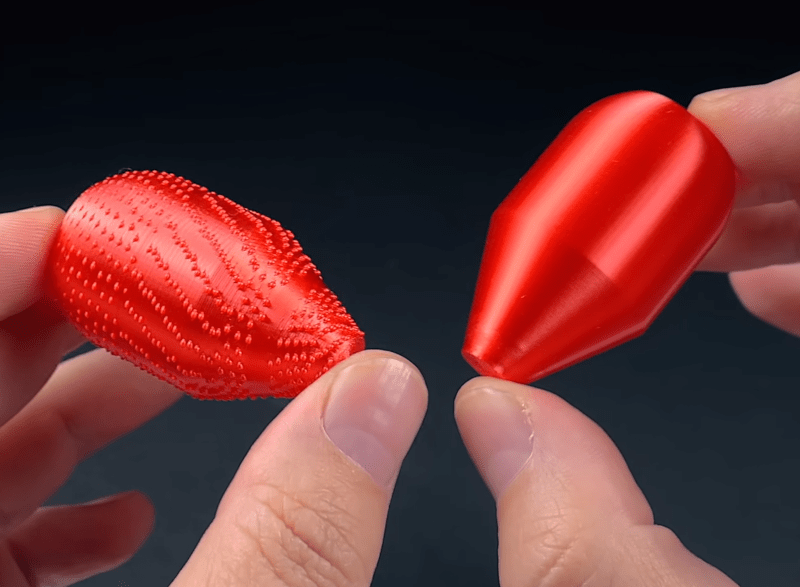
[Geek Detour] had a mystery to solve. A round part he was printing had a distinct pattern of blobs. If you’ve been 3D printing for any length of time, you know that pauses in printing can cause blobs like this. He also showed a perfectly-printed version of the same part and claimed it was from the same printer with the same material and even slicer settings. So what was causing the blobs? You can find the answer in the video below.
As you might guess from the title, however, the issue was the power loss recovery feature built into the printer. While there’s a lot going on in the video, you can break it down to a few items, all of which you can fix in one way or another including the simple fix: turn off power loss recovery.
If you have never used a printer with power loss recovery, the intent is to make it so that you can pick up a print job where it left off if the power dies. To do this, the printer periodically writes some state information to the SD card. If your SD card is slow or you are trying to print from the same SD card, you can trigger this problem. But there is more to it than that.
The first problem is that smooth, round objects like this tend to generate a lot of gcode. You can control this in several ways, including at design time and by setting the resolution of the slicing. What’s more, you can ensure you have support for arcs in your firmware and instruct your slicer to emit arcs or use a plugin for Octoprint called arc welder. This can significantly reduce the amount of gcode involved in these arcs.
Another possibility is to increase the buffers in your firmware. If you can rebuild Marlin, this is not very hard to do. The problem is that using the power loss feature is also tying up the SD card, so the more you can read ahead, the more time it has to write to the card for power loss. There is an Octoprint plugin called Buffer Buddy, by the way, that can give you some insight into your printing issues, although it can also hang your printer, especially — we’ve found — if you have Meatpack enabled to compress gcode over serial, too. Even if you don’t want to install it, the discussion of why curved lines sometimes cause blobs even over USB is well-explained in the README file, not to mention the associated blog post.
We also were impressed with [Geek Detour]’s time-lapse videos which are quite cinematic and use a motion-control camera. If you want to know more about arc welding (the 3D printer kind, not the spark-and-metal kind), we’ve talked about it before. If you want to know more about making time lapses of your 3D prints, we’ve covered that, too.


So what is the alternative? Raspberry pi with backup battery and fast RAM?
And why do I need to know more than the current line of GCODE if power cuts?
Note: I don’t own a 3d printer. I only programmed a few CNC mills, first in simulators then real hardware.
Actually, on large robotic servo-controller platforms it is common to see cheap high-current lead-acid battery banks as part of a power-supply. This is simply because the platform motors instantaneous power requirements can peak well above the service capacity of the building etc.
Even a small project running 12v NEMA17 sized motors can have stall-currents peak well above those LED lighting-ballast power supplies popular with hobbyists. If someone runs the drive logic from the same supply as the motor drivers, than brownouts can certainly occur as the machine enters a peak load condition at random locations in the CNC motion paths.
Another common mistake is trusting your wall power. A cheap line-conditioner like a tripp-lite LC1200 is pretty much a required upgrade in areas with large AC-motors / compressors etc… Nice if you want stable measurement instrumentation or power supplies with fewer issues. =)
That indeed seems to be the most sensible approach to back-up the entire system. Many such cases where currents spike, even with ESP8266 and ESP32 during wifi loads. Which of course is manageable with tiny capacitors. I love when people run more complex setups and it would be fun to read about professional 3D printing on HaD!
You need a bit more details than just the line you’re currently on because of e.g. arc-movements: if power cuts out halfway through an arc-move (while extruding, obviously), do you just skip the rest of the arc and move to the next line possibly causing a nasty-looking half-skipped arc, or do you restart the line from the beginning, attempting to just ram violently through the already-extruded part of the arc?
Thanks, I think I understand now the complexity just 1 instruction can have in 3D printing! Also nice to know that you need to log the process. I was naive enough to assume the XYZ would be enough.
I have had this issue before when streaming over USB on extremely detailed curves. In my case though printing via SD card was the solution.
Disclaimer, I used to work for Ultimaker.
During development of the Ultimaker 3, we often looked at this. Mostly to save/avoid emmc flash/disk corruption Linux issues at the time. The problem was ‘how to detect power failure’ and ‘what can we do with N ms. Especially that last part, flush buffers to storage, was the most important thing, as we did not use SD cards, so we would have to store progress data in Linux anyway. Obviously you want were as little as possible to avoid disk wear.
The simple answer always came back to, why do you need this? To avoid a ruined 10 hour print or some such. Well resuming g is _really hard_ anyway. E.g.after power failure, the gcode only helps with so much, the bed probably needs to be recalibrated etc. What I the print warped and moved? SSO many things that can fail.
The, without a doubt, best solution? Always the same, which works on Ultimaker with SD cards too. A UPS! If you print enough and don’t want to risk failure? Get a 300$ or something UPS. When a print is well on it’s way, the bed temp can be lowered and it should be able to print quite a bit. If brownouts are the issue? A smaller UPS already help a ton.
There was never enough demand, but plugging the UPS into USB could even do smart things based power status, finish layer, turn off/low heaters, retract or what have you, and wait for power return.
Agree, I got a $50 1500va ups on market place. When bed adhesion is based on temperature, unless you resume quick the print is gone. Currently upgrading the ups from lead acid to lifepo4. It does double duty keeping my internet alive in canada. Power issues are more than I liked.
I’d too like to upgrade my APC Smart Ups 1400 to LiFePO4, but can’t find enough data. Hint for a dedicated Had post?
There is a post on a forum somewhere about apc ups and it seems quite good. I have eaton so I’ll see how it goes then might have to use the temp probe to adjust charge voltage.
“If you can rebuild Marlin”. No, Marlin was never any good, except as an outdated proof of concept. Use Klipper and be done in 5 s. Also, just use an UPS if you are in a country without a stable power grid (ours has 99.99% uptime, so I really see no need).
It’s a good thing Marlin meets my 3D printing needs, because the rabid stans keep me from trying Klipper.
This must be what us Linux users sounded like to everyone else in the ’00s.
Slightly orthogonal to the post but I have to share my piece.
Marlin holds a special place in my heart for introducing me to the world of 3d printing. But the hardcoded parameter architecture made it so difficult to love. Yes, a handful of parameters are stored in EEPROM and can be modified post-compile, but the vast majority of settings and feature enablements are all hardcoded #defines. Yuck. So much time spent building and flashing.
I had to use git to version control my Config.h and Config_advanced.h files and do merges every time Marlin released a new update because they would change the format and add new lines.
Klipper saved my 3d printing life. All these problems disappear. My Klipper config file is now short, clean and portable. I know exactly what each line means and does because I wrote it. I can enable/disable features in 5 seconds over a web UI. The firmware running on the controller board is so generic, it doesn’t even know the GPIO pin map at compile time. Amazing! Everything is passed on to it externally. I never have to reflash the controller.
The whole system is just an all around joy to use.
I think the HAD audience would do well to look into it.
Add a UPS to a 3D printer.
I did this the first time I lost a print 7 hours into a 7h10m print. Didn’t think of doing it to a 3d printer until then (all other devices in my house have one), but I’ve been into brownouts and short blackouts and the UPS has saved a few prints already.
SD cards periodically need to do some internal maintenance for wear-leveling. They internally maintain some sort of “write journal” or queue in some intermediate flash location, and when the journal gets full they need to pause and apply all the writes in the journal to the bulk flash. This is how they’re able to get away with 512 byte blocks at the protocol layer, while using significantly larger physical flash block sizes.
They do this maintenance during block write commands, which is pretty much the only time the card is allowed to report that it’s “busy” for an arbitrary amount of time before it acknowledges that the write completed. When all you do is single block writes (presumably what Marlin’s doing), this maximizes the rate at which the write journal fills up, as well as tends to max out the time the card takes to tear through it. As a result, you can expect even a high end name brand SD card to be periodically busy for hundreds of milliseconds when used in an embedded system like this.
Even worse, SD card firmwares aren’t perfect, and a sudden power loss in the middle of an internal maintenance operation can result in internal corruption of the the firmware itself, and a bricked SD card.
This seems like a perfect use-case for ferroelectric RAM, or classic battery-backed SRAM.
This! Finally a use for FRAM!
(Or a battery.)
I’ve wanted to try FRAM in a design for some time now, but the price has always been way too high. If the price dropped significantly, using FRAM would be a no brainer in our designs.
Put that thing in a music box and see what plays.
And blobs align in this pattern? No. There is simple fix for this shape which is arc wielder. Works like charm.
It is not always the solution. I had to disable arc welder to reduce blobs on my Lotmaxx shark with stock firmware.
Looks like those drums with pins in musical clocks.
I was thinking of a strawberry.
The way the duet board / RRF firmware handles it is by looking for voltage drops on the Vin line
with a setting to check if it drops below a certain threshold in which case pause the print and save the resume state as g-code.
I suspect this is a much better method than periodically saving to the SD every few mins