Hacking Google With Plasma

Google recently made some videos to highlight cybersecurity. The video below is episode three, and it tells an interesting story about the first crash test dummy. However, the really interesting part is the story about a USB plasma globe built to hack into computers. One of the people who built that globe tells the story of its insides in a recent blog post that has a bit more technical detail.

The attack in question was in 2012, when people were starting to get the idea that inserting random USB drives into their computers wasn’t a great idea. However, what harm could there be in a cute little plasma globe that just draws power from the port?

Continue reading “Hacking Google With Plasma”

This ESP32 CAN!

Since modern cars use the CAN bus for so many of their functions, it’s unsurprising that it’s a frequent object of interest for those in our community. Some people go no further than commercial plug-in analysers, while others build their own CAN devices. This is what [Magnus Thomé] has done, with his RejsaCAN microcontroller board.

It’s a small PCB with an onboard CAN interface from an ESP32-S3 and a car-friendly power supply circuit, and perhaps most importantly, it has an auto-shutdown feature to prevent battery drain. Software-wise it’s a blank piece of paper for the user to roll their own application, but since the ESP32 is supported by the Arduino ecosystem, there are libraries that make talking CAN as easy as it can be.

[Magnus] has a list of potential applications for the board, many of which take advantage of the ESP’s wireless capabilities. So far, [Magnus] has hooked it up to an LCD display, but we can see so many other useful things coming out powered by something like this.

You haven’t tried playing with your car’s CAN bus yet? Maybe you should read this to whet your appetite.

Amateur Rocket Aims For The Kármán Line, One Launch At A Time

When it comes to high-powered rocketry, [BPS.space] has the unique distinction of being the first to propulsively land a solid-fueled model rocket. How could he top that? Well, we’re talking about actual rocket science here, and the only way is up! All the way up to the Kármán line: 100 km. How’s he going to get there? That’s the subject of the video below the break.

Getting to space is notoriously difficult because it’s impossible to fully test for the environment in which a rocket will be flying. But there is quite a lot that can be tested, and those tests are the purpose of a rocket that [Joe] at [BPS.space] calls Avalanche. Starting with a known, simple design as a test bed, numerous launches are planned in order to iterate quickly through several launches- three of which are covered just in this video.

The goal with Avalanche isn’t to get to the Kármán line, but to learn the lessons needed to build a far bigger rocket that will. A home-brewed guidance system, a gimballed spin-stabilized 4K camera, and the descent system are among those being tested and perfected.

Of course, you don’t have to be a rocket scientist to have fun with prototyping. Sometimes you just want to 3D print a detonation engine, no matter how long it won’t last. Why not?

Continue reading “Amateur Rocket Aims For The Kármán Line, One Launch At A Time”

Power Loss Recovery Might Make 3D-Printed Blobs

[Geek Detour] had a mystery to solve. A round part he was printing had a distinct pattern of blobs. If you’ve been 3D printing for any length of time, you know that pauses in printing can cause blobs like this. He also showed a perfectly-printed version of the same part and claimed it was from the same printer with the same material and even slicer settings. So what was causing the blobs? You can find the answer in the video below.

As you might guess from the title, however, the issue was the power loss recovery feature built into the printer. While there’s a lot going on in the video, you can break it down to a few items, all of which you can fix in one way or another including the simple fix: turn off power loss recovery.

Continue reading “Power Loss Recovery Might Make 3D-Printed Blobs”

a comparison of the before and after

Compensating For Your TVs Backlight

[Pekka Väänänen] has a Panasonic TV with a broken backlight that creates an uneven pink/green color. While it isn’t a huge deal for most films, black-and-white films tend to show the most effect. So, by modeling the distortion as a function, [Pekka] set out to find an inverse function that corrects the distortion before it gets to the TV.

However, the backlight doesn’t emit enough light for some colors, which means the blue and green channels need to be dimmed. As mentioned earlier, the distortion isn’t even, so the distortion needs to be captured and then calculated.

He took a few pictures with his phone, corrected the perspective, and applied a blur. The camera also has some distortion but works as a first approximation, but that isn’t something he covered here. Next, he set up a webcam and pointed it at the TV, trying to find good gain and offset values with a bit of Python.


Now it just becomes a problem of minimizing the per-pixel difference. Ultimately he just went for a random approach rather than an annealing or hill-climbing approach. Now that he had a function to apply, it was just a matter of adding a custom shader to his video player, which includes a live shader editor. He had to hack in support for an external texture, but he is kind enough to include the shader code and the patch in the article.

The result is excellent, and it’s a great use for an old TV. But perhaps, in some cases, it might be worth replacing the backlight entirely.

RF Hacking Hack Chat

Join us on Wednesday, October 12 at noon Pacific for the RF Hacking Hack Chat with Christopher Poore!

On the time scale of technological history, it really wasn’t all that long ago that radio was — well, boring. We’re not talking about the relative entertainment value of the Jack Benny Show or listening to a Brooklyn Dodgers game, but about the fact that for the most part, radio was a one-dimensional medium: what you heard was pretty much all there was to a signal, and radio was rarely used for anything particularly hackable.

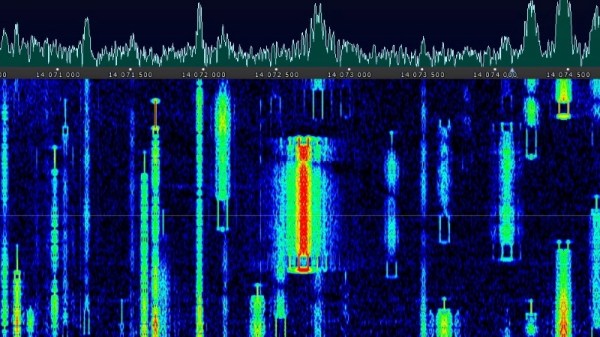
Not so today, of course, where anything electronic seems to have at least one radio stuffed into it, and the space around us is filled with a rich soup of fascinating RF signals. For hackers, this is where radio gets interesting — listening in on those signals, exploring their nature, and figuring out how to put them to use are like red meat for most of us.

join-hack-chatHacking and reverse engineering opportunities abound in the RF realm, but can sometimes be a bit difficult. What’s needed is a framework for pulling those signals out of the ether and putting them into some kind of context. Fortunately, there are plenty of tips and tricks in this space; we talked about one of them, FISSURE, not too long ago. The acronym — “Frequency Independent SDR-Based Signal Understand and Reverse Engineering” — about sums up what this framework is all about. But to bring it into further focus, we’re lucky enough to have Chris Poore, a Senior Reverse Engineer at Assured Information Security, drop by the Hack Chat. We’ll talk about RF reverse engineering in general and FISSURE in particular. Be sure to stop by with your RF hacking and reverse engineering questions and war stories!

Our Hack Chats are live community events in the Hackaday.io Hack Chat group messaging. This week we’ll be sitting down on Wednesday, October 12 at 12:00 PM Pacific time. If time zones have you tied up, we have a handy time zone converter.

Simple CNC Gear Production With Arduino

We’ve seen plenty of people 3D printing custom gears over the years, but [Mr Innovative] decided against an additive process for his bespoke component. He ended up using a simple CNC machine that makes use of several components that were either salvaged from a 3D printer or produced on one. Using a small saw blade, the machine cuts gear teeth into some plastic material and — presumably — could cut gears into anything the saw blade was able to slice into, especially if you added a little lubrication, cooling, and dust removal.

If you’ve built a 3D printer, you’ll see a lot of familiar parts. Stepper motors, aluminum extrusion, straight rods, bearing blocks, and rod holders are all used in the build. There’s also a lead screw and the associated components you usually see in a printer’s Z-axis. Naturally, an Arduino drives the whole affair.

The saw blade was custom-made from a washer, grinding an edge and using a 3D printed template to cut teeth in it. We might have been more inclined to use a cut-off wheel from a rotary tool, but this certainly did the trick. An LCD accepts the gear diameter and number of teeth. The stepper rotates the correct number of degrees and another stepper lowers the cutting head which is spinning with a common DC motor.

As impressive as this machine is, the fact remains that a 3D printer can produce more complex designs. For example, a herringbone pattern can help with alignment issues. It has been done many times. You can even use a resin printer, although you might prefer to stick with FDM.

Continue reading “Simple CNC Gear Production With Arduino”