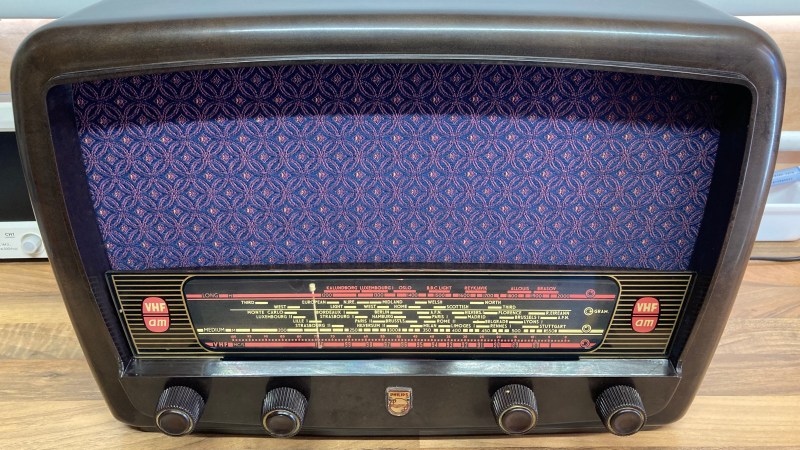
Ever wanted a good, good look at the insides of a 1950s radio, along with fantastic commentary on the internals and the purpose of various components? Then don’t miss [Adam Wilson]’s repair and restoration of a 1956 Philips 353A, a task made easier by a digitized copy of the service manual. [Adam] provides loads of great pictures, as well as tips on what it takes to bring vintage electronics back to life. What’s not to like?
Vintage electronics like this are often chock-full of components that deteriorate with age, so one doesn’t simply apply power to see if it still works as a first step. These devices need to be inspected and serviced before power is ever applied. Even then, powerup should be done with a current-controlled source that can be shut down if anything seems amiss.
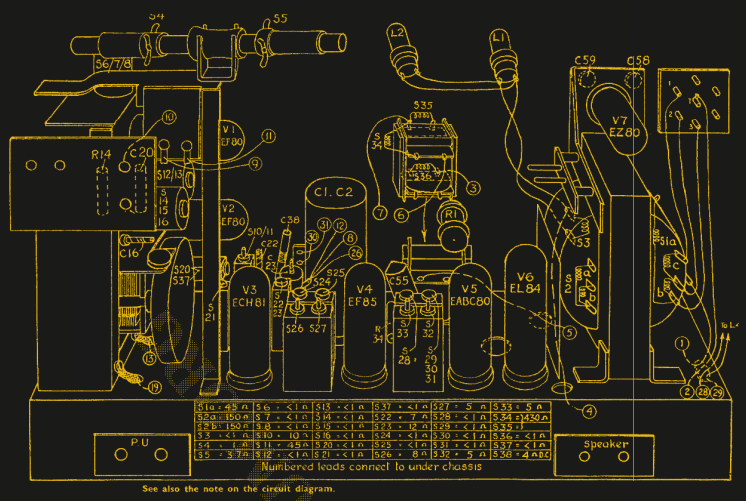
Devices like these largely predate printed circuit boards, so one can expect to see plenty of point-to-point soldering. Vacuum tubes did much of the hard work, so they are present instead of integrated circuits and transistors. Capacitors in the microfarads were much larger compared to their modern equivalents, and paper/wax capacitors (literally made from rolled-up paper covered in wax) handled capacitances in the nanofarad range instead of the little ceramic disk caps of today.
One thing that helped immensely is the previously-mentioned Philips 353A service manual, which includes not only a chassis and component layout, but even has servicing procedures such as cord replacement for the tuning dial. Back then, a tuning dial was an electromechanical assembly that used a winding of cord to rotate the tuning capacitor, and replacing it was a fiddly process. If only all hardware was documented so well!
The end result looks wonderful and still has great sound. As a final tweak, [Adam] added an external audio input cable as a nod to the modern age. Now, we have in the past seen a small LED screen integrated convincingly into an antique, but in this case [Adam] kept the original look completely intact. You can see it in action, playing some Frank Sinatra in the short video embedded below.


Nice work! I wonder if this one required an isolation transformer as these old radios can sometimes give a nasty surprise due to non-polarized AC source plugs.
I think you’ll have a hard time plugging in a BS1363 the wrong way around.
I mean the first thing the AC mains is going to go through in tube gear is a transformer (perhaps a fuse and of course the main power switch).
Anybody bringing old tube tech back to life will want to invest in a nice variac. And build a light bulb current limiter as well. Putting an incandescent in series with the gadget is a good way to a.) prevent excessive over-current (usually because of an ancient filter cap that has given up the ghost) and b.) it provides a visual indicator for any sudden jumps in current.
Old electrolytics like to be replaced. At the very least, bring them up to mains voltage s l o w l y. 10 volts every 20 minutes as a rule of thumb.
Test the rectifier tubes for shorts. A lot of the old stuff had no fuses. Put one in. As the gizmo comes up to full power, check often for odd smells (roasting old dust is normal, burning insulation or other noxious fumes is not). Tubes should get pretty hot, but caps shouldn’t. Check the transformers for signs of wax melting and leakage. The iron will heat up in time, but if transformers get hot immediately that’s usually bad.
It’s always a good idea to use an isolation transformer whether the radio has an internal power transformer or not.
There’s no guarantee the AC in an old radio is going to go through a transformer. A great many sets back in the day were of the “All-American-Five” design (using five tubes), which had no transformer; incoming AC was routed through the five tube heaters and a resistor (often part of the line cord) which summed up to 110 volts. The B+ was also derived from the AC line. Usually the radio chassis was used as the AC line return. Of course, line cords were not polarized back then, so you had a 50-50 chance of the hot side of the line being connected to the radio chassis, which could easily give you quite a zap if you weren’t careful.
Mmmm live chassis… Electrical safety sure has come a long way!
From the images, it looks like this is a transformer set, so external isolation is probably not necessary.
One thing I didn’t notice in this set–but add to every vintage radio I fix/restore–is a fuse.
It is also my habit to add 3-conductor grounded power cords.
oops…spoke before looking at the diagram. This one shouldn’t need an isolation xfrmr but many do.
No, it’s fine, I think. It’s good if someone addresses such dangerous things.
Speaking of, the paper condensers were dangerous, too.
Because, they could “hit through” and cause a short/failure.
Not cool, if it’s used for galvanic insulation etc. Or as a DC blocker.
Agreed. I restore old radios as well, usually of the Drake or Yaesu variety. But I ran across a Hallicrafters S-38 awhile back and ran into the need for an isolation transformer for the first time. Since then I’ve run across several devices needing one which is why I mentioned it.
Caps ALWAYS need replacement. If they’re over 10-15 years it’s a matter of when, not if. And lately I’ve run across a lot of resistors that were open or shorted, more so than normal.
Brings back memories…senior year in high school (72-73) I took a course in “electronics and power mechanics” in which we each built the “All American Five”, five-tube AM radio. We learned the designations of the five tubes (in that model) to the point that it almost became a litany: 12AB6, 12BE6, 12AV6, 35W4, 50C5. The heater voltages add up to 121 volts and so were connected directly to line voltage in series, so a mains transformer wasn’t required, which kept the cost down.
I was showing a younger brother the chassis, and pointing out the connections to to the rectifier, when I accidentally found out that if you touch the wrong pin you can both feel 170 V (half-wave rectified DC) and hear the 60 Hz hum… :-O
FInally, someone who actually restored it, and didn’t simply dump out the components, polish the shell, and place an arduino or some other crap inside.
I agree. I restore radios in my spare time.
But the latest annoying issue isn’t an Arduino, it’s these damn LED lights. The RF that many of them broadcast bleeds right into most of these old radio’s chassis.
I mean, if is was going to a scrapyard, wether it is fully restored or repurposed with an arduino/raspi doesn’t matter, as long as it is getting a second life.
There is plenty of old radios laying around, most of them were cheap in the 50’s, and a full restore is not always worth it.