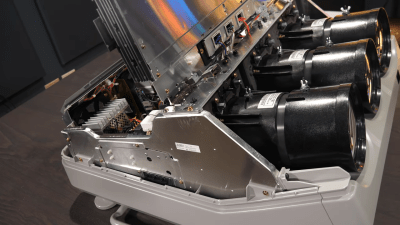
Sometimes you find something that looks really cool but doesn’t work, but that’s an opportunity to give it a new life. That was the case when [Davis DeWitt] got his hands on a weird Soviet-era box with four original Nixie tubes inside. He tears the unit down, shows off the engineering that went into it and explains what it took to give the unit a new life as a clock.
Each digit is housed inside a pluggable unit. If a digit failed, a technician could simply swap it out.
A lot can happen over decades of neglect. That was clear when [Davis] discovered every single bolt had seized in place and had to be carefully drilled out. But Nixie tubes don’t really go bad, so he was hopeful that the process would pay off.
The unit is a modular display of some kind, clearly meant to plug into a larger assembly. Inside the unit, each digit is housed in its own modular plug with a single Nixie tube at the front, a small neon bulb for a decimal point, and a bunch of internal electronics. Bringing up the rear is a card edge connector.
[Taylor and Amy] love taking on retro computer projects. This week they’re building a MiniPET from Tynemouth and The Future is 8 Bit. It’s a pretty awesome kit which sadly isn’t available anymore. Taylor bought one of the last ones as part of a charity sale at the 2023 Vintage Computer Festival Southwest.
If you haven’t seen their YouTube channel yet, check it out! The two have been best friends since 1984. Their channel has just the right mix of education and comedy, with pacing fast enough to keep things interesting. It’s really refreshing to see two people enjoying a project together.
The MiniPET is of course a reproduction of the hardware in the Commodore PET, the machine which predated the VIC-20 and of course the Commodore 64. The kit starts with installing a few discrete parts — resistors, capacitors, and diodes. Then come the IC sockets. [Taylor and Amy] ran into a bit of trouble when it came time to install the chips. While installing the 40-pin 65C21 Peripheral Interface Adapter (PIA), one pin bent under the socket. [Taylor] popped the chip back out, and replaced it — which resulted in 3 bent pins!
Anyone who’s installed new DIP parts has been through this. The pins are always bent out a bit from the factory. The old “Bend it in using a table” method usually works — but if you want perfect pins, try a pin straightener. These versatile tools can even be 3D printed.
Once the pin problems are solved, it’s time to power up the kit and see if it will work. That’s when we get to see that magic moment when a project first comes to life. Check out the video – you’ll see what we mean.
[Joren] recently did some work as part of an electronic music heritage project, and restored an 80s-era NeXTcube workstation complete with vintage sound card, setting it up with a copy of MAX, a graphical music programming environment. But there was one piece missing: MIDI. [Joren] didn’t let that stop him, and successfully created hardware to allow MIDI input and output.
The new panel provides all the connectors necessary to interface with either classic MIDI devices, or MIDI over USB (where it appears as a USB MIDI device to any modern OS.)
Interestingly, the soundcard for the NeXTcube has an RS-422 serial port and some 8-pin mini DIN connectors. They are not compatible with standard MIDI signals, but they’re not far off, either.
A metal enclosure with a 3D-printed panel rounds out the device, restoring a critical piece of functionality to the electronic music-oriented workstation.
MIDI as a protocol isn’t technically limited to musical applications, though that’s one place it shines. And just in case it comes in handy someday, you can send MIDI over I2C if you really need to.
There’s a strange synchronicity in the projects we see here at Hackaday, where different people come up with strikingly similar stuff at nearly the same time. We’re not sure why this is, but it’s easily observable, with this vintage altimeter teardown and repair by our good friend [CuriousMarc] as the latest example.
The altimeter that [Marc] dissects in the video below was made by Kollsman, which is what prompted us to recall this recent project that turned a jet engine tachometer into a CPU utilization gauge. That instrument was also manufactured by Kollsman, but was electrically driven. [Marc]’s project required an all-mechanical altimeter, so he ordered a couple from eBay.
Unfortunately, thanks to rough handling in transit they arrived in less than working condition, necessitating the look inside. For which we’re thankful, of course, because the guts of these aneroid altimeters are quite impressive. The mechanism is all mechanical, with parts that look like something [Click Spring] would make for a fine timepiece. [Marc]’s inspection revealed the problem: a broken pivot screw keeping the expansion and contraction of the aneroid diaphragms from transmitting force to the gear train that moves the needles. The repair was a little improvisational, with 0.5-mm steel balls used to stand in for the borked piece. It may not be flight ready, but it worked well enough to get the instrument back in action.
[Emupedia]’s work to preserve computer history by way of making classic and abandoned games and software as accessible as possible is being done in a handy way: right in your browser with EmuOS.
A few moments of BIOS startup kicks off EmuOS right in a browser window.
Doing things this way has powerful “Just Works” energy. Visit that link in a modern browser and in no time at all you’ll be looking at a Windows 95 (or Windows 98, or Windows ME) desktop, filled with a ton of shortcuts to pre-installed and ready-to-run classic software. Heck, you can even keep it simple and be playing the original Microsoft Solitaire in no time flat. There is also a whole ton of DOS software waiting to be fired up, just double-click the DOSBox icon, and browse a huge list. The project is still in development, so not everything works, but the stuff that does is awfully slick.
Cloudy with a chance of concrete? The “success” of last week’s brief but eventful Starship launch has apparently raised some regulatory eyebrows, with the Federal Aviation Administration launching an investigation into the destruction wrought by the mighty rocket. And it’s not just the hapless Dodge Caravan that they’re concerned with — although we found some fantastic POV footage that shows the kill shot as well as close-ups of the results — but also the damage rained down upon residents around the Boca Chica launch complex. Tons of concrete and rebar were excavated by the 33 Raptor engines during the launch and sent in all directions, reportedly landing up to 6 miles (10 kilometers) from the pad. What’s worse, a lot of debris ended up on beaches that are home to endangered species, which has the Sierra Club also taking an interest. The FAA has apparently nixed any launches from the Texas facility until they complete their investigation.
The Fisher-Price See ‘n Say was introduced back in 1964, and since then has helped teach countless children the different sounds made by farm animals. But what about our urban youth? If they’re going to navigate a concrete jungle, why not prepare them to identify the sound of a jackhammer or the chime that plays before an announcement goes out over the subway’s PA system?
That’s the idea behind this hacked See ‘n Say [John Park] put together for Adafruit. Now we should note up front that no vintage toys were sacrificed during the production of this gadget — it seems Fisher-Price (predictably) dropped the tiny record player these toys used to use for a cheap electronic board sometime in the 90s. A quick check with everyone’s favorite A-to-Z megacorp shows you can pick up one of these new-school models for around $25 USD.
The modern electronic version of the toy is easy to mod.
Cracking open the electronic version of the See ‘n Say reveals a circular PCB with a series of membrane buttons that are pressed by the mechanics of the spinning pointer. As it so happens, there are handy test points next to each of these buttons, which makes it simple to wire up to a microcontroller.
In this case, it’s Adafruit’s KB2040, which is connected to a MAX98357A amplifier board over I2S. A small boost converter module is used to wring 5 volts out of the toy’s pair of AA batteries. The original speaker is repurposed, though [John] adds a physical power switch to keep the boost converter from flattening the alkaline batteries when not in use.
On the software side, all you’ve got to do is load the MCU with your sounds and write a bit of code that associates them with the button being pressed on the PCB. [John] gets his city sounds from Freesound, a community-maintained database of Creative Commons Licensed sounds, and provides the CircuitPython code necessary to tie everything together.
The last step is the artwork. For this project, [Brian Kesinger] provided some swanky vintage-looking imagery that perfectly fits the See ‘n Say style. The art is available under the NonCommercial-ShareAlike Creative Commons license, so you’re free to use it in your own version. Though naturally, that assumes you’ve decided to use the same sounds as [John] — the beauty of this project is that you could easily load it up with whatever sounds you’d like Hacker Junior to learn. Possibly a well-known Australian YouTuber?
If anyone feels inclined to build a Hackaday-themed See ‘n Say based on this project, we’ve love to see it.