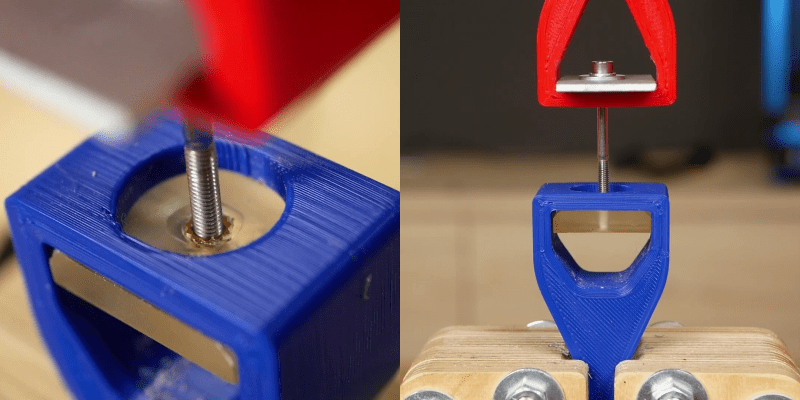
Threaded inserts are great for melting into FDM prints with a soldering iron. The process isn’t so simple for resin prints, since they don’t generally soften with heat. Off course, you can also print the threads directly, screw a bolt into an un-threaded hole, or tap a hole. Following his usual rigorous testing process, [Stefan] from CNC Kitchen investigated various ways of adding threaded holes to resin prints.
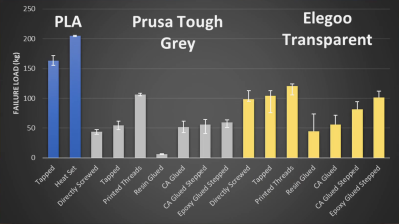
After establishing a pull-out force on PLA using threaded inserts (205 kg) and tapped holes (163 kg), [Stefan] tested parts printed with Prusament Tough Anthracite resin. Un-threaded and tapped holes failed at 44 kg and 55 kg respectively, while printed threads were almost twice as strong, reaching 106 kg before breaking. Stephan also tried gluing inserts into the parts using resin and CA glue. The resin didn’t cure properly in the opaque parts (6 kg) while CA was comparable to plastic threads, failing at 52 kg.

[Stefan] also tested regular ELEGOO Translucent resin. The higher hardness of the cured resin allowed the parts to hold on to around 100 kg for un-threaded and tapped holes, while printed threads reached 120 kg. Threaded insert glued with resin did better on the transparent parts thanks to improved UV penetration, but were very inconsistent. Inserts glued with CA performed about the same as on the Prusament parts, failing at 56 kg.
In an attempt to improve the performance of the inserts [Stefan] printed some parts with stepped holes to match the geometry of the inserts, which had the advantage of preventing the insert from falling through during gluing. It only made a marginal difference on the Prusament parts but boosted the strength of CA-glued inserts on the ELEGOO resin to 82 kg. Two-part epoxy was also tried, which matched the un-threaded holes in strength.
So for resin parts you’ll probably be best served by just modeling the threads in CAD and printing them directly. If you need to be able to repeatedly screw and unscrew fasteners in a hole without stripping, threaded holes with CA or epoxy might be a better solution.


Good work – thanks!
I’m a little surprised about the absolute numbers. A single M3 bolt in PLA will hold more than twice my weight?
For comparison, a Fischer Dübel for fixing a screw into drywall board of 1/2 inch 12.5mm thickness is rated for holding 8kg with a 4-5mm screw. https://www.fischer.de/de-de/produkte/hohlraum-befestigungen/plattenduebel/gipskartonduebel-gk
I understand that this is rated load (including safety factors) vs. breaking load… But still
it’s not the screw, it’s the drywall that limits it for the fisher item you linked…
M3 Class 4.6 (lowest) can take 450 lb
M3 Class 12.9 can take 1380 lb
https://www.engineeringtoolbox.com/metric-bolts-minimum-ultimate-tensile-proof-loads-d_2026.html
We want to remind the honored readers that this only applies to static and strict axial loads.
If we have pulsating, cyclic, not very axial loads or even more a combination of any of these, we are knee deep in stress analysis calculations. Or we choose a safety factor of 10.0 (ten, ok, might work with less, may be 7.9 to 8.1) and lots of low/middle class screws.
It also assume they are made of a steel like substance. Chineseium on the other hand…
>A single M3 bolt in PLA will hold more than twice my weight?
For a brief moment, until the plastic starts to creep.
A quick and dirty stress analysis, assuming you have PLA plastic, an M3 bolt, and 5-6 threads in contact, gives a stress area of about 10 sq-mm and the plastic should stand about 50 MPa, which is Newtons per sq-mm, so 500 Newtons, or roughly 50 kilograms. However, 10-100 hours later the plastic creep has set in and the screw will pull the threads off anyways.
I found that just changing resin from Anycubic’s ultra brittle eco resin to their tough resin was night and day. Didn’t measure it, but anecdotally just printing round holes at about the tap drill diameter (and then maybe tweaking from there) gives me pretty good results. Haven’t had any failures yet whereas with “standard” resin the walls would crack every time. Using M1.7 screws that have pointed tips. I suspect they self-tap a bit better into tough filament that has a little bit of flex than the flat bottom style ones.
I’d like to see this test done with tough or engineering resins too, since Elegoo standard is far from the strongest resin on the market (though, maybe stiffness is more important here, idk).
Has anybody tried casting the threads with epoxy on a greased bolt? I accidentally did something similar with gorilla snot and was wondering if it’s a known technique?
Nice test and video, but it seems I’m drawing some different conclusions.
First, the resin stuff is not very strong, but that was already known.
Second: epoxy does not bond the the resin, so don’t use it.
Third: These in-melt nuts do not work properly when glued. Even directly threaded is twice as strong.
Strengthening nuts in the resin type of plastic needs a whole different approach.
Maybe rampa nuts work, but the resin may be too brittle.
Other options are heli coils, or the threaded inserts which also have thread on the outside.
These last two methods work by increasing the diameter, and therefore increasing the surface area.
Second the external/internal thread inserts, particularly if the are bonded to the print with a suitable resin/glue. The enemy with threads is not always the holding force of the insert, but forces acting on the thread while inserting the screw (torque mostly).
Print threads for an insert like this:
https://www.anzor.co.nz/threaded-inserts/wood-threaded-inserts
https://www.ezlok.com/threaded-inserts-for-wood
It allows much more resin for each thread, as the thread cross section is so fine. A normal bolt/nut thread is 50/50 since the bolt material is the same strength as the nut material.
Third option is rivet nuts. They’re designed to physically expand in the hole and either jam against the sides or grab a hold from the other side of a thin sheet. Of course if the fit is not right then the rivet will shatter the plastic.
Though of course you can insert the rivet from the “wrong” side, so the flange will catch and you won’t even need to expand it.
In my experience inserts with external/internal thread is the safest overall, particularly when sizes are less than 3mm or when thread length is limited. I size the hole, tap external thread, thread the insert and reinforce with glue. Also consider how much repeated use the thread will get. A metal insert will be your friend here.
There are also threaded inserts that expand when you insert the bold so you don’t need to heat them. I have a handfull (M3 and M4) of them for over 40 years (way before 3D became a thing).
I was going to say something similar – the brand name I’ve used before is Helicoil, but there are others out there. Model / print at the appropriate size and then use the wire insert.
Unless it is a very big block, it will put the part into tension or hoop stress, which that epoxy is incredibly weak for.
Design in a slot. Slide in a nut. Seems easy, reliable and strong.
I like to put the insert on the opposite side of the part and run the bolt through so that it is pulling the insert further in, not out. So long as you can somehow manage to glue it in tight enough that it doesn’t turn when you try to tighten the screw that shouldn’t be going anywhere!
I might be inclined to use a TimeSert insert. We used them in magnesium for years where steel studs pulled the material over time. They come in a number of sizes and might just have a solution just for plastic.