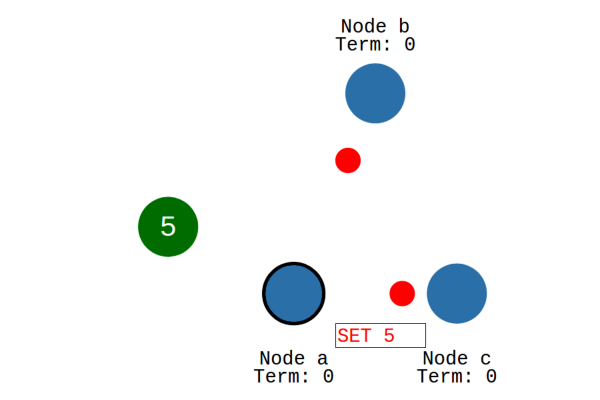
With billions of computers talking to each other daily, how do they decide anything? Even in a database or server deployment, how do the different computers that make up the database decide what values have been committed? How do they agree on what time it is? How do they come to a consensus?
But first, what is the concept of consensus in the context of computers? Boiled down, it is for all involved agents to agree on a single value. However, allowances for dissenting, incorrect, or faulting agents are designed into the protocol. Every correct agent must answer, and all proper agents must have the same answer. This is particularly important for data centers or mesh networks. What happens if the network becomes partitioned, some nodes go offline, or the software crashes weirdly, sending strange garbled data? One of the most common consensus algorithms is Raft. Continue reading “Building Your Own Consensus”→
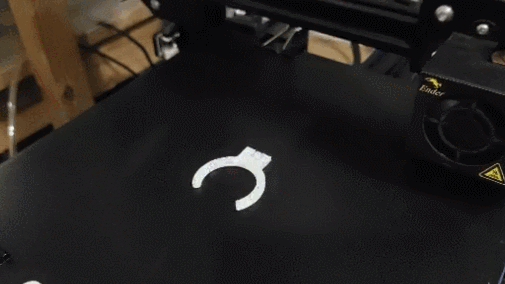
The trick to producing great 3D printing time-lapse animations is to ensure that the extruder has moved out of the frame each time a photo is taken — which usually requires OctoPrint to be controlling both the camera and printer. But [NirL] managed to bodge up a system to get the same result with a spare limit switch, a resistor, his mobile phone, and an old set of earbuds. Not bad for some spare parts and a little extra G-Code.
The print head hits a remote shutter button during a brief parking action after each layer.
Inserting custom G-Code to park the print head at regular intervals takes care of standardizing the printer’s movements; there’s even a post-processing extension in Cura that makes this easy. As for triggering the camera, [NirL] was inspired by the remote shutter button on a selfie stick. By positioning a physical switch in such a way that the print head pushes it every time it (briefly) parks, a photo gets taken for every layer. Essentially the same thing Octolapse does, just with fewer parts.
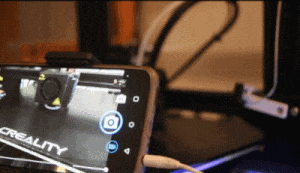
To create the DIY remote shutter button, [NirL] used a spare limit switch, resistor, and cannibalized an old set of earbuds for the cable and 4-conductor 3.5 mm audio plug. Most phones and camera apps trigger the shutter when they receive a Vol+ signal through the audio plug, which is done by connecting MIC and GND through a 240 Ohm resistor.
In this way a photo is snapped for every layer, giving [NirL] all that is needed to assemble a smooth animation. Sure, it ties up a mobile phone for the duration of the print, but for just a few spare parts it does the job. You can see the project in action in the video, embedded just under the page break.
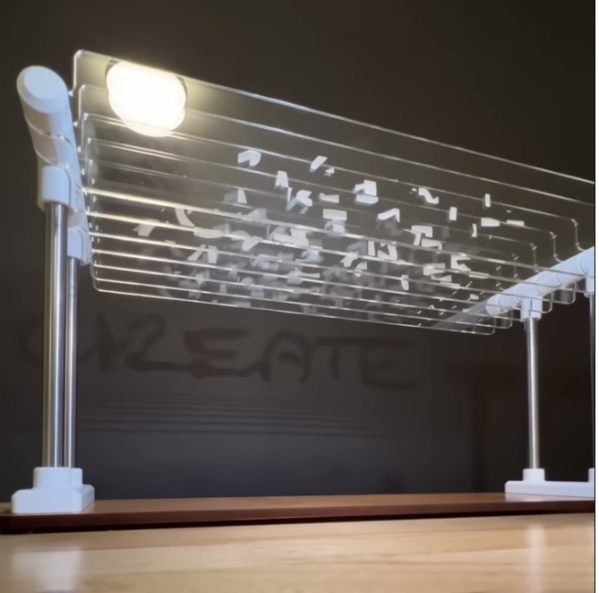
[JBV Creative] recently became a proud owner of a laser cutter and, like most of us, started to think about what they could make with it. The answer was simple, a clever little piece of art or puzzle made of stacked acrylic.
He created some text and extruded it from a single point, but not every part intersected with every plate, giving each plate an indecipherable appearance. This allows a small light source (like the LED likely on the back of your phone) to cast a shadow on the wall. With some 3D printed brackets and spacers, it was mounted to a nice piece of cherry plywood. Overall, the technique is quite simple and easy to understand. [JBV Creative] didn’t include more detail on the process, which is a shame because it looks like a beautiful effect to recreate for some puzzles.
These glowing coasters are fantastic if you’re looking for engraved acrylic with a light source. Or this puzzle that lights up as the pieces are placed.