A benchtop power supply is a key thing to have for any aspiring electronics hacker. While you can always buy one, plenty of us have old computer PSUs lying around that could do a fine job themselves. [Frugha] decided to whip up a neat 3D-printed design for converting any ATX PSU into a usable bench unit.
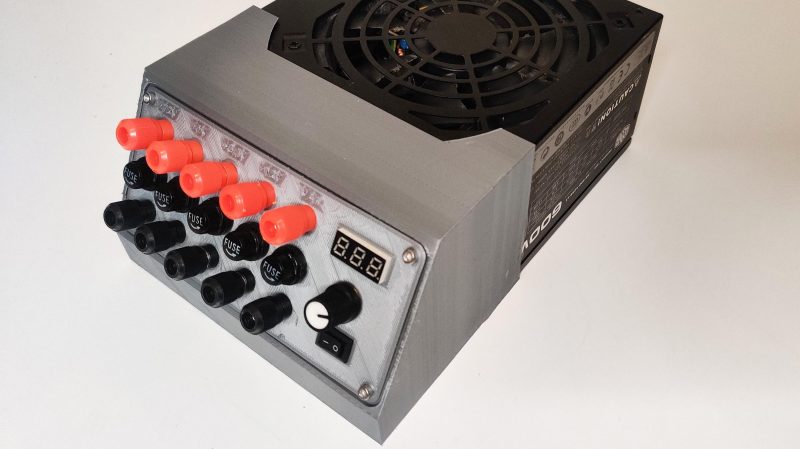
The design features banana plugs outputting +12V, -12V, +5V, and +3.3V, with all outputs appropriately fused for safety. There’s also a fused stepdown converter used to supply variable voltages as needed. Its original trimpot was replaced with a multi-turn pot for ease of control. To make everything work, a load resistor on the 5V circuit makes the power supply think it’s hooked up to a motherboard. It’s all wrapped up in a neat slant-sided 3D-printed case that fits onto the ATX power supply itself.
The result is a neat and tidy power supply built out of readily-available components. We particularly like the addition of the stepdown converter – most ATX-based projects don’t offer variable output, which can nonetheless come in handy.
We’ve seen some other great builds along these lines before, too. If you’ve been cooking up your own homebrew power supply, don’t hesitate to share it on the tipsline!


Come on ?? Again !??
You can never have too many bench power supplies. Looks good!
Or too many DVMs, just as cabinetmakers can not have too many clamps.
You can never have too many STABLE AND QUIET bench power supplies. It is tempting to use an ATX SMPS because it’s cheap and available, but it’s about the worst power supply you can get in terms of ripple, noise and regulation. These things aren’t designed to power anything directly, since nowadays all PC components come with their own voltage regulators.
Only if you are using the cheapest of the cheap bargain-basement PSUs. The ATX12V spec is pretty stringent on allowable sag and ripple at high loads, and most decent power supplies exceed those specs.
Components come with their own voltage regulators because they require ~1v at hundreds of amps, which is not viable to connect to a remote power supply via wiring or PCB traces.
If you don’t mind ±5% voltage tolerance and 1% wideband ripple, then it’s ok. But this isn’t good enough for analog stuff, not even for an Arduino if you want to use the ADC (most Arduinos have AVCC tied directly to +5V).
I like the custom from end! I made mine by adding jack to the existing care, and it look like I added jacks to an existing case!
The fuse for each circuit is also a nice feature.
Not that the fuses are bad, but don’t these supplies have overload protection? Maybe a standard ATX supply doesn’t. I used a hot pluggable supply that was a spare for a Compaq server. Shorting or overloading a circuit will cause the supply to shut off for ten seconds or so. Using these power supplies really is a great way to build a bench PS that covers MCU and other electronics design and testing.
They’ll shut down instantly on a dead short, but considering the amps these things put out a fuse isn’t a bad idea. 20 or 30 amps thru your Arduino isn’t going to make it happy.
I just wish people would stick to the 3/4″ spacing for the sockets (I know about the AC sockets in Europe.)
…and he put 20A fuses in anyways. Ah well.
Just on the +12-volt line.
Better than nothing, I guess, which is what most of these PSU-retrofit projects use.
That said, whatever you power with it will almost certainly benefit greatly from additional voltage regulation AND filtering. I don’t even want to know how much noise is on the output of that variable buck supply.
If 20-30 A goes through your Arduino you have done something very wrong and the Arduino is probably damaged anyway, even if you limit it to 1 A or so.
“Before you glue the case onto the power supply make sure the wires …”
It was a pretty slick build until this point. You need to be able to get back inside and service it or fix an assembly bug. A little extra work would have made the panel attach to the power supply box in some way that no extra screw holes need to be drilled into it. Such as extending the panel sides to wrap around the back of the box, or mount both panel and box on a substrate piece of say acrylic or even wood.
Apart from that it’s a heck of a lot nicer-looking than many other PS conversions.
How’s that better than few bits of steel or aluminium plate drilled, riveted together and screwed to existing holes in PSU case?
Lot of younger hackers don’t have access to steel / aluminum plates or drills.
3D printer is certainly easier, as is laser and even faster.
Do a write-up on your metal version to show us how it’s done.
It’s not, but kids nowadays don’t know how to use a drill, or any hand tool.
Ok boomer
They don’t know, or not allowed to use them?
I got a gift certificate for Christmas 1975. I rushed over and bought an electric drill. I think the most expensive purchase at that time. A few years later, I bought a “drill press stand” for it.
‘k. I don’t think most of them did in the 80s either. Where and when was this magical time and place that the kids typically spent all that abundant summer vacation time actually making things, with tools. What school lunchroom roared with the sound of kids talking about their new drill rather than the upcoming football game or showed off their new screwdriver set as opposed to.. well, I don’t know, whatever kids brag about now.
From what I see on the Internet I think kids might be more handy today than they were when I was growing up. But do tell when and where you think your utopia existed.
Declinism – the first sign of dimentia
Define “better”
It would be a good idea to swap the positions of the black terminals and the fuses. The terminal spacing could then be adjusted to the standard 0.75 inches (19.05 mm), enabling dual plugs to be used.
I did the same, but I put everything in a large case, and with 2 variable small 3A variable PSU’s (extremely handy). A good pc psu makes for a fantastic and very cheap “bench” power supply… And it comes with all the securities which usually go with pc PSU’s.