Easy PCB fabrication in China has revolutionised electronic construction at our level, but there are still times when it makes sense to etch your own boards. It’s a messy business that can also be a slow one, but at least a project from [earldanielph] takes away one chore. It agitates the etchant solution round the board, by moving the tank backwards and forwards on the drawer of an old optical drive.
The first part of the build is simply removing all parts of the drive except the drawer mechanism and its motor. This is still, in most cases, a DC motor, so an Arduino can easily drive it with a motor control shield. It’s worth a moment to reflect on how little there is to a modern optical drive.
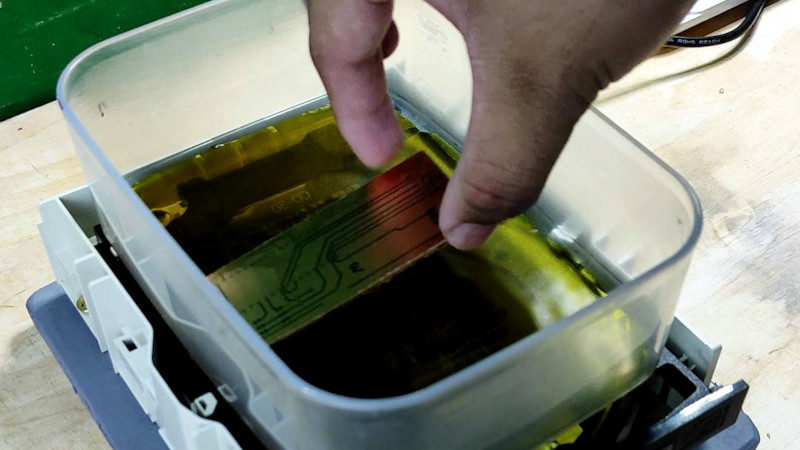
The Arduino receives a sketch that moves the tray backward and forward, and a piece of ply is attached to the tray. This becomes a stand for a plastic tub containing the etchant and board, and the liquid is soon swishing back and forwards over the surface. You can see the result in the video below the break. Definitely a saving over manual agitation. It’s an inventive machine, but it’s not the first PCB agitator we’ve seen.


Too much hardware for something so simple.
In fact to make plates you don’t even have to shake anything. But if you want to, just put the bucket on a PC fan with one less blade, so it’s unbalanced and vibrates.
Won’t that cause the bearings to wear out pretty quickly?
And noisy at high RPM. Long ago I had a Delta 200 CFM fan throw a blade while running at about 4000 RPM. The racket was horrible. A smaller fan with low RPM is probably doable without the annoying noise
Not enough energy from an imbalanced fan. His method is best.
This is overly complicated. I can think of a few different ways to accomplish this that may be more visually appealing… Like using a soxhlet driven by the reaction heat (i know that’s overly optimistic) but this… Is goofy.
It’s one thing if they built it all from scratch or had to fabricate components, but they literally removed some components from a drive and threw a microcontroller on it.
Despite being more hardware than necessary, the amount of labor and time involved was next to nothing. There’s nothing wrong with this approach.
A motor, a wheel, a link, and a hinge. Link goes between the wheel and the hinged board the tank sits on. Can’t get much simpler.
A motor with a gear reduction and a cam can provide the slosh much more simply.
My thoughts exactly. There’s also less wear and tear on the bearings. And it should do a better job of getting more solution moving over the traces instead of tiny motions that leave the copper that’s being removed on top of the exposed traces to tarnish them. I remember doing it by hand in the 70s and 80s and it worked much better with a slow sloshing motion. You can also use rivets for “thru-holes” like the old days, for double sided-boards, but registration is harder.
I used an Arduino Nano and a single servo connected to a USB power outlet.
Could have done it with a ‘555.
Could have used a set of limit switches to reverse the direction. No silicon required.
One DPDT switch. Position carefully or add a linkage.
Yeap! Or a pair of course switches… or a flip-flop circuit.
A Python script would be faster and simpler. So I’ve heard. At lot. But yet to see.
Well i made the experience that using a sponge will use way less etchant and is souch faster.
One has to only gently brush the copper off
Ofc wearing protection.
I used to do that until I wiped some of the resist off on more than one occasion (and it was laser engraved paint)
Just fabricate some gcode and put it on the 3dprinters bed^^
Yeah… and it will be heated at the same time :-)
I feel like anyone claiming it’s too complicated is missing the point of doing something for fun. It’s all too complicated and the results are average at best, it’s much better to get a fab house to make it, but there’s no fun in that.
For many projects where you just need one of something, sending off to a fab doesn’t make economic sense (esp when you should test the circuit first). At a minimum, I like to etch and assemble a prototype to verify basic design aspects (though that may be just for a subsection of a design rather than the whole board). There’s nothing quite as disheartening as getting your new fabbed boards back, assembling one, and finding you got some pinning wrong.
I’ve sent plenty of designs off to fab, but I also have plenty of one-off home etched boards still doing fine. I’m also too cheap to pay for expedited shipping since even those might sit around for a week before being shipped out. Having a board I can start soldering to in < 10 minutes after laying it up in KiCAD is great.
I used to feel the same way. I’ve since gotten older and can happily wait a week for my super cheap professionally made circuits. They’re never more than a minor tweak away from working anyway! My time is worth more than playing in tanks of acid and printers.
Been there, done that. My drive, however, had some part that slightly rotated around, say, y axis while the caddy moved along x, hence it was the issue of removing some unnecessary parts and connecting some motor from the same drive to whatever moved that rotating thingy with a piece of wire and then just adding some power supply to that contraption. Simple, stupid, and jerky but kinda worked.
Why not use a 555 to operate a motor to move the tray much simpler than am arduino
Didn’t hackaday cover a self reversing screw not too long ago? https://www.youtube.com/watch?v=sxsctBXCuGk
Been doing that since ages-https://www.youtube.com/shorts/fbGIQ8s-LwE
Plus my method reduces chances of damage from acid to machine by having it higher and away from acid
Also, No fancy electronics, just a simple synchronous motor
Nice idea, but a cam ona motor is good enough. I made one using lego and did my uni work with it. https://www.youtube.com/watch?app=desktop&v=iHAWKudEBHg&ab_channel=Roboteernat