Rickrolling SSID With ESP32

Reddit user [nomoreimfull] posted code for a dynamic WiFi beacon to r/arduino.  The simple, but clever, sketch is preloaded with some rather familiar lyrics and is configured to Rickroll wireless LAN users via the broadcast SSID (service set identifier) of an ESP32 WiFi radio.

The ESP32 and its smaller sibling the ESP8266 are tiny microcontrollers that featuring built-in WiFi support. With their miniature size, price, and power consumption characteristics, they’ve become favorites for makers, hackers, and yes pranksters for a wide variety of projects. They can be easily programmed using their own SDK or through a “board support” extension to the Arduino IDE.

For the dynamic WiFi beacon, the ESP32 is placed into AP (access point) mode and broadcasts its human readable name (SSID) as configured. What makes the SSID dynamic, or rolling, is that the sketch periodically updates the SSID to a next line of text stored within the code. Of course, in the Rickroll prank this means the next line of lyrics from “Never Gonna Give You Up” by Rick Astley himself.

Always a favorite prank, we’ve seen Rickrolls take the form of IR remote controls , free WiFi servers, and coin cell throwies.

Rick Astley picture: Wjack12, CC BY-SA 4.0.

Shake Your PCB Etching, With An Old Optical Drive

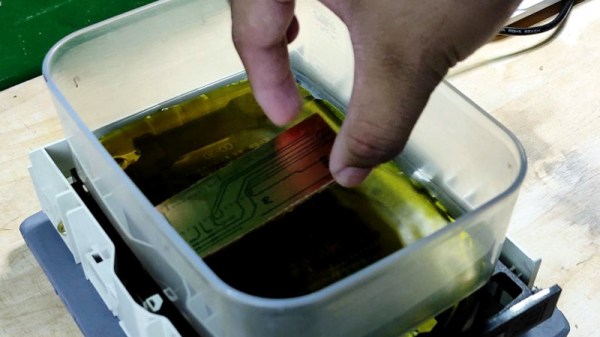
Easy PCB fabrication in China has revolutionised electronic construction at our level, but there are still times when it makes sense to etch your own boards. It’s a messy business that can also be a slow one, but at least a project from [earldanielph] takes away one chore. It agitates the etchant solution round the board, by moving the tank backwards and forwards on the drawer of an old optical drive.

The first part of the build is simply removing all parts of the drive except the drawer mechanism and its motor. This is still, in most cases, a DC motor, so an Arduino can easily drive it with a motor control shield. It’s worth a moment to reflect on how little there is to a modern optical drive.

The Arduino receives a sketch that moves the tray backward and forward, and a piece of ply is attached to the tray. This becomes a stand for a plastic tub containing the etchant and board, and the liquid is soon swishing back and forwards over the surface. You can see the result in the video below the break. Definitely a saving over manual agitation. It’s an inventive machine, but it’s not the first PCB agitator we’ve seen.

Continue reading “Shake Your PCB Etching, With An Old Optical Drive”

Hackaday Links Column Banner

Hackaday Links: April 23, 2023

Mark it on your calendars, folks — this is the week that the term RUD has entered the public lexicon. Sure, most of our community already knows the acronym for “rapid unscheduled disassembly,” and realizes its tongue-in-cheek nature. But given that the term has been used by Elon Musk and others to describe the ignominious end of the recent Starship test flight, it seems like RUD will catch on in the popular press. But while everyone’s attention was focused on the spectacular results of manually activating Starship’s flight termination system to end its by-then uncontrolled flight at a mere 39 km, perhaps the more interesting results of the launch were being seen in and around the launch pad on Boca Chica. That’s where a couple of hundred tons of pulverized reinforced concrete rained down, turned to slag and dust by the 33 Raptor engines on the booster. A hapless Dodge Caravan seemed to catch the worst of the collateral damage, but the real wrath of those engines was focused on the Orbital Launch Mount, which now has a huge crater under it.

Continue reading “Hackaday Links: April 23, 2023”

VCF East 2023: Retro Luminaries Take The Stage

Our friend [Fran Blanche] recently recorded what it was like to participate in an energetic round table at the recently held Vintage Computer Festival (VCF) East. Fran joined well known personalities [Jeri Ellsworth], [Adrian Black] of Adrian’s Digital Basement, and Usagi Electric creator [Dave Lovett] with yours truly moderating.

The table-less roundtable discussed the pros and cons of streaming about retro and tech, and what its like to hang yourself out there in video format. Goals and motives differed widely from speaker to speaker and there was some good-natured ribbing about who makes money vs. who simply gets away with spending less.

Most of all fun was had by the speakers as they interacted with each other, and with the audience — and that comfort came across to the standing room only crowd of avid retro-enthusiasts who only told us good things about what they saw and heard that night.

One thing we did note was that every speaker actually knew what microphones were and how to use them.

Want to learn more about the 2023 Vintage Computer Festival East? You can start by checking out our previous coverage, and don’t miss the first in a series of fascinating interviews recorded by the Hackaday crew as they explored this phenomenal retrocomputing event.

Continue reading “VCF East 2023: Retro Luminaries Take The Stage”

Run Linux By Emulating RISC-V On A RISC-V Microcontroller

For years it was a given that it was impossible to run a Linux based operating system on a less powerful computer whose architecture lacked a memory management unit. There were projects such as uCLinux which sought to provide some tidbits to low computing power Linux users, but ultimately they came to naught. It is achievable after a fashion though, by using the limited architecture to emulate a more powerful one. It’s been done on AVR chips emulating ARM, on ARM chips, and now someone’s done it on an ESP32-C3 microcontroller, a RISC-V part running a RISC-V emulator. What’s going on?

RISC-V is an architecture specification that can be implemented at many levels from a simple microcontroller or even a pile of 74 logic to a full-fat application processor. The ESP32-C3 lies towards the less complicated end of this curve, though that’s not the whole reason for the emulation. The PSRAM storage is used by the C3 as data storage and can’t be used to run software, so to access all that memory capacity an emulator is required that in turn can use the PSRAM as its program memory. It’s a necessary trick for Espressif’s implementation of the architecture.

Surprisingly it’s not as slow as might be expected, with a boot-up time under two minutes. It’s not what we’d expect from our desktop powerhouses, but it’s not so long ago that certain lower-power full-fat processors could be just as lethargic. For past glories, see the AVR running Linux, and the RP2040.

A home-made tape robot that stores VHS tapes

VHS Robot Swaps Tapes, As Seen In Hackers

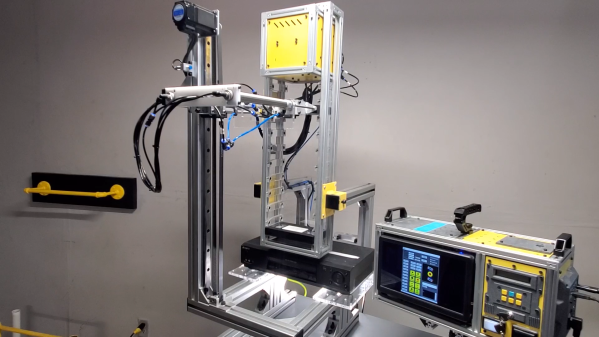
Tape robots are typically used in places that store vast amounts of data – think film studios and government archives. If you’ve seen the 1995 cult movie Hackers, you might remember a scene where the main character hacks into a TV station and reprograms their tape ‘bot to load a series he wanted to watch. It’s this scene that inspired [Nathan] over at [Midwest Cyberpunk] to make his own tape robot that loads VHS tapes.

[Nathan] has thousands of tapes in his collection, but the robot is not built to manage all of them. Instead, it’s meant to help him run his VHS streaming channel, saving him from having to physically go to his VCR every time a tape needs swapping. For that, a ten-tape storage capacity is plenty.

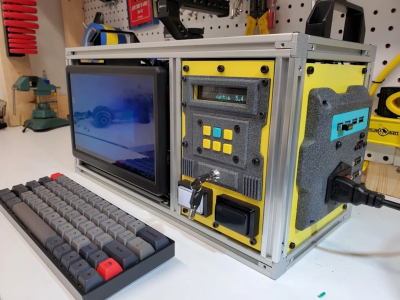
A custom cyberdeck used to drive a tape robotThe main parts of the tape robot are a grabber that holds the tape, an extender that moves it forward and backward, and a linear rail that moves it up and down. The vertical motion is generated by a hybrid stepper motor through a belt drive system, while the grabber and extender are operated pneumatically. Once the grabber reaches the VCR, a pneumatic pusher shoves the tape inside. All of this is nearly identical to the robot seen in the movie, which was most likely not a commercial machine but a custom-made prop.

The whole system is controlled by an ESP32 running FluidNC inside the robot as well as a handmade cyberdeck next to it that manages the overall process of loading and storing tapes. Although [Nathan] is currently using the robot for his streaming channel, he’s planning to also use it for digitizing part of his massive tape collection, which contains a few titles that were never released on newer formats.

Working with old tapes can be tricky: some types of tape degrade over time, while others might come with primitive copy protection systems. But moving information over to newer media is a necessity if you don’t want to risk losing it forever.

Continue reading “VHS Robot Swaps Tapes, As Seen In Hackers

Generating Entangled Qubits And Qudits With Fully On-Chip Photonic Quantum Source

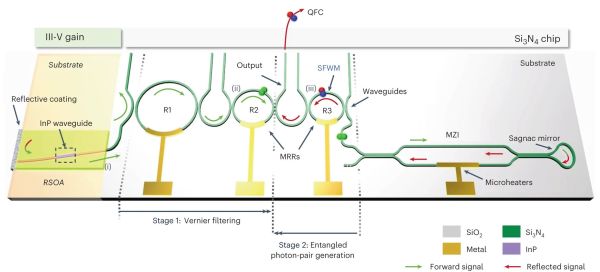
As the world of computing and communication draws ever closer to a quantum future, researchers are faced with many of the similar challenges encountered with classical computing and the associated semiconductor hurdles. For the use of entangled photon pairs, for example, it was already possible to perform the entanglement using miniaturized photonic structures, but these still required a bulky external laser source. In a recently demonstrated first, a team of researchers have created a fully on-chip integrated laser source with photonic circuitry that can perform all of these tasks without external modules.

In their paper published in Nature Photonics, Hatam Mahmudlu and colleagues cover the process in detail. Key to this achievement was finding a way to integrate the laser and photonics side into a single, hybric chip while overcoming the (refractive) mismatch between the InP optical amplifier and Si3N4 waveguide feedback circuit. The appeal of photon-based quantum entanglement should be obvious when one considers the relatively stable nature of these pairs and their compatibility with existing optical (fiber) infrastructure. What was missing previously was an economical and compact way to create these pairs outside of a laboratory setup. Assuming that the described approach can be scaled up for mass-production, it may just make quantum communications a realistic option outside of government organizations.