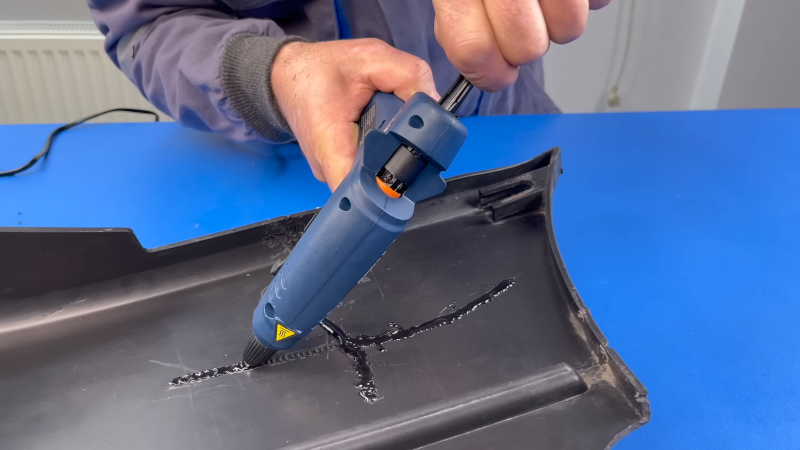
Plastic welding isn’t a new idea. But a recent video from [The Maker] shows an interesting twist. Given a broken piece of plastic, he secures it together with tape, machines out a channel around the cracks, and then melts zip ties into the channels. Honestly, although he mentions plastic welding and soldering, we aren’t sure this isn’t just simple gluing, but it did give us some ideas. Watch the video below and you’ll probably get the same ideas.
The ingenuity here isn’t necessarily using hot plastic to glue together two pieces — that’s just a hot glue gun, after all. Rather, it occurred to us that the key here was machining out the places where significant amounts of the hot plastic could bond the two pieces together. He cut the channels with a rotary tool, buffed them, and used a hot knife to give them some internal texture. But with a 3D printer, you could build these channels into parts that were made to interlock.
Think about it. Two pieces you print that have some type of tab arrangement to interlock. But their surfaces provide a built-in “glue canal,” sort of like he builds on the video. At the end, you could use some of the same filament in a 3D printing pen or even rigged in a hot glue gun like the zip ties and make a perfect connection.
We haven’t tried this, but it seems like a good idea. We’ve certainly glued parts together before and covered many methods for alignment, too. If you try it, do share the results!


Do note that this probably only works with the high temperature hot glue guns, not the cheap low-temperature ones.
The real cheap ones will have no temperature sensor and just keep heating the plastic or glue sticks until they almost burn up. That could potentially be an advantage here…
I don’t think any glue gun has a sensor except some very new ones. They usually use PTC ceramics afaik.
I ruined my $30 hot glue gun a couple of weeks ago after watching this video.
Completely jammed up the heating chamber. It was hot enough to cram the plastic into, but not hot enough to melt all the plastic so that it could be extruded. I was unable to clean it out, and now I’m the proud owner of a “for-parts-only” glue gun.
Learned a valuable lesson: know your materials before you commit!
I did the same thing so I thought I would mention how I reclaimed mine. While glue gun is hot; use leather glove and remove extruder(tip), remove ziptie bundle out of other end (use needle nose pliers to get all that’s accessable), while gun is still hot with tip REMOVED push a stick of all-thread or longer bolt through the glue stick chamber.
On tip; mount tip in vise, use large but on chamber side, use small bit to clear hole.
Re-install tip and run glue stick through!
also note that trying to mix plastics will not end well for adhesion purposes. He also let the plastic cool before putting the other plastic on top of it another very bad idea. This is more of a video of what not to do rather than an interesting twist. I can guarantee that will pop apart very easily. This is not a hack but a bad idea.
Completely agree, this is an utter waste of time other than for a show peice.
It has no durability whatsoever the plastic inserted is very brittle (snaps), tried many many times with cable ties.
I think many comments are missing the point. I mentioned it isn’t really welding but my interest was in creating the channels as part of the design process and then using the same plastic to do the weld. I’ve always glued parts at the seam but this method could make a better bond with a real weld or even with, say, epoxy.
FWIW I make my larger prints out of small prints and use a soldering iron as the welding tool. If you force it pretty deep into the joint between the two pieces you automatically get a trench with a welded bottom, and then you use raw filament as a filler into that trench to reinforce the joint. It’s largely similar to multipass tig welding, with a base and filler pass. The result is quite strong, as well.
The biggest difference is that you actually melt both parts and the filler material. If you just melt the filament and smush it in the gap, it won’t adhere properly.
As someone who works in plastic manufacturing and has welded a fair bit of plastic, that filler is not adding any structure in the least. You effectly used it as a glue. The first step of dremeling would suffice for prep (provided you go slightly past the crack which it looks like you did) then clean the trench with the knife like you had. That spatula in the soldering iron will effectively weld them together, though won’t give you a nice smoother finish you probably wanted. If you’re wanting to use the hot glue gun, you need to move slowly. Depending on how hot they get, you need to go incredibly slow. The goal is to melt the trench and have it melted long enough for the filler (in this case the zip ties) to be deposited on to it and form a proper bond to it. If you’re goal is more for looks, by all means use both or just the glue gun, if you want structural support, only one method was needed: either glue gun (assuming it gets hot enough and that you use the method above) or the soldering iron which is a good and effective idea and rather quick and easy.
A key thing to keep in mind is material type. Those zip ties are most likely nylon but I don’t know what that part is so I can’t say what material it is. I think it is a fender for something like a quad or sport bike which is typically abs if I remember correctly.
Thank you sir for pointing out what a waste of time video this is. Shotty “repair” job this fix cannot hold up to do anything more than cosmetic treatment and that is not even on par with what needs to be done for a satisfying result. This video is a waste.
There are lots of videos like this on youtube: miracle cures that look like they work great but are mainly just for show.
The example plastic is polypropylene and zipties are typically nylon. The only bonding done here is achieved with the soldering iron. *All* the other activities are just time-wasting.
Come on Hackaday – are you really publishing this on its journalistic/technical merit?
Agreed, the ‘repair’ started and finished at the soldering iron.
All the other steps were pointless at best. Sanding and painting an internal/never-to-be-seen surface and leaving the visible surface with a crack still visible just wastes time, money and potentially needs to replace the tools as well.
HaD is a blog, not a peer reviewed scientific journal. Criticize the source all you like, don’t criticize HaD for pointing to it.
I would like to point you to homeopathy and astrology. On a technical blog.
>don’t criticize HaD for pointing to it.
Uh, why not?
Well, there’s nothing saying you can’t criticize it. However, at the same time, you’re not paying for it, so your criticism doesn’t really matter. As long as “someone” is willing to consume the content, it doesn’t really matter if that someone is “you”.
Making noise to no effect may be self-satisfying, but that’s really all it can be.
I don’t think it is ineffective when half the comments say “not a hack”. The article itself is not bad, but the source video is subpar.
But if the folks who do the blogging don’t limit themselves to reasonably sound technical articles what is the point? Or are you saying that we shouldn’t expect them to have the capability to do that?
People with actual specialised technical knowledge, do not have the time to write articles for hackaday in exchange for peanuts. Hackaday will be what hackaday is..
It’s “Hack” a day, not “Verified actually applicable to every engineer AND amateur information” a day. Is original article a hack? Yep, definitely. Is it a good way to weld plastics? Maybe not really, but this blog is about showing you all hacks, so article on HAD is in my humble opinion ok.
@Al Williams – please continue!
On the inverse, 5 years ago I knew nothing about plastic welding. Then one day I I had multiple broken plastic things. I spend a weekend reading useful blogs and youtube videos. Made a plan of action bought maybe $90 of tools, one of those triangular welding spades with the hole for loading, and materials and was able to weld stuff.
I don’t know much on the topic but I do know this video is probably the worse video on the subject I have ever seen. There are many good sources for learning how to make good plastic welds and learning about the differences between the plastics you are welding.
The article says “…although he mentions plastic welding and soldering, we aren’t sure this isn’t just simple gluing, but it did give us some ideas.”
The point was not that this example was a good process, but that opening the channel and texturing the surface might be a good way to achieve a better DIY plastic weld (for someone rwally doing a plastic weld).
The combination of making the back side flat and painting it makes this video quite awkward. Trying to push zip ties through a hot melt gun is also awkward.
Some things I would have done differently:
When you put on the backing tape on the front side, pull it real tight.. This makes the gap smaller and less visible. I once did this with the broken (painted) plastic of a scooter, and the cracks were almost invisible.
And then, why remove plastic with your dremel? Just push in the hot spatula and mix the plastic around a bit. Then you just make a weld with the already available plastic.
And why cut the backside smooth? When I did this, I glued strips of wood over the backside for extra strength.
If you want to get more serious, then look at commercial kits for plastic welding. It’s usually a hot air gun combined with some thin tube (3mm or so) to push filler material through. That makes more sense then putting 15 tie wraps in a hot melt gun.
From the various videos I’ve seen the pros use staples to strengthen things, and they sell those on aliexpress from many vendors as sets with the soldering iron to apply them.
That’s a brilliant idea.
Ps if anyone knows a cheap, available and see through soft plastic I can easily glue into place, I’d like to know. I 3D printed a mount for a bluetooth music controller and mounted it to my motorcycle handlebars, but I can’t find a plastic that will stuck to glue. A soft plastic would allow me to have it waterproof and let me press the buttons. I tried tons of plastic bags but none would work.
Not sure where you are… Here in Pennsylvania at my local ACE hardware they have some excellent clear vinyl sheeting, probably 12 mil or so… And by clear, I mean CLEAR… Twice now I’ve used it as a temporary fix for vehicle windows. No problems with visibility at all…
At my ACE, they keep it in the back. Have to ask for it. Cut to length, price per foot.
Also, very pliable and UV resistant.
Glue is probably the wrong approach, better would be a mechanical connection with a gasket, that way you can use any plastic or rubber you want.
Waterproofing is not easy though, you’ll probably have to epoxy the 3d print unless your printer is perfectly dialed in, it’s likely porous.
How I always done it was you peice it back together and use a metal screen on the backside. Use a crappy soldering iron with a flat tip and push the metal screening into the cracked joint letting the plastic melt into it. From there use body filler to fill in any missing pieces and hide the crack.
What this guy is doing he is removing more plastic to add more plastic but if you use a different plastic then what the item is made from it won’t really adhere to.
This☝️☝️
I’ve done that same repair method many times myself over the years.
Though I’ve experimented with many different kinds of reinforcement filler. From Bondo to epoxy with varying degrees of success.
Might have to try melted plastic.
This is a golden tried and tested way to do this kind of job. Did these jobs many many times with excellent durable result.
As is so often the case, the real gold is to be found in the comments. Thank you for the “metal screen” idea!
Nice “click me” video, I’ll pass.
@ Al Williams: At least in Germany, the definition is as follows: Soldering is when you melt everything but the base material, welding is when you add molten material and melt also the base material.
I.e. copper + tin solder = soldering.
PS + PA ziptie = probably soldering.
Steel + welding rod = welding.
PA+PA ziptie = welding.
Hot gluing is “plastic soldering” per definition and not glueing.
Honestly, it may be more intelligent to check on things before writing things like “Honestly, although he mentions plastic welding and soldering, we aren’t sure this isn’t just simple gluing…”. Just sayin’
Nitpicking. It is actually called welding when plastic or PVC.
As Jan says, most hot gluing of plastic substrates would probably count as welding, by your definitions. Hot gluing of wood, textile, metal, etc, would be soldering, of course.
Welding doesn’t always need a filler, eg solvent welding plastics or friction welding steel.
It’s called plastic welding because the filler rod is the same material as the base material. If you use a different material, eg nylon cable ties with the ABS base, then that’s called stupid.
I’ve thought about similar solutions for 3d prints however instead flowing resins into intentional voids/channels to join and strengthen. Hot plastic melt to join complex not flat surfaces might solve some joining problems where I’d like to avoid fasteners.
I do this already with the 3d pen and 3d prints. I leave room for the melted plastic for putting the pieces together. I also have left voids where I need strength so the part doesn’t shear along the layer lines.
Same, it is a very basic concept, just leave a little room for the extra plastic you will be adding.
and use the same type of plastic as filler
https://youtu.be/3XdRiVKAcUA?t=83
We used to repair seismic cable using a similar method, but with a heat gun and more of the same material from a discarded cable. The trick was to get the cable skin melted on the donor piece and the damaged cable to the same extent and then press them together. We chamfered the edges after the repair too and often bound it with tape as reinforcement, but it usually held the water out and the kerosene in down to 40 feet or so.
It was something that you got a knack for and it helped that the material was about 3-4mm thick, but it didn’t help trying to do it on a rolling deck with water breaking all around you whilst you were doing it !!
Sounds not entirely unlike melting/joining/welding/fusing together a polyurethane belt. I’ve rigged up a tool for that using a soldering gun with a cutting tip, snap ring pliers (with replaceable tip clamps holding the material ends apart then together), and a pretty fair dose of (im)patience eventually resulting in a working belt for a tiny drill press that I subsequently used once, maybe twice.
I’ve never even heard of seismic cable before this and may be imagining it all wrong. On second thought, maybe it’s not at all similar. Carry on.
I just spent some time looking it up. Apparently they’re several mile long cables consisting of acoustic sensors. The kerosene makes them bouyent. Ships drag them along the ocean, while an emitter blasts the ocean floor with low frequency sound waves. The sound waves penetrate the ground, reflecting back on density changes. The acoustic sensors pick up the reflections and then math turns it into pretty pictures. It’s the seismic version of an ultrasound.
Anything to comment.
Although this video is semi-BS you could I guess shove some equal plastic in a high-power glue gun instead of dissimilar material zipties, and if it’s PP, I see that PP has a lower melting point than nylon, so that should make it even easier.
As for the suggested epoxy in other comments, I wish you good luck trying to get it to reliably stick to PP. that simply won’t work. But of course I don’t know if the plastic in the video was PP, it might not have been.
Wow, 90% of the commenters here didn’t actually read the article and are just outraged at something the author clearly points out. Kinda explains the state of the world we’re living in.
To the author and the few comments in between that are relevant to the article, thank you. I hadn’t thought of intentionally adding features to be able to weld 3d prints better.
My problem is sealing cracks in HDPE. Nothing sticks to that shit.
This is going to fail in use. The first part is good: routing the crack. Don’t bother trimming the cruft. Then you need to use the hot iron to embed w fasteners (thin w shaped pieces of stainless steel) or much better: stainless steel mesh about an inch on either side of the crack. Fill in the crack with the same plastic if possible, not nylon, unless that’s all you have. Just put the filler plastic on top of the crack and melt it into the surrounding with the iron. Or I suppose you could apply it with the hot glue gun and then melt the entire plastic channel, again, making sure the base plastic gets melted together with the filler plastic. I’ve done this with bumpers successfully, but I used the same material as the bumper for filler.
Calmese.
He fixed it with tape on the first step. Done.
Gorilla tape on both sides. Finito.
Hi from France; Please check the differences between thermoplastic and hot-melt plastics, and therefore the differences between welding and bonding (gluing).