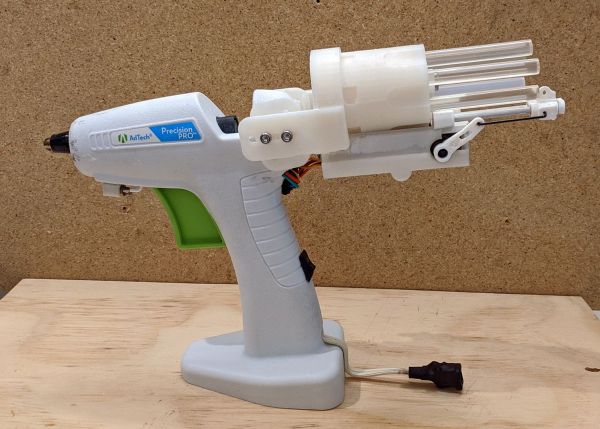
Sticky Situation Leads To Legit LEGO Hack

[samsuksiri] frequently uses a laptop and has an external drive to store projects. The drive flops around on the end of its tether and gets in the way, so they repurposed their old iPod pouch and attached it to the laptop lid with double-sided tape. You can guess how that went — the weight of the drive caused the pocket to sag and eventually detach over time.

Then [samsuksiri] remembered that they had LEGO DOTS patch stashed somewhere. It’s an 8×8 plate with adhesive on the back so you can build almost anywhere. Then the problem was this: how to attach LEGO to the drive itself? You’d think this is where the hot glue comes in, but that didn’t work because the drive is too slippery.

Nothing worked, really — not until [samsuksiri] flipped the drive over to work with the dimpled side that has un-coated plastic. Finally, the answer turned out to be mounting tape. Now, [samsuksiri] can attach the drive in any orientation, or even attach a second drive. Be sure to check it out after the break.

Looking for slightly more astounding LEGO creations? Check out this hydroelectric dam.

Continue reading “Sticky Situation Leads To Legit LEGO Hack”

Ballpoint Switch Is Oh-So Satisfying

Alright, here’s your quick and dirty hack for the day. The astute among you may recall [Peter Waldraff]’s bookshelf train build of a few days ago, and the fact that he used a switch made from a dead ballpoint pen to light up the scene. Fortunately, [Peter] wrote in to give us the details of this low-voltage sub-build, which you can see in the video after the break.

Essentially, [Peter] starts by making a shortened version of the pen. He modifies nearly every bit of it, including cutting down the ink cartridge, so if you try this, make sure the thing is all dried up first. Then, as he is screwing the point holder back on the barrel, he wraps elastic cord around the inside barrel in lieu of having sewing thread lying around. This cord along with some hot glue will hold a pair of paper clips to the sides of the point holder. When the pen is clicked into the writing position, it makes a connection between the paper clips and closes the circuit on whatever is wired into it.

What types of little hacks like this have gotten you through the build? Let us know in the comments, or better yet, write it up and drop us a tip. By the way, here is that bookshelf train build in case you missed it.

Continue reading “Ballpoint Switch Is Oh-So Satisfying”

Zippy Plastic Welding

Plastic welding isn’t a new idea. But a recent video from [The Maker] shows an interesting twist. Given a broken piece of plastic, he secures it together with tape, machines out a channel around the cracks, and then melts zip ties into the channels. Honestly, although he mentions plastic welding and soldering, we aren’t sure this isn’t just simple gluing, but it did give us some ideas. Watch the video below and you’ll probably get the same ideas.

The ingenuity here isn’t necessarily using hot plastic to glue together two pieces — that’s just a hot glue gun, after all. Rather, it occurred to us that the key here was machining out the places where significant amounts of the hot plastic could bond the two pieces together. He cut the channels with a rotary tool, buffed them, and used a hot knife to give them some internal texture. But with a 3D printer, you could build these channels into parts that were made to interlock.

Continue reading “Zippy Plastic Welding”

A hot glue gun with a revolving stick holder on the back

Quick Reload For Your Glue Sticks: The Glue Gun Six Shooter

They say that the two essential items in any toolbox are WD-40 and duct tape: one thing to make stuff move and another thing to stop stuff from moving. Many hackers would argue that the third essential tool should be hot glue — it stops stuff from moving, but still allows you to move it later if you decide that’s better after all. It also works on loads of stuff ranging from macaroni to microcontrollers. And let’s be honest: who hasn’t done the “pew pew” thing with their glue gun?

[Vije Miller] decided to give his hot glue dispenser a bit of a western vibe and built himself a Glue Gun Six Shooter. Like an Old West revolver, it has a rotating cylinder with six rounds of ammunition that lets you continue gluing right away even if your glue stick runs out in the middle of a job. A tiny switch on the side of the barrel starts the reloading sequence: one servo rotates the cylinder, then another one chambers a round. Both are controlled by an Arduino Nano, which is powered by a 5 V USB power supply hidden in the grip.

A red laser below the barrel gives the user a better aim, as well as a bit more “pew pew” ability. The rest of the gun is pretty standard, similar to what we’ve seen before in a teardown. If you’re looking for something more high-tech, check out [Ben Heck]’s ultimate glue gun.

Continue reading “Quick Reload For Your Glue Sticks: The Glue Gun Six Shooter”

Throw Out That Box? No, Build A Shelving Unit

Are you one of those people who hoards cardboard for someday, and then periodically breaks it all down and puts it out for recycling because you haven’t done anything with it yet? Well, load up a new blade in the utility knife and fire up that hot glue gun, because the [Cardboard Ninja]’s gonna show you how to make a shelving unit from the biggest box in your collection.

[Cardboard Ninja] goes about the build quite smartly, cutting the legs from the four long bends already in the cardboard. This is repeated in the shelves, which are made from the box’s sides — [Cardboard Ninja] takes advantage of the bends when it comes to cutting out the shelves and creates the other three with the edge of a metal ruler. The rest of the cardboard is devoted to supports for shelves and legs.

While you could use this unit to hold all the other, smaller boxen you have lying around, that would be a gross under-utilization. You see, the way this is put together, it can hold upwards of 133 lbs (60 kg) total, provided the rules of weight distribution are followed, and the heaviest things are on the bottom shelf.

That does seem like a lot of weight, but given that this was constructed by someone who has a holster for their utility knife and calls themselves [Cardboard Ninja], I think we can trust their stress tests and just go with it. Given that, it’s always a good idea to anchor shelving units to the wall.

You know, this would make a pretty good entry into the second Challenge of this year’s Hackaday Prize. Remember: this is the final weekend to enter, and the window closes at 7AM Pacific on Sunday, so get hackin’!

Continue reading “Throw Out That Box? No, Build A Shelving Unit”

Joel showing off his webshooter

Spider-Man Swings A Little Closer To Reality

Despite reading Hackaday daily and seeing the incredible things that people do, something comes along that just sort of blows you away every once in a while. Sometimes it’s just technically impressive, but often it is just, “I didn’t think that anyone would try this or even think of this.” [Joel Creates] is one such example with his Spider-Man wrist-mounted web-shooters.

Previously, [Joel] had built a web-slinging system based around a pressurized tank of hot glue worn like a backpack. What it lacked in miniaturization, it made up for in functionality. However, [JT of Build IRL] created a grappling-based Spider-Man system that fired ropes which got [Joel] thinking that perhaps the hot glue and the grappling system could be combined for a smaller overall package.

His solution is quite simple. Old CO2 cartridges filled with glue and a small nozzle drilled in are loaded into a quick-connect fitting. The hot glue is heated via an induction coil on a small tool belt before loading. A thermally insulating layer of paint and micro-vacuum spheres on the canister helps [Joel] place it in the wrist shooter without burning himself. A bike tire inflator with a lever-activated system forms the main assembly of the shooter. Using compressed air, the system fires a glob of hot glue at a surface and a metal web-shaped disk with holes and a rope attached to the blob of hot glue. As the glue rapidly cools, the metal disk provides a lot of surfaces for the adhesive to hang onto. Overall, the results are pretty impressive, but the engineering challenges make for an exciting journey. Everything from failed prototypes to failed power supplies seems to happen on this build.

Combined with some electromagnets, you could really have the whole spider package.

Thanks [Carson B] for sending this one in! Video after the break.

Continue reading “Spider-Man Swings A Little Closer To Reality”

Kid Friendly MP3 Cube

3D Printed Preschooler Proof MP3 Player Takes A Beat-ing

Prototyping new ideas can be a lot of fun, but putting new projects in a durable enclosure can be a difficulty. This is especially the case when the user of this product is one of the most destructive forces in nature: A toddler! This is the circumstance that [blue blade] found himself in when he wanted to build a durable MP3 player for his grandson, and you can see the results of his work below the break.

The hardware is simple: A 16850 lithium-ion battery powers an MP3 Decoder/Amplifier module that plays MP3s stored on a Micro SD card. A speaker, power switch, and micro USB powered battery charger complete the build. What stands out most is the enclosure. Why?

When children are involved, durability isn’t a matter of product lifetime, it’s also a matter of safety. Items that are easily broken aren’t just useless, they can be dangerous. With this in mind, [blue blade] built a brightly colored enclosure with extra thick walls joined by metal bolts. Externally, a rounded cover bolts over the charger connector and Micro SD card slot. The only other protrusion is a lighted rocker switch for powering the MP3 player on and off.

Continue reading “3D Printed Preschooler Proof MP3 Player Takes A Beat-ing”