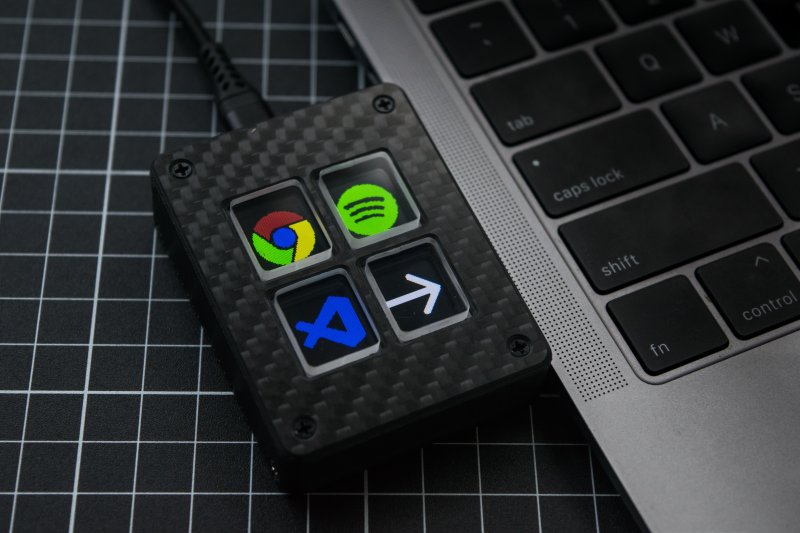
Once in a while, we see projects that could easily pass for commercial products. This is one of those projects: a (surprisingly) low-cost DIY macro pad from [Josh R] that was designed to be a cheaper alternative to the various stream decks out there. Between the carbon fiber top plate and the crystal-clear acrylic keycaps, this is quite the elegant solution.
This lovely little macro pad is built around the ESP8266, specifically the WEMOS D1 Mini V4. However, the most vital part to get right is the screen, which must be a 128 x 160 TFT display in order to line up with the 3D printed frame that divides it into fourths. Custom parts like the acrylic keycaps and the carbon fiber top plate are available on Tindie if you don’t have access to a CNC.
Operationally, Open Deck has a nice-looking GUI. Once programmed, each shortcut is capable of having three beneath it, with the fourth button reserved for Home. Be sure to check out the extremely satisfying build video after the break.
Want a stream deck, but don’t want to build it? Just dig up an old phone or tablet.


Steam deck, stream deck, I’m confused.
I like the hardware being cheap, but running machine side software is a no go for me.
This is the first one I’ve seen that has 4 buttons with one LCD. Nothing in the write up, but I assume there is a central pivot and the physical switches are off the edges of the screen. Bonus points if you make the acrylic buttons sit slightly concave when not pressed so they don’t wind up too convex as you press them. Of course if the throw is 1mm at 25mm it may not matter that much. And you can likely adjust it with the 3d print.
Run it in say a Pico or Atmega and make it compatible with something like the programmable keyboard configurator and you’d really have something.
I did look into using someone like QMK but decided against it as it would limit the additional functionality. By making a custom PC application it meant that things like automatically showing the macros for the currently active app was possible, making it much more usable. The PC app also makes it super easy to update the images by doing all the bitmap conversation and sizing for you.
The acrylic keys protrude to create basically an entire layer but are individual blocks. There is a small spacer layer over the screen and then micro switches along the sides of the screen. Pressing a key clicks the switch on the side while the other end is supported by the spacer. It would produce a feeling of tipping slightly to the side.
Massive kudos on the simple and cost effective design.
Don’t make me watch an assembly video to figure it out though.
Move the software onboard so it’s invisible to the client, improve the documentation, and there’s some serious potential here.
“Don’t make me watch an assembly video to figure it out though.”
Indeed. The Idea is quite nice and well executed, but the video is terrible. Lots of flashy nonsense. Who wants to see a screw in tweezers for 3 seconds, or sped up video’s of making solder joints? While it contains just a few short seconds spread over several short intervals worth of real info on how the switches are actually actuated.
00:35 It’s plastic (PMA?) buttons with a thin section at the side.
02:06 The micro switches are at the side of the LCD.
02:48 A thin strip in the center is the pivot point for all switches.
I really like the idea of the unique screen for 4 buttons, but at this point, we could wonder if using an old phone for this task would be a viable alternative?
I really like the Idea of putting one LCD behind 4 buttons, but for mechanical keyboards, the feel of actuating buttons is an important part, and using a lever that pivots in the center of the LCD (@02:48) is not very great for this.
But it is a seed for more thought. Instead of using the levers, the buttons can be made out of a C section of acrylic “around” the LCD, with the micro switches directly behind the center of the button.
This also makes the whole product narrower, and you could make it modular to add more buttons by cascading these devices. But the best would be to have a way to put 16 or more buttons in front of a single LCD, and still have them operate micro switches. Maybe it is possible to fake it. Only put a clickety thing in the buttons to get the feel, and then use a touch screen LCD to do the actual sensing.
I saw the thumbnail and thought “I wonder where they got those tiny colour screens from”.
Never would’ve imagined it was a single large screen. I guess that’s what I get for upgrading myself from a hobbyist to a “professional”.
When will someone make one of these with an Ethernet interface that does not need to be tethered to a PC?
This has WiFi and all images are stored locally on the device so can be used standalone
Have a look at the Genovation ControlPad CP24 Programmable usb Keypad on ebay, under $20.
I use one for presentations using an api on the presentation software and curl on the pc. I tired them together with autohotkey.