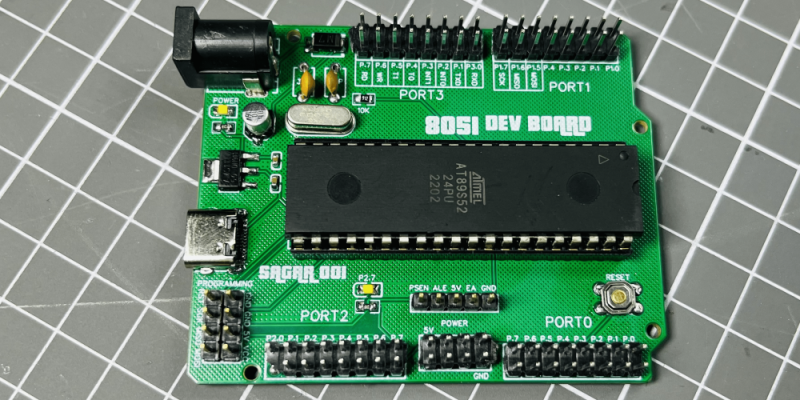
Most of us are familiar with the Arduino Uno, a starting place for electronics projects since 2010. But what if the Arduino Uno was released in 1980? You’d probably get something like [ElectroBoy]’s 8051-based Arduino Uno.

The Arduino Uno-compatible board has an MCS-51 (often called 8051 instead) instead of the usual ATmega328P/ATmega168. Specifically, [ElectroBoy] uses the AT89S52. Like the ATmega microcontrollers, the AT89S52 has an 8-bit CPU with a Harvard architecture and very similar GPIO capabilities. Unlike the ATmega, however, the original MCS-51 has a CISC CPU (as opposed to ATmega being RISC) and a release date about 36 years earlier.
The board itself also has some differences from the original Arduino Uno. First of all, it has a USB type-C port, which is definitely a bonus. Secondly, it’s simpler: No USB-UART (which also means no USB programming), a different pin layout (Arduino shields likely won’t fit) and more I/Os than the ATmegas have. Sure, it’s not as practical as an actual Arduino Uno, but it’s definitely cool for our retrocomputing nerds.


I’m confused:
>”The Arduino Uno-compatible board …”
>”No USB-UART (which also means no USB programming), a different pin layout (Arduino shields likely won’t fit) and more I/Os than the ATmegas have”
How exactly is is arduino-compatible? The hallmark feature that makes arduino (usb plug-n-play) is missing, the form factor is different, and I’m not aware of any C++ compilers available for the 8051.
A few C++ compilers exist for 8051:
https://www.iar.com/products/architectures/iar-embedded-workbench-for-8051
https://ceibo.com/eng/products/cpp.shtml
I was just looking at the CH552 series microcontrollers, which are also MCS51 based, and the Arduino extension for it is apparently limited because there are no free C compiler (noted here: https://github.com/DeqingSun/ch55xduino)
AFAICT, there are no unencumbered compilers for the MCS51 (I’d be happy to be proven wrong about that)
Though to address the point at hand – I think “Arduino Uno” compatible may reference the form factor of the board, including pinout. Whether that’s meaningful for shields and libraries related to Arduino is the deeper question.
SDCC does have support for mcs51 – i have never tried it hovever
https://sdcc.sourceforge.net/
MCU on the photo is AT89S52 – here is some blog post describing usage of SDCC for exactly this MCU
https://ernstc.dk/arduino/at89s.html
Many years ago I used SDCC to develop code for several NRF24LE1-based products (that chip marries an 8051 core with the NRF24L01+ radio). I think SDCC is GPL licensed (except for some PIC header files). It is easy to use and I found it to put out good code and by the end of the projects I was turning out really performant and functional code with it (I spent a bit of time looking at the assembly it generated). I don’t think I ever found a bug. I just looked and it is still being supported and improved.
The thing that I haven’t seen anyone discuss here is that the thing that makes a board an Arduino is the ability to build and program from the Arduino IDE and a set of libraries at least implementing the core Arduino functionality. This board has neither. I think someone could do that using SDCC but it would be a labor of love. Despite the quirky fun of the MCS51 architecture the world has moved on.
Around the late ’80s there was Small-C which ran on a few 8-bit chips at time. Although I only used the 6502 (native on a BBC Microcomputer with 32KB!) compiler.
Although with a little googling shows there was an SDCC (Small Device C Compiler) release supporting 8051. There sourceforge.net page is not responding for me, here’s the archive.org version:
https://web.archive.org/web/20230128034654/https://sdcc.sourceforge.net/
And wikipedia:
https://en.wikipedia.org/wiki/Small_Device_C_Compiler
And for reference the wikipedia Small-C page:
https://en.wikipedia.org/wiki/Small-C
It also doesn’t have many of the similar peripherals. The project itself simply says the vague shape is what ties it to Arduino, and reads a bit like an advert for a PCB fab.
I’d prefer those big clunky PIC devboards with this 8051.
Plenty of stuff to implement but you can’t deny it’s artistic fun seeing the clash of modern and old here.
You know you can program the arduino from the serial port right? You absolutely do not need a usb port to program an arduino. You can use another arduono if you so desire. And while we generally use usb to access serial ports, serial predates the heck out of usb.
Hi. The Arduino Uno uses a humble serial connection internally.
There’s an USB to Serial converter on the board to make it look USB (one control pin triggers reset on the ATMega chip).
On the software side, it’s just a classic COM port, though.
So there’s nothing wrong to just use a real serial port straight away.
Rather the contrary.
A traditional RS-232 port on motherboard or PCI/PCIe expansion card has a true FiFo buffer and supports things like 5-Bit format.
So frame issues won’t happen (an old issue with USB serial dongles).
So if the voltage levels are correct (3.3v to 5v TTL), there’s no issue.
The microcontroller mustn’t get +/- 12v on its RX pin or reset pin.
Using a simple one transistor driver, opto-coupler or MAX232 can do it.
Some people claim to have used an 7805 in series, even. Was in the 80s, I think.
The other way round is not so critical (microcontroller transmitting to PC).
A real RS-232 port can understand TTL levels, even if it’s a bit quick&dirty to rely on that.
The first Arduinos had the serial port as a true DE9
Right, thanks! 😃
Found a related hackaday.com article about the early models.
https://hackaday.com/2016/03/04/wiring-was-arduino-before-arduino/
When I started my apprenticeship with 16, the AT89S52 was the first MCU I’ve written C for, that was in 2006.
And just a couple of weeks ago I wrote some code to run on an Cypress FX2 that also has an 8051 core. RISC-V is being used more and more as a replacement for many of the use cases (e.g. cheap USB peripherals), however, I doubt the 8051 will be gone anytime soon. It is immortal by now.
This needs a parallel port and an IDE that runs on a C64.
The only thing Arduino UNO about this is the shape of the base PCB.
Connectors are all different (USB) and in different positions (POWER jack, I/O headers).
Arduino UNO shields won’t work.
Kind of like calling a VW bug a Lamborghini because they both have four wheels.
LOL, who’d compare Arduino to a Lamborghini?!
Lamborghini likely uses some ATTiny chips. So they’re basically the same thing!
FYI, The ATmega4414, 8515, and 162 have the same pinout, including most peripherals.
I went the other way, starting with 8051, then moving onto AVRs and mostly stuck with the 8515. Though, 8051’s (and 8031’s) are so common, I’ve thought about going back to them for small/slow projects.
Also, the 8051-series has a pin to bypass the internal ROM for an external one… which means even scavenged OTP 8051’s could be reused as though they’re 8031’s.
And, yes, SDCC.
That USB C port needs to be replaced with a DB-25 and it needs an IDE that runs in DOS.
http://tinyurl.com/3pv3jeuf
😁
Hi. I think it’s also possible to use a PS/2 or mini-DIN type connector here, which has similar dimensions to USB-B connector.
We need to have 4 pins merely. GND, TXD, RXD, RESET.
Alternatively, a 3 ring 3,5mm phono jack could be used.
The 2 ring (stereo) version was being used by cheap electronic organizers (aka databases, PDAs) in the 90s, already.
That’s when Windows 3.1x was being around, still. It predated USB, so serial connections were being used for all sorts of things (they could survive shorts).
Parallel connections were more critical by contrast.
As a newbie, one thing that I’ve tried is a Arduino Uno shield for 8051 programming. I’m kind happy that I could pull it of after one year learning electronics from almost zero (I’m only a software developer with more than 10 years of experience), but one bummer is that I couldn’t make it work as a “development board” (quotes because it depends on being attached to an Arduino as ISP) too… I guess the missing part is figuring out how to cut the ICSP communication between the ATMEGA and the AT89552 after the programming procedure.
C? Hell, go super retro and program it in BASIC. 😂
https://www.mcselec.com/index.php?option=com_content&task=view&id=16&Itemid=104
Or, you could really go super retro and program it in MCS BASIC 52
http://web.mit.edu/6.121/www/other/basic_man/CH1.html
Oops:
https://www.dos4ever.com/8031board/Basic52Manual.pdf
Interesting side note here, an awful lot of the original Intel 8031/8032 chips were actually factory programmed 805x chips.
Putting them in a programmer capable of reading them would often yield code, one such device I found had MCS BASIC 1.0 instead of the far more common V1.1.
I found tinybasic in romless chips too. Pm me.
One wierd thing about 8031 is that it has disadvantages of both Havard and Von Neumann. Like Havard, the data and code address spaces are seperated, can execute from data space and the can use same instructions for ro-data and rw-data requiring roundabout ways like tagged pointers. Like Von Neumann, both code and data is accessed over single bus, leading to bus congestion and data read-writes influencing instruction fetches.
Did you mean “can’t” when referring to execution from data space and same pointer operations for both spaces?
One think that was commonly done back in the 8051 days was to overlap the upper 32K address spaces into a single SRAM chip. This would let you execute code from RAM and was very useful for testing and development.
How about AT89LP51RD2 ? It is pin compatible with AT89C51, has 64KB flash, 2.2KB sram, most instructions in 1 cycle, hardware multiply in 2 cycle, dedicated 16×16 multiply accumulate hardware, numerous peripherals both digital (TWI, enhanced USART, 7 8-bit PWM, N 16-bit PWM, all pin configurable as push-pull, open drain, quasi bidirectional) and analog (10-bit ADC/DAC, analog comparator). Has, self writing support and already has factory programmed serial bootloader. Can run at as low as 2.4V and as fast as 20MHz. And has higher performance than equivalent AVR uC.
My old day project use 8051 from atmel and also from Phillips. All code with assembly. 20 yes ago and still can be run. Nowadays assembly compiler for 8051 that compatible with windows10 is hard to find.
You can call the atari 2600 a microcontroller since the versions from the late 80s and early 90s used a single chip
Just give it 5v, clock, color delay voltage, and 4k of rom, plenty of bankswich schemes to add RAM and extra rom
Joystick ports provides is your gpio, paddles can be used for bit banged serial ports
And built in graphics with s-video, though the single chip may only spit out composite iirc
With a full 6502 instruction set
Better compatibility than a noac
No interrupts, you do have an integrated timer with the io for joysticks and 128 bytes of ram
The auduino TV out library emulates this
You also have 2 channels of sound output and can be used as a dac for digital audio, up to 8bit using both channels 4 bit for just one
Only problem is that your 6502 only runs at about 1 mhz
You could do what I do and just build a full computer based around the chipset
As a digital engineer, not an analog one
Have a memory map and programming scheme that doesn’t give you an aneurysm.
Use a real 6502, a 138 or 139 to generate a bunch of chip selects and some 74 glue logic and latches for builtin bankswitch
Run an atmega to dma tia, 6502 needs tristating to do this, bus stuffing can also be exploited.
128 bytes becomes zero page cache, because you’ll have 32-128k bankable, advantage of adding ay8910 or ay8930 with 16 bit gpio and get dat nes and c64 sound too along wit tia audio
Rom still is 4k but you have ability to fuck with a12, a13,a14,a15 as flags, and writing and reading will actually now do things a 6507 cant
2k and 4k roms should work natively because they should never need to access these areas, 8k and larger can simply be ported remove the bankswitch, write a loader, and just load the entire cartridge data or rom in ram, and just remap addresses to work
With the atmega coprocessor, running at 21.47727mhz it’s own interrupts, uart, timers, and pipelining, 1 clock cycle = 1 instruction on average maybe 2 or 3 depending on Instruction. 18 times faster than the 6502, 6 time the tia clock (I use ntsc chips, best one with the largest color pallette)
Can do audio, and graphics u never though a atari vcs can actually do
Can even over clock the cpu thru a gate and soft switch, to get a 3.579545mhz cpu clock.
Or try overclocking the tia, but need a cpld to spit out an rgb signal since hardware timing changes and tv looks retarded trying to read dat video signal
Unlike the antic the atmega can also do memory operations and write to work ram, has its own eeprom and ram, with flash
Store a bootloader, and some lookup tables in eeprom for tia
Arduino uno has to be one of the worst pcb layouts for connector spacing, designed to be awkward. Never liked or used it. Arduino Nano for the win, and ESP8266 / ESP32 for anything needing wifi or more speed.
remember using 87C752 dev kit from philips to learn microcontroller prorgramming with 2004 lcd. erasing eprom for code change not fun.