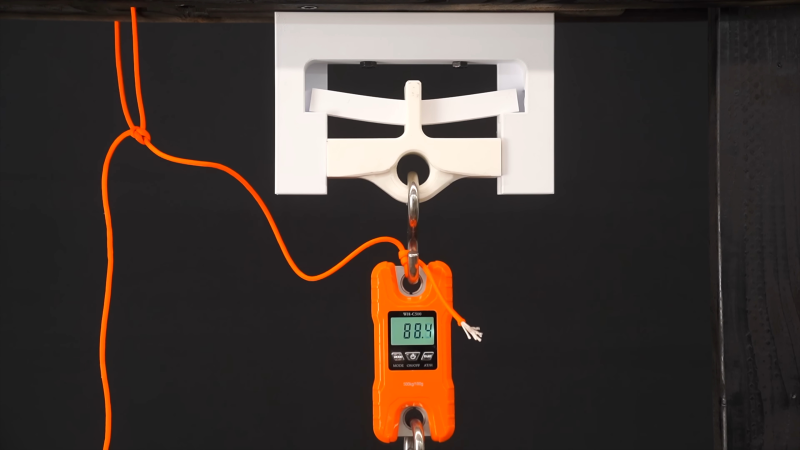
When working with an FDM 3D printer your first prints are likely trinkets where strength is less relevant than surface quality. Later on when attempting more structural prints, the settings become very important, and quite frankly rather bewildering. A few attempts have been made over the years to determine in quantifiable terms, how these settings affect results and here is another such experiment, this time from Youtuber 3DPrinterAcademy looking specifically at the effect of wall count, infill density and the infill pattern upon the strength of a simple beam when subjected to a midpoint load.
When setting up a print, many people will stick to the same few profiles, with a little variety in wall count and infill density, but generally keep things consistent. This works well, up to a point, and that point is when you want to print something significantly different in size, structure or function. The slicer software is usually very helpful in explaining the effect of tweaking the numbers upon how the print is formed, but not too great at explaining the result of this in real life, since it can’t know your application. As far as the slicer is concerned your object is a shape that will be turned into slices, internal spaces, outlines and support structures. It doesn’t know whether you’re making a keyfob or a bearing holder, and cannot help you get the settings right for each application. Perhaps upcoming AI applications will be trained upon all these experimental results and be fed back into the slicing software, but for now, we’ll just have to go with experience and experiment.
The video does a reasonable job of determining the yield point for a few values of the parameters of interest, but most interesting were the figures for which infill patterns are strongest, and how to optimise for weight-to-strength ratio, which could be useful for some folks.
This kind of content is not new on these pages. Here’s an experiment to determine the stiffness of various filaments. Here’s another angle that uses printed worm gears as a testbed to determine the effect of printing orientation, amongst other factors. If you’re a bit newer to 3D printering than all this, then check out our guide to getting started, complete with actual practical advice. That’ll never catch on.


N=1, so every setting is only tested once. So I would take the results as indicative, as there was no test done to see how much variation you will have in multiple samples of the same type.
Not to mention that depending on the filament used (ABS, PLA, …), the infill may behave a little different. Some filaments are more elastic than others, some resist better in compression, other in tension.
And also the cell size of the infill pattern is important. If the cell is small enough, the walls will be stiff because they are to small to bend.
Did I talk about the influence of the pigment in filament behaviour? Or of the printing temperature, infill percentage, humidity, shape of the printed part and (perhaps the most important) the phase of the moon? (jk)
However lacking this experiment is, it is a start.
There are a lot of factors to account in while choosing an infill, from the material science category factors to the time constraints and artistic side (the dreaded “i like the other infill/colour/material/shine/size/etc more, can you reprint all 200 like that, pretty please?”) and the most doen to ground possible: the printer and filament at hand.
And not related directly: what did you print today/last time and what it was? I printed a compliant mechanism toy. I checked that the infill will not be present in the most stressed parts and is not, but those parts still bend a little.
It
For 3d printing I don’t actually see that as a problem – more test samples are obviously good but there is such a variety of part loadings, filament materials, print temperature/speed type settings etc that you can never have exhaustive good for every possible user info. So anybody actually intending to use 3d prints at all near the mechanical limits will have to do their own test iterations under the conditions their parts are expected to work in…
All any external test like this and the many others out there can ever really be is a useful resource to help build the intuition on what will be best for you, or a sufficient proof that your needs are so far beyond/below the limits you need a redesign or may wish to redesign to reduce material consumption… Good to let you skip a few iteration in your design perhaps and get you close to your goals first time.
The bigger problem I see, is the different infill percentages. For the different patterns adjusting to keep printed part weight the same would be better. If you are worried about efficient use of filament. Sometimes strength to speed of printing is more important to me than the cost.
OK when you’ve done your better video with N=5 or N=50 for each one I’m sure HaD will feature it and we’ll all watch it and give thanks.
Sadly, they aren’t working to characterize the infill patterns properties beyond stiffness. Also, I agree that a single print is not enough to draw a conclusion. To really understand the infill pattern it would be best to test using a simulation. This way you can isolate the properties of the pattern from the properties of the type of material printed. There are many dimensions to this problem that are being completely ignored like pattern wall thickness and pattern size.
This is crude testing at best and junk science at worse.
Simmer down a tad. I think it’s reasonably representative. A simulation would have to be pretty high end to beat real world testing and it hardly seems economical.
If you disagree, please run a simulation that is beyond reproach.
Agreed, I don’t even think it can be done with any meaningful accuracy yet. As before you can model the strength of a part based on its sliced geometry with any accuracy you would have to do lots of fluid dynamics on the print process to have some idea of what the material properties will be. Which rather invalidates simple simulation.
Does this model/filament/print speed/temperature (etc) mean it holds heat well enough that each new layer really remelts deeply into the previous for good layer to layer adhesion? Do all the areas cool evenly for similar internal structure and well distributed internal tensions from the cooling? How many thermal cycles has this polymer been through? How much moisture has it absorbed? And as most models are hollow and filled with air you have to ask just how air tight the print is, will the external force create internal air pressure? If so does the nature of the infill contain or distribute that increased pressure in a beneficial way to the metric being measured?
Someone posits a simple expirement to explain some basic concepts to a group of new students, it’s nature itself implying that there is a deeper understanding that will require far more than a brief first day introductory lecture.
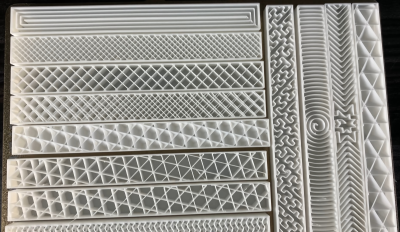
Take-away from this video: 3 perimeters, 20% gyroid infill.
Increasing perimeters beyond 3 is okay, but best not to overdo it.
Lastly 3D honeycomb, and Cubic are still good choices if you don’t like your printer shaking itself apart while it makes cubic…
I love empirical testing videos like these. I would be curious if this can be simulated accurately.
In the YouTube comment section people mentioned that printing time should also be considered as a cost and not just weight.
Also this video only tests bending strength. But I would also be interested in how durable they are (how many cycles can they bend at, lets say 50% of its max, or how many hours at 90% of its max) and how stiff they are. I suspect some types of infills might wear out quicker and lose strength after a few bending cycles. Torsion strength might also be interested.