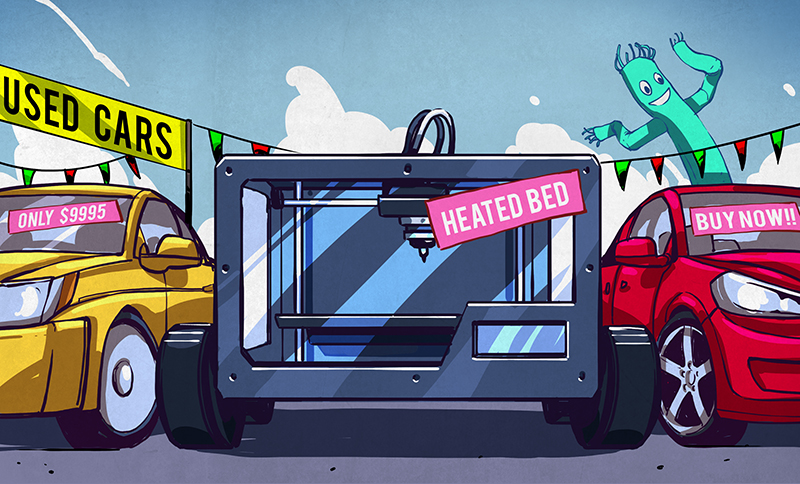
Given the incredibly low prices on some of the models currently on the market, it’s more than likely a number of Hackaday readers have come out of the holiday season with a shiny new desktop 3D printer. It’s even possible some of you have already made the realization that 3D printing is a bit harder than you imagined. Sure the newer generation of 3D printers make it easier than ever, but it’s still not the same “click and forget” experience of printing on paper, for instance.
In light of this, I thought it might be nice to start off the new year with some advice for those who’ve suddenly found themselves lost in a forest of PLA. Some of this information may seem obvious to those of us who’ve spent years huddled over a print bed, but as with many technical pursuits, we tend to take for granted the knowledge gained from experience. For my own part, the challenges I faced years ago with my first wooden 3D printer were wholly different than what I imagined. I assumed that the real challenge would be getting the machine assembled and running, but the time it took to build the machine was nothing in comparison to the hours and hours of trial and error it took before I gained the confidence to really utilize the technology.
Of course, everyone’s experience is bound to be different, and we’d love to hear about yours in the comments. Grand successes, crushing defeats, and everything in between. It’s all part of the learning process, and all valuable information for those who are just starting out.
Establish a Baseline
 If you just plugged in your 3D printer, your first project shouldn’t be a replica DOOM rifle that takes 30+ hours over dozens of prints to complete. You need to start small, but more importantly than that, you need to establish what kind of condition the printer is in. You want to determine how well the machine is calibrated and setup, but it’s also helpful to have a reference point for what the print quality was like when the machine was brand new out of the box.
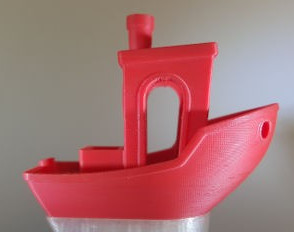
One of those things they don’t tell you going in is that there are certain degenerative issues inherent to 3D printers: nozzles wear out, belts get lose and worn down, beds warp, and so on. If one of your first prints is a common benchmark like the extremely popular “Benchy”, or even a classic calibration cube, then you’ll have a physical reference point you can later compare with your current prints to see if quality has begun to degrade.
Keep Notes
There are many variables involved in producing high quality 3D prints, and even early on, you’re likely to notice some trends as you experiment. Different brands of filaments may require different temperatures for good bed adhesion and surface detail, even if it’s all PLA. You may find where you are 3D printing is often just as important as how. The temperature and humidity of your work area can have a direct impact on your printing experience, and you might find that you have more difficulty getting prints to stick to the bed in winter than in summer.
As you make these discoveries, record them. You’ll really be kicking yourself if you forgot the proper temperature and extrusion multiplier for a specific brand of PLA that you haven’t used in awhile, and you come home to a print that looks terrible because of it. I’m not going to say this exact scenario happened to me a week or so back, but just keep it in mind as a hypothetical.
Maintain your Printer
As previously mentioned, there are some issues which can crop up on your printer over time, but unless you’re really cranking stuff out it will take awhile before they manifest themselves. Checking your belts every six months or so should be sufficient. You want to make sure that the teeth aren’t worn down, and that they are at the proper tension. It’s not the most scientific method, but you should be able to pluck your belts and hear a deep twang sound, not unlike a bass guitar. If they don’t make a sound when plucked, they’re probably too loose and should be tightened by whatever method your particular printer uses.
Nozzle wear is a bit harder to quantify. Under normal conditions using straight PLA, you’re looking at nozzle wear on a scale of years. It’s entirely possible you’ll upgrade to a newer 3D printer before your nozzle wears out. But if you’re using more abrasive filaments, such as PLA with additives (wood, metal, stone, etc) or glow in the dark filament, then you could go through nozzles rather quickly. If you’re seeing poor print quality after running through a couple rolls of this sort of filament, it’s probably time to change your nozzle.
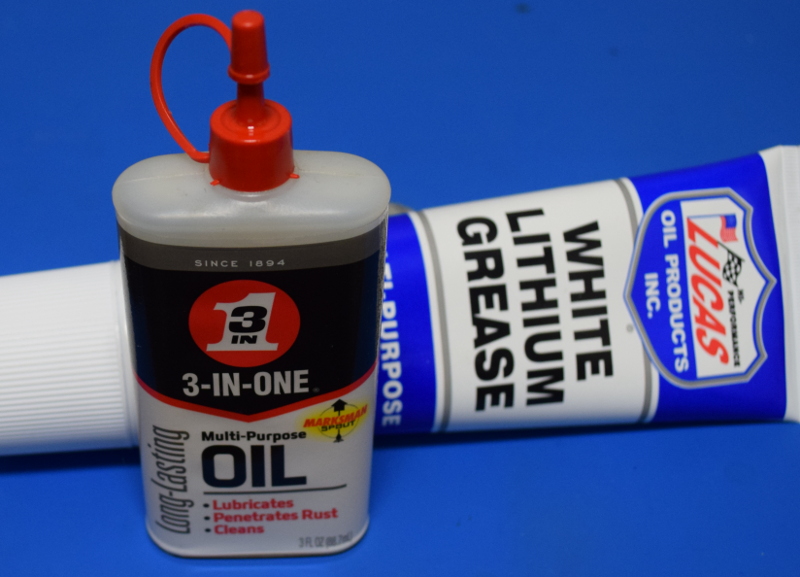
Lubrication should be done on a regular basis. That doesn’t mean spraying the printer with WD-40 either, that stuff has no business near the plastic parts that many printers use. For linear bearings and rods you want a light machine oil. On threaded rod, especially if running through metal nuts, you should be using a thin lithium grease. You should also be cleaning out any dust and debris that has a tendency to build up on the rods by wiping them down with a soft cloth before applying your oil.
Print Regularly
This one’s easy: just print some stuff. You don’t have to print every day, but printing something every week or at least every month should be a goal to keep in the back of your mind. Like anything else, 3D printing takes some practice to get the hang of, so you need to do it often. You don’t want to break out your printer the day before you’ve got a big project and struggle to remember how the software works, or what the proper process is for leveling the bed.
Websites like Thingiverse, Pinshape, and YouMagine are overflowing with interesting models to print, running the gamut from desk toys to legitimate tools. Keep an eye on the newly added models on sites like these and print out anything that catches your eye. Be sure to post a picture of your print and give some feedback to the creator as well; that’s the kind of thing that keeps the community going.
Go Design Something
I’ll wrap this is up with the last piece of advice I always give new 3D printer owners: design something. It’s a lot of fun finding neat models and printing them out, and you’ll probably get a couple months of enjoyment out of that alone. But imagine if you bought a paper printer and all you ever did with it was print out cat pictures you found online. That would be kind of weird, right? Start small with something easy to pick up like TinkerCAD, and see where your imagination takes you.
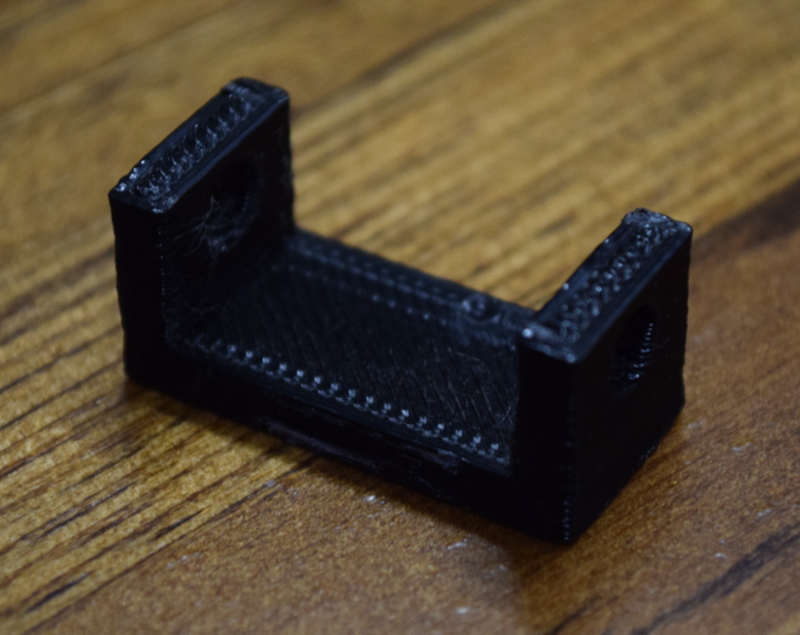
The true “Eureka” moment with desktop 3D printing is the first time you successfully print one of your own designs, the first time you look at the rendering on your computer and down at the physical object in your hand and realize you’ve effectively given birth to a little plastic baby. I still have the very first print I made based on my own design: it’s an ugly little bracket that looks like it was extruded with a glue stick, and I have no idea what it was even supposed to be for at this point. But years later it’s still sitting in my desk drawer as a reminder of the moment I realized 3D printing was more than a novelty.


I am new to 3D printing last year 2017. It has been a fun and frustrating time learning. I did learn Tinkercad and it has been great made several things using it. It is worth jumping into 3D printing just for the learning experience.
I started with A8 Anet and now got a CR010s. Gave several 3D objects for Christmas.
It took me a few months to really learn what all the people don’t want you to know. There is a combination of free programs to use that make a successful, cheap and easy experience. In my opinion (just another opinion) tinkercad is pathetic and has poor/young support. There are other programs out there with large communities and backed with 15 years of forums to read.
I am sure to some tinkercad is “pathetic” but I had never done CADing before and it got me over the hump. I am ready to move on but not so sure what to move to. You said “There is a combination of free programs to use that make a successful, cheap and easy experience.” So don’t leave us hanging what is your suggested list?
Try FreeCAD for example!
I’m new to 3d as well. I’ve been trying to use Blender. It’s a full featured 3D modeler and it’s free. But it has a pretty steep learning curve. I’m not a big Windows fan. But Windows 10 uses 3D Builder. I don’t know enough about it to pass judgment yet.
I find OpenSCAD to be really useful. If you have some basic programming experience it’s probably easier to get up to speed with than a 3D CAD environment. At least it was for me.
I literally work with Autocad, autocad MEP, Revit and 3ds everyday, and I do NOT think tinkercad is worthless. It’s great for quick little things i need to mock up, and although it CAN get more in depth, it works just fine for what it’s designed for. Autocad is like Lego Technic, tinkercad is more towards the duplo end of things, but there is absolutely nothing wrong with that. I enjoy using it myself. Use what works for you, and don’t let anyone else crap on you for it. There is too much finger wagging and tsk tsk-ing in the technical world.
You’d be amazed what you can churn out with MS Paint, free online SVG converters, and tinkercad.
you start printing replacement parts for said printer, rinse repeat ;)
In the end it’s similar to ham radio, sure you can talk to anyone about nearly anything around the whole world… but mostly you just end up talking about radios…
Same with 3d printing, you can print anything, but mostly you end up printing 3d printer parts.
Or the FORTH programming language. Most of what I’ve encountered with FORTH programmers is all the neat additions they’ve made for their own personal FORTH setup, but rarely ever do I hear about programs they’ve written *in* FORTH that other FORTH users can run to do useful things.
true, but in forth’s defense, if that’s how you’re gonna roll then forth makes it far easier than any other language!
The programs that I’ve worked on in Forth were for embedded systems–they did useful things for people who had no idea about the language the code was written in.
As for neat additions to our Forth setup, we added a “ranged case” statement (cases execute if the switch value falls within a range defined by two values, instead of being equal to a single value) that greatly improved the readability of certain code compared to the equivalent using IF-ELSE-THEN.
So true. Reminded me when I was a college student and had a VW, there was always more parts to make it better, same with the 3D printers.
Electronics hobby and woodworking is a trap too: let me make this wood jig so I can make other jigs, so I can eventually make a final product…but first I’ll make this other thing that will help me make those first two….
Or, “I’m going to make a better multimeter, or capacitance meter, or oscilloscope, or a LED trsistor checker!
This is so true LOLOLOLOL
I agree, just be wary of badly designed brackets and belt tensioners and the like. For example I’ve seen many flimsy Y-belt tensioners for Prusa i3 and its kin on Thingiverse which would introduce way more slop than they eliminate if you replace the stock pulley mount with these things. And a lot of the photos of builds clearly showed layer grain oriented with the least strength along the direction of tension. Sometimes you’ve got to use your critical thinking and decide for yourself if a printed upgrade is really an improvement–and the best method of all, test it empirically!
A little experience in any other mechanical engineering-related project will really lessen the blow of learning to 3d print. Even something like woodworking. It definitely makes it no surprise at all that it’s not a click-and-forget operation. I had absolutely no expectation of that lol
It was a nice and enjoyable read, thanks for the writing.
BTW. White lithium grease (or any grease for that matter) has no place on 3D printers. Grease is for high load, high pressure applications, which 3D printers are not (even the Z). A light oil should be used. Unless of course your still in 2010 running a wade geared extruder, then a little grease may be in order on the gear set.
*you’re
The Lulzbot TAZ 5 & 6 use lithium grease for their z-rods. That extruder assembly (rods and all) is far heavier than any off-the-shelf Prusa clone or even the mid-range Makerbots.
The Lulzbot KITTAZ (kit version of the TAZ 4) also called for white lithium grease on the z-axis screws.
Grease is for sliding, oil is for rotating.
Maybe if you’ve got a Monoprice Mini or something, but there are definitely printers with heavy Zs and metal-on-metal contact that benefit from more than light oil. In addition to the Lulzbot documentation, I believe MakerBot advises grease on the Z rods as well.
Really, outside of the possible collection of dust, I can’t see any reason you wouldn’t want to use a light grease. Light is the key word though, too thick and it could gum things up.
Personally I would go with SuperLube PTFE grease, but I think the point of the author was to point out stuff you could find easily. I’ve never found SuperLube in a big box retailer, unless I’m just looking in wrong spot.
Lithium grease isn’t exactly an EP grease. Now I wouldn’t put something like Honda Moly 60 on a 3d printer’s lead screws, but lithium grease has a slight advantage over light machine oil in that it has some cling; it stays on the entire length of the vertical lead screw instead of running down and eventually pooling in the motor coupler.
But in practice, either would work fairly well if you kept an eye on it and didn’t leave it in dusty, humid elements without renewing lubrication for eons. A little bit of love and attention is the most important ingredient.
Just got my first 3D printer this year, Anet A8 kit. Building it was the most fun I’ve had in years, really reminded me of getting big lego sets or, even better, Technic!
I can see how the kit building would be fun for some, it was a pain for me. I already had to much things to build, BTW I am an engineer, so capable but maybe lazy or been there done that. That is why my next machine was built. At least you got to know the machine. I do strongly recommend the Anet to those who want to get started.
Yes, I got an Anet and so far its been a good experience. Printed a perfect Benchy Boat and Tolerance cube straight up with minimal input by me. I’m just finding things to print now.
Same here, high five! So far so good. I’m designing my own E3D v6 print head carriage, which I am assembling and will soon test. At the very least it should make it easier to change filaments. I plan to use flex filament often, so I’m keeping the direct drive–but I hate having a fan and heat sink screwed in over the extruder. I’m excited to see how it works out!
Heat pipes might help move the mass elsewhere.
“This one’s easy: just print some stuff. You don’t have to print every day, but printing something every week or at least every month should be a goal to keep in the back of your mind.”
At least we haven’t regressed to the inkjet “need to print”.
This advice really resonated with me. I stepped back from printing for nearly a year, forgot all of the relevant settings, tips, tricks, and etc. I stared for a few minutes at OpenSCAD in horror. (Is it “extrude_linear” or “linear_extrude”?)
After a little while back in the saddle, I’m back to being fluent. It’s very nice to be able to just cobble something together in 10 minutes, hit print, and have a fair-to-decent chance of something useable come out without having to worry if the machine is set up, or if I’ve got the right configs or whatever.
Keep your skills sharp.
I know this is a site devoted to thinking outside of the box but wouldn’t it be nice if 3D printers were more into the “just work” category, rather than having to constantly tune, monitor and tweak things? You don’t do anything with your 2D printer but send it files, most of the time and it does a pretty good job of printing things. At least, most of the time.
Even in the world of six figure industrial 3D printers, you still have to do plenty of manual things and while things will likely shut down if there are issues versus continuing to run endlessly, it’s still not really something you can just use and expect to work most of the time without some degree of maintenance and upkeep and technical know how and parts. The level of which may be different for different printers of course but it is not anywhere close to zero on any one of them either.
I assume it is possible to have a machine that monitors enough that it can not just work correctly but also notice early problems and possibly even correct for them itself but that feels more like science fiction than the real world of 3D printers.
Because 2d printers don’t have the same issue. Everything is standardized and even then has some customization. On average, its all 8.5×11 with 20lb bond and 0.1mm thickness. If everyone printed at the same resolution/infill/material/speed then it wouldn’t be a problem.
It might happen, but it’s going to cost you. Lots more money for additional intelligence and sensors to detect where the problem is. It’s perfectly possible to build that today; there just isn’t a market for it because it would cost so much and people are very focused on price. “Why would i buy that one for $3000 when this one is $300 and the print comes out the same?”
I wouldn’t expect high end industrial printers to be hand-holding devices; they’re there to do real work with a lot of flexibility. I can’t think of any industry with heavy duty equipment that “just works”. Anything that moves needs maintenance due to wear. The SANs at my job are smart enough to order new drives when one fails. That kind of thing gets very difficult to monitor when you’re talking about tire wear or cracked hoses.
In the civilised world, everything is A4 or A3 at 80gsm or thereabout, but then you have to be able to handle 6″x4″ for photos, on 150gsm or even more, plus label sheets, or direct printing on Cd’s / DVD’s …
No that will start we they discuss the hydrophilic nature of some filament… print it or lose it…
Carrying that thought further, if the filament gets brittle when exposed to humidity int he air, what happens to the prints? For some applications, having the print get brittle would be pretty bad. PLA is a terrible material…
Its a biodegredable polymer. It will detoriate. Its hard to have both long lasting and biodegradable materials ;)
Biodegradable stuff is meant to break down when it’s in the biosphere. Or a landfill as a close approximation. Can be broke down by soil bacteria, natural cycles, etc. It’s not supposed to just disintegrate sat on the shelf!
Definitely design your own parts. There are only so many use objects on Thingiverse before you run out. 3D printers are best used as a tool for other DIY hobbies like electronics, home improvement, costumes and props, tabletop games, art etc. They can be a hobby of their own but without an outlet you’re left with questionably-useful or entirely decorative prints. The 3D Printing Nerd is in that predicament – too many printers and filaments to test, not enough models.
Maybe the answer to “You Got a 3D Printer, Now What?” is, “buy a 3d scanner to go with it”.
Ha ha. Exactly what I did, haven’t implemented it yet but couldn’t pass it up.
Even with the $4000 NextEngine 3d scanner, the output is just not that good. I’ve never gotten a single usable part out of a 3d scan without a LOT of hand reworking.
Try a diy printer and also a scanner. This way you can get it super cheap. Print new parts. A diy scanner using photogrammetry can produce and infinite about of resolution and clarity depending on your camera. You can get a cheap high resolution dslr cheap or maybe away have one. That would put the price too make a diy scanner at around 100 with the ability to outperform most any scanner available to you on the market.
I come from a long and storied background in computer animation, so it’s been a huge shame that I haven’t had access to a 3d printer at home until recently. I design 3d stuff all the time, and I’ve always loved making intricate machines with functional mechanical animation. I don’t use CAD software, since I’m already proficient in Maya. This might be a mistake, I’m not sure. I design using that, and keep a library of standard mechanical parts (m3 hardware, fans, electrical components, etc) that I can design around. However, it’s been an interesting challenge to go from designs that merely look mechanically sound to designs that actually are mechanically sound and hold up to specific tolerances and stress. I think it goes both ways–it’s actually helped my visual design a lot to iterate a mechanical shape and see how form evolves out of need.
Maya is even more obtuse and expensive than a lot of CAD software, but if you’re like me and you’ve done 3d work for games or whatnot, you can use what experience and software you already have to some success. I know there’s a ton of blender tutorials out there.
“Design your own parts”++
I keep thinking I’m going to save some time by just downloading something on Thingiverse, and then it ends up being sub-par and I end up re-doing it myself to get everything just right. (OK, all models except that Yoda head and the Fillenium Malcon. Those are perfect as-is.)
Happened twice last week with Lego-compatible bricks and cookie cutters. (How can you make a non-functional cookie cutter?!?!) So now I have libraries to make more Legos and arbitrary cookie cutters that don’t suck. Spent a couple of hours, but I like to do that sort of thing…
Design is hard, though. But it teaches you a lot: about engineering, about the materials, and about the limitations of the printer. It’s worth it.
So yeah. Totally agree.
I have never printed, nor will ever print that damn boat.
:D
I believe that is too bad. Given that is rather fully dimensioned and there is bridging etc to test your setup with.
I’m with you. If I see another picture of one of those things I’m going to puke. If you want to tune up a printer, it’s best to use prints designed to induce specific types of errors.
what, like a boat with arches in it?
If you wanna try how your printer works with bridges, there are a lot of designs to test bridging with different temperature settings and distance between two points which are bridged. Printing Benchy boat saying you
only one thing – you have good setting for manufacturing tens or hundreds of boats, nothing else.
I think you’ve misunderstood something here – “Benchy” is a purpose-built benchmark print designed from the ground up as a challenging test print in several areas. It was designed by Daniel Norée of creative tools, a prolific designer of some extremely cool open hardware printable projects (see his project site here http://danielnoree.com/ )
Daniel presented at MRRF last year describing his work and his motivation for open sourcing everything. I can assure you – the boat you see everyone printing isn’t just there to look cute, it’s a serious tool that has helped thousands of people dial in various settings with help from others around the world by the simple expedience of posting pictures of their print for others to diagnose.
Forgot one important link – a description of Benchy features and what they’re there for: http://www.3dbenchy.com/features/
@dongwaffle Thanks for sharing helpful. Daniel’s work is fantastic.
Yes, Benchy is for benchmark. I know… But i dont need to print one in real life. If adjusting something in 3d printing, i always want to test and set only ONE thing and dont need to see others “printing possibilities”. One design is best for temperature setting, other for bridging, another one for retraction of filament, etc… Do you understand me now? I am not stupid because you don’t understand me.
@Telimektar
“i always want to test and set only ONE thing and dont need to see others ”
Unable to reply directly because of nesting.
Whilst i see your point, you should still be using benchy (or a multi challenge equivalent) because even though you’re only trying to fix a bridging issue, if you run a bridge only benchmark you won’t know if you’ve affected anything else.
Benchy will show you how your printer is going across many factors, ensuring you have have fixed your issue AND not introduced others.
yes, that particular model you’re trying to do only needs minor support so you can solve for that, but then are you going to put all the settings back afterwards? if not, won’t you be interested to see if you’ve made another factor worse? if so, just test with the part you’re trying to make, any benchmark would be worse than simply seeing if the part your want to make will print.
It’s Tugger! https://orig00.deviantart.net/218c/f/2017/298/f/4/russell_crowe4_by_maxfunnies2550-dbrqb66.jpg
Foighting around the world!
Just to be contrarian? It’s a good indicator of lots of different features of your printer that can be done in a single, quick print. But sometimes you gotta refuse to do what everyone else is doing, I understand that. We all do that sometimes and it’s okay.
I recommend NOT using 3-in-One oil for most places one would be inclined to use it.
Find a “light machine oil” or “sewing machine oil” from a reputable source/company and use that instead,
less chance of gumming up the works.
Huh?
3-in-1 is like THE defacto light machine oil. Stuff has been around for literally 100+ years. I don’t know how much reputable it can possibly be.
Just like WD-40.
Only if you are exceptionally poor at math. WD-40 was invented in the 50’s, 3-in-1 was introduced in in 1894.
You jest. WD-40 is one of the most often inappropriately-used lubricants, as I’m sure has been repeated here often. It’s a penetrating lube for breaking loose rusty junk and banishing humidity, but it makes a terrible machine oil.
Just like 3-in-1
3 n 1 is a high quality light machine oil? Have you not ever used it? Its exactly the same as singer sewing machine oil.
Maybe it’s changed. Doubt it, but to date myself – back in the day when I repaired record players and tape machines for a living on commision (it paid insanely well for a teenager – I made more than my engineer Dad one year) – an absolutely sure way to see a customer again in 8 to 12 months was to lube their stuff with 3 in 1. 100% chance of it turning into gooey sludge and gluing the machine together. This never happened with the much more expensive and far better refined Singer oil. Ever. I still use it.
If we really disliked someone, we’d use orange grease on the trip lever on the record changing cam. 100% return rate, right out of our warranty. If we liked them, just made it smooth with no lube at all.
So, yes, I’ve used 3 in 1, especially in anger. So have lots of my acquaintances, and we all agree it’s crap.
So your not a hacker pur sang cause they would perhaps dislike its owner but never punish the device ;)
“I assumed that the real challenge would be getting the machine assembled and running, but the time it took to build the machine was nothing in comparison to the hours and hours of trial and error it took before I gained the confidence to really utilize the technology.”
Same thought I had!! I am still in “trial and error” fase…
“click and forget experience of printing on paper, for instance.”
HAHAHA you made me laugh.
It was only yesterday when I printed something from a webpage… a single page… resulted in 5 pages of messed up paper. Complete nonsense. I ended up in writing the interesting data by hand to give that to my co-worker.
Not to mention the days when ink is drying in the printheads, paper jam, folded stickers in the printer, grey ribbons for the production printer that has problems with it’s tractor feeder. A printer that keeps printing in mirror because the idiot that installed the drivers on the server made “mirror” the default setting. Then the PDF that created a printer queue error now the rest of the company can’t print any more and the IT-crowd are away for a training day…
But technically speaking… it is indeed easier then 3D printing.
Nearing 100 years of computers and still one of the buggiest parts is getting output onto paper. You can sit there and stare at the printer and it’ll work fine. Leave the room and that’s when things go wrong. Paper jams, real or not. Failures to print that have no apparent cause but go away by restarting the computer and printer.
Web browsers that keep resetting the page layout to landscape.
Windows 10 has a default setting that whichever printer the user selects for any print job automatically gets changed to Default. You can turn that off but it still auto-Defaults any *new* printer that’s installed or that it finds on a network. “Where’s my printout?” *checks printers* “What the? There’s a new printer on the network?”
How Windows 10 manages printers http://knowyourmeme.com/memes/im-helping
When I’m printing from a webpage I pull up the dev console in my bowser and delete the sections of the webpage that are not required.
This allows me to change the formatting, remove menus, adverts, headers and so on.
Once you get used to it it’s simple because pages are almost uniservally written with DIV’s to mark each section and handy names. Failing there there is a picker tool to select the bits on the page for removal.
Using the dev tools is a handy skill. You can bypass blocking messages for paywalls or AdBlock blockers 9/10 too without actually having to do what they ask of you.
It’s practically a necessary part of having a browser. Yep, so much shit you benefit from deleting.
I’d like to know why Adblock programs don’t bypass Adblock-blockers. I suppose there’s the potential for an arms race, but that hasn’t happened yet has it?
I purchased my son a STARTT 3D printer for Christmas because it was the only one I found that was remotely in my budget (though it turned out to be over budget with the substantial shipping cost). I was a bit nervous because I knew nothing about 3D printing and I didn’t want him to be disappointed. I was pleasantly surprised to find that we had an overwhelmingly positive experience. It took about 8 hours to assemble while taking our time and being methodical. There were a few small kinks to work out, but we were printing all kinds of trinkets in no time. I highly recommend getting a 3D printer kit just for the experience if nothing else.
We found that 3M double sided clear tape works really well to keep the print in place; we need to find something else though because it is a bit expensive to use for every print.
I tried a lot of tapes and options, for PLA by far the best that worked for me is simple paper glue stick, the cheap supermarket brand. Baby wipes to clean it up.
new to the 3d printing game got myself an ANET A8 love the machine plenty of mods for it. you can pick them up new for £105.00 GB pounds now. I can see that price dropping. as for sticking to the bed. make sure uts level and the gap is just right. blue painters tape and a glue stick.
The correct oil to use for sliding contacts like guide rods is a good quality way oil, as used for eons for the ways on lathes and mills. Sewing machine oil is too light for the loads in a 3d printer, grease is probably too heavy. Way oil has been developed specifically for these purposes.
KEEP NOTES!!! good article
also, use openscad, it’s like a programming language for doodads. if you’re so inclined, keep all your openscad files in a git repository along with your slicer config so you can see how it changes as you learn your printer, and your printer wears.
KEEP NOTES!! great advice.
Fuck it, it’s the noobiest of noob questions but despite a shitload of forum surfing I haven’t been able to discover the nomenclature to even describe the problem.
What’s it called when the first millimeter or so of filament curls up, creating a hook that will inevitably catch the head when it returns for a second pass?
I have owned a Micro 3D for a couple of years and managed two complete prints in that time (granted, it was hiding in a closet for some of that time). I’ve monkeyed about with heat settings, different bed leveling regimens, Octoprint/M33 Fio and a bunch of things I have forgotten about. In some cases the changes have ruined adhesion but usually I can get the extrusion to stick with a decent leveling and the right temperature. Doesn’t stop “The Claw” from ruining the print. If I print a raft it gets clawed away. If I print a skirt it gets a claw. This wouldn’t be a problem but the main print gets one as well (assuming the temperature is such that extrusion stops between skirt and raft/print). I knew going in that a cheap printer wouldn’t be “Fire and Forget” but sorting everything else only to be foiled by the same error is maddening.
I can’t give The Claw the slip.
https://www.youtube.com/watch?v=ftbCvjlS_pg
Also, crap: No edit button. I didn’t mean to include the picture.
That’s an adhesion issue. Either it’s the wrong temperature on the 1st layer, or your bed is not providing proper grip for the 1st layer. For temperature, try raising or lowering a few degrees on layer 1. Or maybe 5 degrees. Or maybe 10. For bed adhesion, try putting down painters blue tape or some stick glue, or even some hairspray (let it get tacky before starting the print). Consider a heated bed if you can add one to your printer.
I guess the best way to tell is to look at the stuff that ISNT coming loose; does it look even and properly put down? Many places coming loose might indicate temperature too low. Too melty is temperature too high or too much extrusion.
I have been successfully printing for the last year but at times struggle with issues. Because of earlier HAD discussion I bought the book “3D Printing Failures: How to Diagnose and Repair All 3D Printing Issues” get it at Amazon. Helpful great at $13.
Is there really no market for $3k FDM printers that just work like an actual tool, less like a hobby project?
I’ve had the luxury of using $15k FDM printers and it spoiled me. The difference even when compared to my MK3 is night and day in terms of reliability, capability, sound level, etc.
Why don’t companies like Lulzbot or Prusa offer a higher end model for small businesses like mine with a focus on reliability, speed and sound? Even if that means we have to purchase filament that’s 50% more expensive, we’re ok with that because it gets passed onto the customer.
I’ve personally tried at least a half dozen printers in the $1k to $5k range, read reviews for about a dozen more and they’re all not significantly better than the sub $1k models. If you look at the teardowns of $10k FDM printers, there’s almost NO functional difference other than slightly higher quality materials, construction and use of encoders… and maybe better software. Wouldn’t add more than $200 to the BOM of a typical $1k machine.
You’d think even the closed source companies like Makerbot would do this, but they’re just more of the same.
I made the mistake of attempting to build my own printer from individual parts sourced from all over the net. It’s a beautiful Delta with black anodized openbeam and bright neon green joints, with linear rails for the ultimate smoothness. It cost me more than a kit, but it’s a quality printer. Unfortunately, I’m having temperature issue and weird warts in the print, and being a new dad, I haven’t had time to sit with it in a while, so it’s collecting dust. I’ll make my way back to it. I did manage to learn some OpenSCAD and publish a few of my own files (mainly improvements to existing parts or new parts that did not come with the delta parts I purchased, like adjustable bed mounts).
In hindsight, I should have started with someone’s cheap kit printer and graduated to building the printer I wanted after spending some time on something designed by a “pro”.
Waiting for my BuildOne printer to get there :-)
I built my own printer 2+ years ago (cartesian, with prusa-style axes), using my work’s Makerbot Replicator 2 for some of the parts that I designed based on an existing design (existing used 20mm extrusions, I had 1″ extrusions available), and parts I had laying around or I could get for little or not cost. I enjoyed it, as I was able to cobble together great ideas from other designs (e.g. Lulzbot modular extruder swapping). The one detail I didn’t skimp on was the extruder (E3D V6). Whether it’s been luck or good designing, it’s been a great workhorse.
I have some upgrades I’d like to implement (X-rails from 8mm to 12mm, heated bed), but I’m reluctant to pull the trigger because it’s working so well! I’ve printed PLA, PETG & ninjaflex with great success (using Elmer’s purple glue stick). I’ve even printed some ABS, but with huge brims and small parts.
I busted out my Printrbot Simple Metal for the first time in two years to make some clips so I can mount my tablet on my stationary bike. Spent part of the day prototyping and remembering how to use OpenSCAD but it’s mostly come back and the first of two pieces is getting printed now.
Thank you for posting this! We just got a 3D printer and I’m scrambling to think of a program that will actually attract people. I didn’t know you could actually design your own things on TinkerCAD so I will definitely set up an account and play with it while waiting for the new toy to arrive!