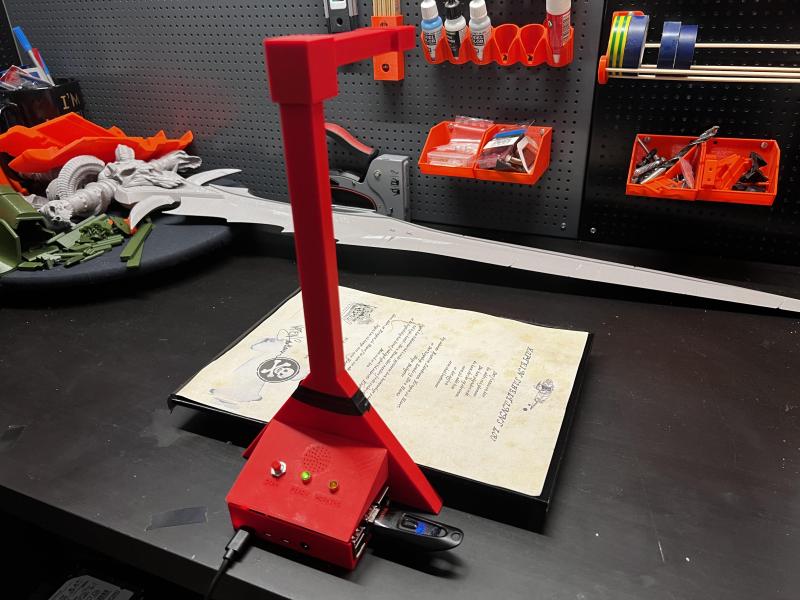
It’s pretty important in 2024 to be able digitize documents quickly and easily without necessarily having to stop by the local library or buy an all-in-one printer. While there are plenty of commercial solutions out there, [Caelestis Cosplay] has created a simple document scanner that takes documents, as [Caelestis Cosplay] puts it, from papers to pixels.
The build is probably what you’re expecting — it’s essentially a Raspberry Pi (in this case a 4B), a V2 Pi camera, and a handful of custom 3D-printed parts. [Caelestis Cosplay] says they had never designed anything for printing before, and we think it looks great. There’s also a buzzer to indicate that the scan is starting (one beep) or has completed (two beeps), a ‘ready’ indicator, and a ‘working’ indicator.
Everything you’d need to build your own is available over on Instructables, including document scanner and controller scripts. Be sure to check it out in action after the break, and see it quickly scan in a document and put it on a thumb drive.
Looking for a 3D scanner? Check out the OpenScan project.


What I really want from a digitiser (software really) is a way to integrate multiple scans into a single clean image.
I typically make two scans, affine register them in GIMP and then paint each in and out to deal with hair, dust etc when digitzing old printed photos.
I can’t help but think with at least 3 images it should be possible to automate the process and reduce noise like astrophotography stacks.
Hugin can do the stitching: https://hugin.sourceforge.io/tutorials/scans/en.shtml
Brilliant thank you! And the response below too.
I’ll play around with these and see if they work for my goals.
Have you looked at Sequator or Starry Landscape Stacker. This article lists some options https://photographylife.com/night-sky-image-stacking
Stacking and stitching are two different things. Usually panoramic stitching programs have mixed results in selecting features and you often end up with ghosting instead of removing artifacts. I had good results with Autopano Pro, but they seem to be out of business now. Some say they released the last version for free, but I wouldn’t trust downloading it from any odd website.
Last time I tried Hugin it was borderline unusable, but maybe they’ve improved.
To deal with dust, I use a small hand held blower, to clean each photo or slide, before it is digitized. Removes a lot of dust.
Google the words dust cleaning blower, photo
The Epson scanner and software I used EpsonScan? had a dust removal option in software too
Imho it lacks a lightsource and perhaps a live view to see if the scan looks ok or something went wrong.
I don’t see where this works better than my smartphone, sorry. I am a bit lost, why this was built. For a single page scan, you are faster with your phone and have instant quality control. Depending where it is being used, it could benefit a lot from added lights.
I regularly scan books in hi res bookscanner hardware in my public library. Most relevant benefit over a phone is good automated cropping, a reeeeally sharp image and speed when scanning a whole book.
“…. I am a bit lost, why this was built…”
I’m no expert here, but I guess it was build because it was fun. A very important reason to build something and it may even result in learning something. The fact that it resulted in something that isn’t optimal regarding it’s primary function (or can be substituted by any modern smartphone or photo camera) doesn’t really matter. After all, 90% of the things we do for fun do not result in something useful. For example: going to a bar, watching a movie, talking to friends, reading hackaday, writing a comment.
And yet, we probably all agree that if we were going to share a project we found fun with the intention that others would copy what we did, we would probably have suggestions for improvement to share. Things we learned while working on the project that would have made things better or easier if we were to do it again, or things we realized we weren’t going to include but would be possibly beneficial.
For instance, the image processing script in the instructable detects edges and looks for a large rectangle, considering that the paper and using that for warping the image to flatten it. But if you’ve already done the hard work and found edges, maybe there’s a way to proceed to sharpen those edges digitally for better readability? Or if you’ve used a gaussian blur to minimize the effect of noise on your processing, then if your results still have a lot of specks which become noticeable in the BW-threshold output, maybe you’d identify that as a point for further improvement. Or, of course, maybe an external light or alternatively a light diffuser to help make better use of existing light sources, if solving things with just the digital processing proves intractable. Not all these have to be actually done – do whatever you like – but their presence or absence in the write-up is part of its quality.
Have you tested this device and speak of defficiencies experienced through real world tests and observation of its processed output or are you just pulling these points of critique from dev/null?
Surely the creator’s own posted results may be used to evaluate the device’s strengths or deficiencies. But yes, I do have experience in processing images, including photos of paper documents. There’s no big mysteries in the basic processing steps that are being used; the source code is right there on the page.
Using the edges you already detected to decide where to sharpen the image isn’t a wild, made-up idea. When using an image editor, it’s perfectly reasonable to put a mask on your sharpening step so that it preferentially sharpens detected and desired edges rather than being applied across the whole image. It’s been automated in Adobe Camera Raw for years; you just adjust a slider and look at the mask until it’s selecting what you want. http://marklindsayart.com/geeks-lens/2012/3/8/edge-masks-for-better-sharpening.html
As for the specks, it looks to me like the usual problem with using a threshold. When the original document is more than black on white (or white on black) then if this is all the processing you do, you’re going to have parts that don’t look right no matter what threshold is used. The document with a feather at the top is one such document. If all you’re after is boosted contrast rather than to truly get a pure black and white output, there’s other higher-effort options, such as using curves or using adjustments like clarity, texture, or dehaze, which are best explained by someone else but are basically contrast that is applied differently across the image based on spatial frequency and level. Sharpness and denoise are actually also in this realm, but that’s another thing. Here’s an explanation that seems decent at a glance. https://photzy.com/what-is-the-difference-between-clarity-texture-and-dehaze-in-post-processing/
If you prefer using your phone then this still has use, modify the print files and use it as a stand for your phone, you have to admit a stable stand is good for scanning.
The pegboard and 3D printed tool holders in the background of the Title Photo
caught my eye.
What is the hole spacing of the pegboard? The holes look smaller and more dense than what hangs in my shop.
Cool project, but you can do the same with your cellphone + app. If you don’t want to use a crappy app, just send the images to your computer and let imagemagick process them.
The main benefit is the tower that holds the camera (or phone). For basic document scanning, all you really need is a cardboard box with a hole in the bottom and one side replaced with a thin sheet of paper for a diffuse light source. Two sides if you want more even illumination.
For proper results you also need software for the lens correction, but that’s a simple batch process in something like Affinity.
A poor man’s light box! Great ideia. But I stick to Imagemagick as a free resource to bulk image correction. You can calibrate your lens (ie Hugin) and use the parameters in ImageMagick to correct prespective, barrel distortion or chromatic aberrations. With some bash or python code you can also easily auto extract page dimensions or images and save the result as image metadata.
https://legacy.imagemagick.org/Usage/lens/
And for those who don’t want to spend time googling around and trying to write python scripts, a good enough result can be had by photographing a grid paper and then using the barrel/pinch distortion tool in your favorite photo editor. Then use that filter/value for your batch process.
If you make a camera stand, you can also make a paper holder that puts the sheet always in the same place, so you can do a simple crop operation after the lens correction for no extra effort.
> you can also easily auto extract page dimensions
Assuming your camera is always at the same height, this is as simple as defining the image DPI to match your pixel density at that distance. Then when you crop the image, the metadata will automatically have the correct page dimensions. You don’t need scripts for that.
Yes you are right. The script idea was more to extract images and also save dimensions in the file metadata. Some projects require special file fields, to prevent information loss in case someone in the future change the images causing info loss. But all this is overkill to a simple project aimed to scan A4 paper :-)
Yeah, I’ve mounted my phone in a tripod, and scanned an A4 notebook into a PDF in under 30 minutes. That includes adjusting page cropping where necessary. Fantastic result for so little effort.
I can think a couple of additions that would make this much cooler:
1. Add a vacuum former style suction pad to the base to hold the pages still and flat
2. Add a way to make very fine adjustment to the camera position to enable doing super resolution image merging, If the corners of the frame are in shot you can even use them for automatic alignment
I was thinking about a vacuum page holder yesterday! I used my phone to digitize one of my kid’s drawings that had curled up in his book bag, and thought a vacuum plate would be handy…
Or drop a sheet of transparent glass on top of it.
We have a glass-top table, so when I need to scan kids drawings I put the drawing on the top of the table and capture from bellow the table. I use Microsoft Lens for that, it works very well.
If a glass is used is good to choose a very wide lens aperture. It partially avoids your camera reflex in the image.
For those of you questioning why you’d build this then you need to know who the end user would be. I put together a hp scanner controlled by a pi for my 83 year old mum to use and all she had to do was put the doc in the auto feeder and press a button on a remote control before it would scan it and send it automatically to me. Could she do that, no! This might be a better approach as it’s somewhat more obvious what it’s doing and less buttons. As for the smartphone idea, you haven’t met my mum.
For office usage would be great to have a printer-like feeder to scan multiple pages
Neat idea, way to go. An idea for improvement would be to add some image processing directly into the Pi.
Now if only there were a reasonably priced monochrome camera available in order to maximize resolution.
I need something like this to flash scan ‘Arch D ‘ size prints