
The look, the feel, the sound — there are few things more satisfying in this world than a nice switch. If you’re putting together a device that you plan on using frequently, outfitting it with high-quality switches is one of those things that’s worth the extra cost and effort.
So we understand completely why [STR-Alorman] went to such great lengths to get the aftermarket seat heaters he purchased working with the gorgeous switches Toyota used in the 2006 4Runner. That might not sound like the kind of thing that would involve reverse engineering hardware, creating a custom PCB, or writing a bit of code to tie it all together. But of course, when working on even a halfway modern automobile, it seems nothing is ever easy.
 The process started with opening up the original Toyota switches and figuring out how they work. The six-pin units have a lot going on internally, with a toggle, a rheostat, and multiple lights packed into each one. Toyota has some pretty good documentation, but it still took some practical testing to distill it down into something a bit more manageable. The resulting KiCad symbol for the switch helps explain what’s happening inside, and [STR-Alorman] has provided a chart that attributes each detent on the knob with the measured resistance.
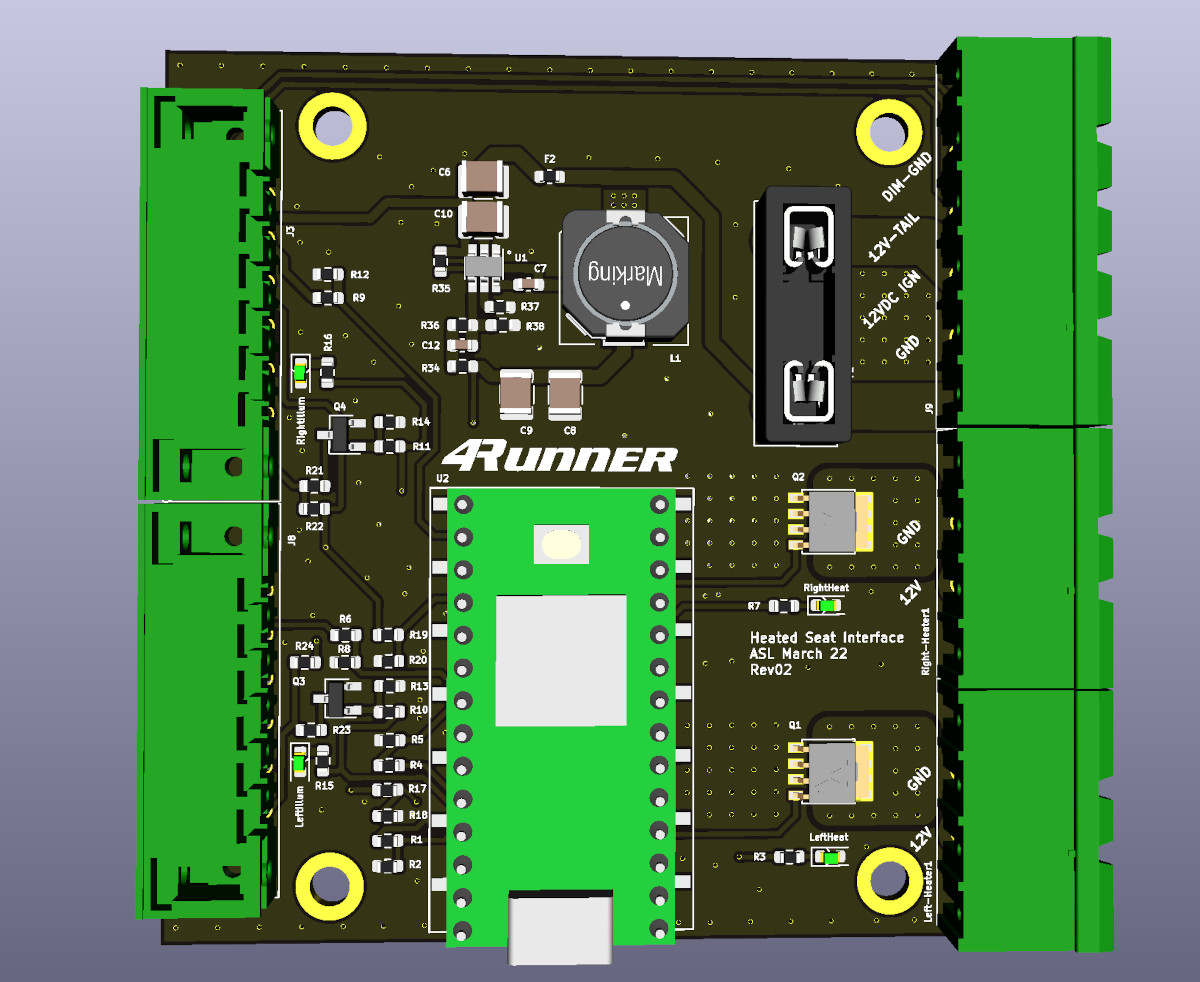
But understanding how the switches worked was only half the battle. The aftermarket seat heaters were only designed to work with simple toggles, so [STR-Alorman] had to develop a controller that could interface with the Toyota switches and convince the heaters to produce the desired result. The custom PCB hosts a Teensy 3.2 that reads the information from both the left and right seat switches, and uses that to control a pair of beefy MOSFETs. An interesting note here is the use of very slow pulse-width modulation (PWM) used to flip the state of the MOSFET due to the thermal inertia of the heater modules.
We love the effort [STR-Alorman] put into documenting this project, going as far as providing the Toyota part numbers for the switches and the appropriate center-console panel with the appropriate openings to accept them. It’s an excellent resource if you happen to own a 4Runner from this era, and a fascinating read for the rest of us.


Would be great to see a hack on those subscription seat heaters.
A hack would be trivial – just add a manual switch to turn the heating element on.
The issue is keeping your product warranty by the manufacturer, and your insurance provider is jumping for joy because they’ll find a reason to blame you in case of a vehicle fire.
> The issue is keeping your product warranty
For once US have one nice law to protect them ;( But something tell me you will need to fight for your right thought. (I never remember the name, but it is the same law as those “void if removed” sticker. TLDR: You win by default and the manufacturer must proove you (or/and your change) break what-ever is broken.
Also, I’m also waiting for the counter measure for those subscriptions hack… It is unlikely on the first version, but it will at some point if enough peoples hack it.
If I were an evil manufacturer, I would size the heating element so it can overheat if someone just naively turns it on and leaves it like that.
It would be trivial to design a heater element that _requires_ a smart controller or else your seat may catch fire. The trick is to make it subtle enough to claim innocence. Then you can indeed find a reason to blame the customer for bypassing the manufacturer’s system, unless they went the extra mile to figure out what’s going on and how to implement the same control scheme.
Example: normally the heating element is a PTC wire that limits power once it reaches a certain temperature.
Evil example: the limit temperature is 1000 C. Your controller alternates between applying power and measuring the resistance of the heating wire to control and limit the temperature to a safe level. You justify this by arguing that it allows you to apply greater power for heating the seat faster from start. If someone were to bypass your controls and simply switch it on, the seat in their car would start to push out smoke in less than a minute.
Until the mosfet fails and your customer gets burnt while driving down the freeway then crashes. Hello lawsuit.
With the amount of FMVSS testing and certification we have to apply to interior parts for fire safety, it never gets off the drawing board.
Posting for a friend…
>Hello lawsuit.
Oh, that’s a problem that applies 20-30 years hence if at all, if you’re clever about it.
That’s really dumb. Why would you want to be an “evil manufacturer?”
Can’t you take pride in your work to create a product that ppl appreciate and enjoy using?
You are referring to the Magnum Moss Warranty Act, I believe
Magnuson Moss Warranty Act
The Magnuson-Moss Warranty Act.
Basically, the manufacturer has to prove your modification is what caused the damage. Your engine couldnt seize, then they see your seat heater setup, and say “warranty void, we aren’t fixing the engine”.
The “hack” is to go to the BMW dealership and get the software update that disables it. They backed out of the subscription heated seat thing basically immediately.
There’s a famous problem with early Lexus RX300 window switches/control boards also. Seems that a relay on the circuit board that the switch connects to fails and your window will go down only part way and then NOT go back up many times. A real problem for security or in the rain.
I found a Youtube video from a guy who diagnosed relay as the problem. He gave the Chinese link for a replacement relay, but of course it was no longer available and Lexus wanted many hundreds of $$’s for a whole circuit board. After studying the specification sheet for the OEM relay, I found an electrically similar relay from a US site. Only problem was its pin layout was different than the OEM relay. So I soldered short wires onto each pin and soldered the pins into the original window control circuit board. Worked like a charm! Spent about $2 instead of $600+. The car is now almost 25 yrs old and that fix is still working. Should have written that up for Hackaday. :-)
You still should! Or at minimum write up a how-to on a forum site pertaining to the vehicle.
I’ve done a few of those How-To posts for cars I’ve owned over the years, to pay back all the help I received from others who have done the same.
I just checked and I still have the photos I did of the job back in 2016.
And I agree with another poster: I was hugely indebted to that “country boy” who took the time to document the problem in his YouTube video. He was one smart guy! I’ll try to find the time to write up what I did on Hackaday.io and maybe submit it to the tip line.
Nice solution. I have seen some vibration and shock tests and the results for autmotive equipment, especially in the doors, which are sometimes slammmed quite hard. So, if that survived for such a long time, you are very lucky with such a mount.
It’s not exceedingly hard to make an assembly that can survive the shaking – it’s difficult to make one that is cheap to manufacture automatically as well.
For example, the relay is relying on the solder joints to stay in place. Adding wires in between and gluing the relay down somewhere else relieves the stress of the mass of the relay shaking on the soldered joints. However, that would be three extra manufacturing steps: add wires to relay, solder wires to board, glue down relay. This is much more expensive than just slotting the relay into the board and wave soldering it in.
please, please, write that up and submit it to us as a tip! that’s very much a cool hack to cover
“The look, the feel, the sound — there are few things more satisfying in this world than a nice switch.”
Carrying high voltages.
https://www.youtube.com/shorts/wy6ZoIbjJgE
Or high current, can’t say it’s not interesting trying to break a high current load.
One of my peeves is that for some reason, all at once around the turn of the century, seemingly every maker of 6-outlet power strips decided to go with these cheesy little low profile power switches. Maybe they’re rated fine, idk, just doesn’t seem like something that moves scarcely 3mm can do a proper job interrupting loads.
“The main interesting part of this code was using a low-rate PWM. The MOSFET was being switched to fast to fully avalanche and thus was causing the MOSFET resistance to be far too high to enter into an overheat cycle. Since there is significant thermal inertia in the heaters and seats themselves, a much slower PWM rate will allow the MOSFET to fully avalanche without exploding. ”
Can anyone explain this further? How does being switched on too fast make the mosfet resistance high?
I think the ‘switched too fast’ statement is referring to the PWM rate, and the MOSFET isn’t fully enhanced (in saturation) before the gate driver goes to turn it off again. This has major impacts on switching losses and safe operating area*.
There is a careful balance between Rd-s(on), gate charge, and gate driver speed when designing with a power MOSFET. Lower Rd-s(on) is generally achieved in a device by making the transistor physically larger, which increases the gate charge. Higher gate charge means we have to push more electrons around to turn it on and off, and without a beefier gate driver (1.5-3A peak current is not uncommon) the transistor will turn on and off slowly. Larger devices will also be more susceptible to uneven current through different areas while not fully enhanced.
*Texas Instruments has a good document talking about SOA:
https://www.ti.com/lit/pdf/slva673a
Would be interesting to see this with a temperature monitor in each seat. My Mazda appears to have that, so the seat targets a constant temperature rather than a PWM cycle time. It means it heats up faster and doesn’t vary the temperature throughout the winter.
Interestingly, I figured this out when my back got really warm – the seat has two heaters in parallel (seat and back) but a temperature monitor in the seat. The seat heater broke so the car kept the back heater on full even when set to low.
If you can find it at a library, SAE J3047 covers heated seats. The major manufacturer product I’m familiar with runs closed loop to a seat cushion target temperature. I don’t know if there is an additional thermal sensor used in the seat back for error state avoidance, but I tend to think there is.
I know Volvo does temperature targets as well. My 2005 S60R let you change what the targets were for the low/medium/high using the proprietary diagnostic software. I had access to a copy of that to recalibrate the continuously variable suspension.
I almost always run my heated seats on low once I’ve thawed out and the car came from the factory with the lowest settings, so I had no need to turn them up. I’m mildly curious how unpleasant the maximum would have been, but I no longer have that car.
Tom, thanks for the kind words.
One clarification. The slowPWM is to allow the MOSFET to stay on long enough that its RdsOn drops and it doesn’t overheat. The thermal inertia of the whole system allows this to not be noticeable to the user.
First off, congrats that your project got featured on Hackaday!
Looking at your schematic, it appears you’re driving your power MOSFETs like they were BJTs, or maybe you picked a 10K gate resistor and put the GPIO pulldown on the wrong side of it.
The datasheet for the power MOSFET you’re using (BUK9Y30-75B) shows the gate threshold voltage Vg-s(th) is 1.5V for a typical device. The 10K/10K voltage divider on the gate results in only 1.65V at the gate, barely enough to turn it on. It will be even higher in the winter time! As much as 2.3V at -55C.
I highly recommend reducing R1/R4 as a starting point. For switching speed you want to approach 0 ohms, with switching EMI being a limiting factor. I would suggest 100-500 ohms as a starting point. It wouldn’t hurt to do the same with R10/R11 as well.
You might also want to add a snubber circuit across the heater output connector, the wiring will have some measurable inductance excited by the faster switching speed.
> I would suggest 100-500 ohms as a starting point.
The recommended GPIO source current for a Teensy 3.2 is under 10 mA, so 100 Ohms is too little. I would go for 470 – 1000 Ohms as a safer bet to keep things nice.
I was originally going to say 330 – 1k ohms. A lot of the stuff I work with 4.7-47 ohms is common, but that’s more for switching power supply circuits running at a few hundred kHz.
I would imagine that 10mA is recommended as a maximum continuous current, to limit power dissipation in the I/O port cell. Keep in mind that, once the gate charges up, the steady-state current sourced by the I/O pin will be whatever the leakage current is (a few microamps at most, unless the board is wet).
So the real question is, what is the AC RMS current that flows through the I/O pin to drive the MOSFET gate? The gate is effectively a capacitor with Miller effect so this depends on the PWM frequency and Vd-s applied to the transistor when it switches on.
With this kind of maker hardware, pushing the datasheet specs for the part is likely to introduce other problems like voltage glitches on the board, so I would be conservative about how much IO current to pull.
Those are Denso switches, they are used in Toyota, Lexus and Subaru heater, headlight-level and instrument cluster dimming functions. Sometimes they are rheostat, sometimes just a pot, sometimes selector switches. But they come in the same 6-pin package