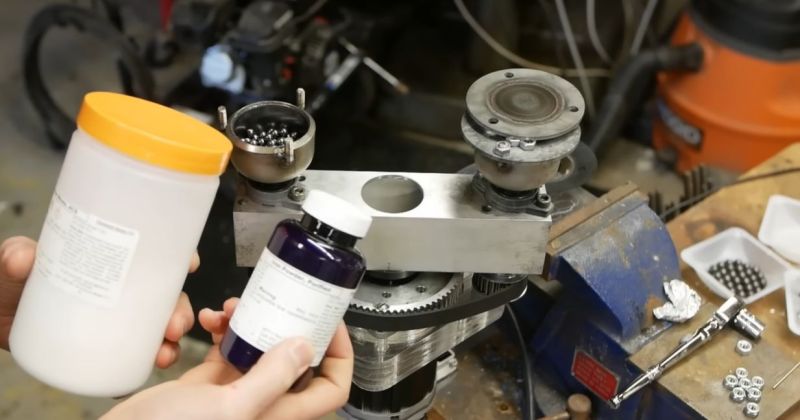
Creating strong permanent magnets without using so-called rare earth elements is an ongoing topic of research. An interesting contestant here are iron nitride magnets (α”-Fe16N2), which have the potential to create permanents magnets on-par with with neodymium (Nd2Fe14B) magnets. The challenging aspect with Fe-N magnets is their manufacturing, with recently [Ben Krasnow] giving it a shot over at the [Applied Science] YouTube channel following the method in a 2016 scientific paper by [Yanfeng Jiang] et al. in Advanced Engineering Materials.
This approach uses a ball mill (like [Ben]’s planetary version) with ammonium nitrate (NH4NO3) as the nitrogen source along with iron. After many hours of milling a significant part of the material is expected to have taken on the α”-Fe16N2 phase, after which shock compaction is applied to create a bulk magnet. After the ball mill grinding, [Ben] used a kiln at 200°C for a day to fix the desired phase. Instead of shock compaction, casting in epoxy was used as alternative.
We have covered Fe-N magnets before, along with the promises they hold. As one can see in [Ben]’s video, oxidation is a big problem, with the typical sintering as with other magnet types not possible either. Ultimately this led to the resulting magnet being fairly weak, with a DIY magnetometer used to determine the strength of the created magnet.
Interestingly, there’s a much newer paper by [Tetsuji Saito] et al. from 2024 in Metals that does use sintering, specifically spark plasma sintering with dynamic compression (SPS-DC). SPS-DC can be done at fairly low temperatures (373 – 573 K, or 99.85 – 299.85 °C), producing much stronger magnets than [Ben] accomplished.
Although Fe-N magnets hold a lot of promise, they have lower coercivity. This means that they demagnetize easier, which is another aspect that weighs against them. For now it would seem that we aren’t quite ready to say farewell to Nd-Fe-B magnets.


When using a rock tumbler to mill ingredients, there are optimum amounts of milling media and charge (the material being milled). Roughly, the jar is about half-full of media. Just enough charge is added to fill the spaces between the media. Many workers use too little media and too much charge.
Grinding an oxidizer such as ammonium nitrate using steel ball bearings might be very hazardous. NH4NO3 is an oxidizer and very hygroscopic, and the iron powder that is created can react spontaneously with moisture as well as with oxygen in the air. I would investigate a less hygroscopic, less reactive compound as the nitrogen source. Perhaps ammonium chloride, urea, acetamide, or maybe acetonitrile. The latter being a liquid would simplify separation of the desired product by filtration.
Still, I would work in a glove box with argon. Grainger has “glove bags” for about $50, or make your own. Cut two holes in a heavy polyethylene bag, heat-seal the cuffs of PE gloves to the holes. Cut top, bottom, and sides out of a suitable box, leaving the edges as a support frame. Insert frame and equipment into bag, fill with argon, close the opening with a few binder clips.
He’s making a few grams at a time, no need for all that.
lol wut. The smaller the batch, the greater the surface area per gram, generally, and thus higher potential for contamination.
Who said anything about contamination? Reading comprehension moment.
Everybody else, but you?
I think you could address multiple problems if you put the rolling mill in a glove box and used ammonia rather than ammonium nitrate, hence the need for the glove box.
Although considering Ben’s past history and experience, I bet he had very good reasons for choosing this.
I like the idea of making a glovebox out of a plastic bag. You can fill it up with any gas you like without much mixing with air. This also reminds me of the ortlieb bags, which are open on one end and then simply rolled up to make a water tight seal.
With an image search for the magic words: “portable glove bag” you find a lot of examples from different manufacturers:
https://duckduckgo.com/?q=portable+glove+bag&t=h_&iar=images
For DIY, maybe glue the backside edges of long sleeved dishwasher gloves into the bags. Or you can use smallish embroidery rings to clamp the edge of the glove to the hole in the bag. If you put some serving platters (or similar) inside the bag before you inflate it, you got a working surface that does not damage the bag too easily, and it also adds some weight to hold the bag in place. Once you know these things exist and you’ve seen a few pictures, it’s not so difficult to make a DIY version of it, and you can tailor it to fit your specific application.
It’s nice to see HaD highlighting good science/hacking YouTube “creators” lately like Applied science and AlphaPhoenix, instead of the usual endless march of some obnoxious brat 3d printing brightly colored garbage to manipulate 1 million views from The Algorithm.
Or we could use tetrataenite…
https://www.advancedsciencenews.com/a-new-way-to-create-permanent-magnets/
I’ve seen multiple papers and patents over the last couple years.
https://patents.google.com/patent/US11462358B2/en
Sometimes Ben doesn’t try very hard because he wants get a lot of smart people thinking/doing/making. It’s great news that strong magnets might not have to be problematic – Permanent magnet progress has been slow. I grew up before Neodymium -My brothers and I somehow had a huge military surplus AlNiCo horseshoe magnet. That old color tv was never quite right after that. ;-)