
If you ever look at projects in an old magazine and compare them to today’s electronic projects, there’s at least one thing that will stand out. Most projects in “the old days” looked like something you built in your garage. Today, if you want to make something that rivals a commercial product, it isn’t nearly as big of a problem.
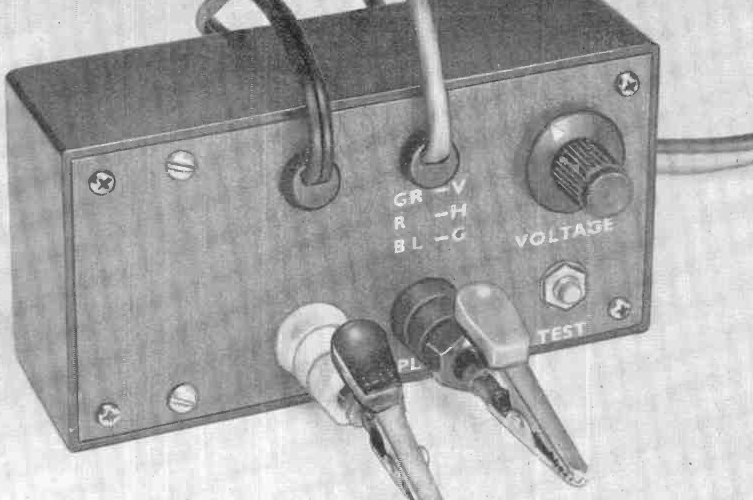
For example, consider the picture of this project from Popular Electronics in 1970. It actually looks pretty nice for a hobby project, but you’d never expect to see it on a store shelf.
Even worse, the amount of effort required to make it look even this good was probably more than you’d expect. The box was a standard case, and drilling holes in a panel would be about the same as it is today, but you were probably less likely to have a drill press in 1970.
But check out the lettering! This is a time before inkjet and laser printers. I’d guess these are probably “rub on” letters, although there are other options. Most projects that didn’t show up in magazines probably had Dymo embossed lettering tape or handwritten labels.
Of course, even as now, sometimes you just make a junky looking project, but to make a showpiece, you had to spend way more time back then to get a far less professional result.
You notice the boxes are all “stock,” so that was part of it. If you were very handy, you might make your own metal case or, more likely, a wooden case. But that usually gave away its homemade nature, too. Very few commercial items come in a wooden box, and those that do are in fine furniture, not some slap-together box with a coat of paint.
The Inside Story

The insides were also a giveaway. While PC boards were not unknown, they were very expensive to have produced commercially. Sure, you could make your own, but it wasn’t as easy as it is now. You probably hand-drew your pattern on a copper board or maybe on a transparency if you were photo etching. Remember, no nice computer printers yet, at least not in your home.
So, most home projects were handwired or maybe wirewrapped. Not that there isn’t a certain aesthetic to that. Beautiful handwiring can be almost an art form. But it hardly looks like a commercial product.
Kits
The best way to get something that looked more or less professional was to get a kit from Heathkit, Allied, or any of the other kit makers. They usually had nice cases with lettering. But building a kit doesn’t feel the same as making something totally from scratch.
Sure, you could modify the kit, and many did. But still not quite the same thing. Besides, not all kits looked any better than your own projects.
The Tao
Of course, maybe we shouldn’t emulate commercial products. Some of the appeal of a homemade product is that it looks homemade. It is like the Tao of Programming notes about software development:
3.3 There was once a programmer who was attached to the court of the warlord of Wu. The warlord asked the programmer: “Which is easier to design: an accounting package or an operating system?”
“An operating system,” replied the programmer.
The warlord uttered an exclamation of disbelief. “Surely an accounting package is trivial next to the complexity of an operating system,” he said.
“Not so,” said the programmer, “When designing an accounting package, the programmer operates as a mediator between people having different ideas: how it must operate, how its reports must appear, and how it must conform to the tax laws. By contrast, an operating system is not limited by outside appearances. When designing an operating system, the programmer seeks the simplest harmony between machine and ideas. This is why an operating system is easier to design.”
Commercial gear has to conform to standards and interface with generic things. Bespoke projects can “seek the simplest harmony between machine and ideas.”
Then again, if you are trying to make something to sell on Tindie, or as a prototype, maybe commercial appeal is a good thing. But if you are just building for yourself, maybe leaning into the homebrew look is a better choice. Who would want to mess with a beautiful wooden arcade cabinet, for example? Or this unique turntable?
Let us know how you feel about it in the comments.


Are those from “Popular Electronics” photos or are they drawings ? Or photos and hand retouched in darkroom ?
They are photos but scanned.
Preparing instrument photos for magazine illustration is probably worthy of a Hackaday post all by itself! There is (or was) an enormous amount of work to produce an image that looked good in print. And yes, plenty of hacks too, like dodging and burning, process chemistry tweaks, partial and double-exposure hacks, unsharp masking, and others. That’s even before you get into the halftone masks and lith film.
We had a drill press in the basement in 1970 – what’s the big deal?? Yes rub on or stick on letters were a pain
Water transfer lettering was also a thing, as found in many an Airfix-type model kit of the era.
But to really use waterslide paper you still have to letter on it somehow… so if you wanted something custom, it was a big pain.
All relative. If you were accustomed to handwriting everything instead of typing it out on a computer, drawing nice looking letters wasn’t such a big deal.
On the psychological side of it, what is “pain” to do is different depending on whether you’ve done it or not. It used to be thought that people are “learned helpless”, where conditions cause a kind of permanent depression and pessimism that suppresses innovation and effort. It turns out people are generally born with the assumption of helplessness – that doing something new or different is not possible or at least too hard – until something or someone proves you can.
Knowing this, it’s easy to recognize the reluctance of a person who has not tried, or is unaccustomed to doing something, and the casual ease of a person who has and doesn’t mind picking up a 00 brush to paint lettering freehand directly on their project box.
Another difference between people is the fear of failure. You tend to hold your painstakingly crafted project to such a high value that you’re afraid to mess it up, to make it less than perfect, so you’re afraid of using methods that might fail. Meanwhile the other type of person is equally if not more interested in the method of making, and isn’t afraid to start the whole thing over if they mess it up. They get results because they’re not afraid of the work and enjoy coming up with new ways of doing stuff, while you’re there sitting and procrastinating about how difficult it is to get nice vinyl cut stencils for the front panel.
I don’t know. I’ve done water slide, Kroy, and even Leroy’s. All seemed hard and/or ugly to me. Datek was tolerable but still…
Yeah I didnt get the “less likely” comment either. Far MORE people were using manual and power tools in their day to day lives in the 70s than today. I remember having to go to my uncles place the next town over because my dad didnt have a metal lathe and he did, But a drill press? I cant remember any of my fathers friends, or my friends dads garages NOT having a drill press. Theyre one of the most basic powertools.
In a pinch, just fixing your drill on the end of a 2×4 plank that was pivoted at the other end with a door hinge would go down straight enough to drill a good hole.
I mean, it’s technically going down in an arc, but for the 1-2 mm you needed to drill the angular error is negligible.
yeah I feel like youd be far better off just holding the drill steady than rigging this suggestion up, ESPECIALLY if you are only drilling through 1-2mm of material.
With a modern drill perhaps, but if you’re holding one of those old corded two-handed Black & Deckers from the 70’s that had no rheostat control for speed, you’d need something to steady it.
LMAO@DUDE
Bruh, Seriously? Do you even tool?
“one of those old corded two-handed Black & Deckers from the 70’s”
1970s drills were available with variable speed control.
.https://tinyurl.com/mu2yd6r9
But for the light duty you imply, going through 1-2mm of material, Most men would just grab their manually cranked hand drill, ALSO a common tool in every american garage of the era.
Yeah or you could just have a coors to steady your nerves and then hold it steady in your hands
Power tools were relatively much more expensive back then compared to the mass-produced far eastern specials we have access to today.
Yes people had them but the “average” hobbyist today probably has far more buying power and a far better selection of tools than they ever did – imagine in the 1970’s if someone said a lot of hobbyists would have CNC machines like mills, lasers, plasma cutters or 3D printers in their shed.
Powertools were relatively the same price back then if you shop for quality. If you buy a new tool at harbor freight every 3 uses then the barrier of entry is cheaper today, though youll spend the same and more eventually.
The 1970 Sears Power and Hand Tool Catalog lists the 15 1/2 inch floor stand Craftsmen drill press at $189.95, about $1,565.61 today. Craftsmen doesn’t exist anymore. Home Depot has a 15 inch Jet Floor stand drill press at $1,229.94.
Lasers and 3d printers arent 1970s tech. so Ill ignore that goalpost.
The Thermal Dynamics Pak 40 plasma cutter (handheld torch) came out in the early 70s at a whopping $4,900 (over $33k today) but by 1980 the Pak 5 price of $2,950 ($9980 today) was a bit more attainable. While its tempting to look at the $1400 Cutmaster 30+ price today, performace wise youd be more in the range of a $4400 Cutmaster 82 to match its performance.
But the Bridgeport Series 1 CNC, was introduced in 1970., no clue the price at the time.
The Series 1, still manufactured, will still set you back $32K with 3 axis servo.
of course, you probably meant some dinky tabletop toy pretending to be a tool like the Carvera.
And lets be real,
My comment wasnt that schools, makerspaces, and millionaires toybins today are less well equpped. It was that the AVERAGE JOEs home garage in the 1970s was BETTER equipped than most average joes garage today.
Yeah not really… The cost savings of outsourcing have mostly dried up by now, and all of that savings is going straight to some hedge fund. We shot past the point where overseas manufacturing was cheaper than local manufacturing a long time ago. I mean the CURRENT local manufacturing is still way more expensive than overseas, so that’s enough to fool ignorant or negligent people, but it’s also way more expensive than it used to be due to vastly reduced capacity.
It’s very closely related to the whole phenomenon with e.g. AirBNB. At first, it was way cheaper than a hotel. They got everyone to switch over. Then they started jacking the price back up. Because that’s the point. They don’t do all this to save you money out of the goodness of their hearts. Now? AirBNB is as expensive as hotels used to be, and hotels (in the US at least) are a total ripoff. Insane how pricey a hotel is now in the USA, and how sleazy and poor service you get for it. Visiting just about any other country is eye-opening
I can’t imagine not having a drill press or at least knowing a friend or neighbor with one in the 70s. People think that the world was medieval before the Clinton era and us giving our entire future away to China just so some of those same people in the 70s could have their retirement portfolios mature
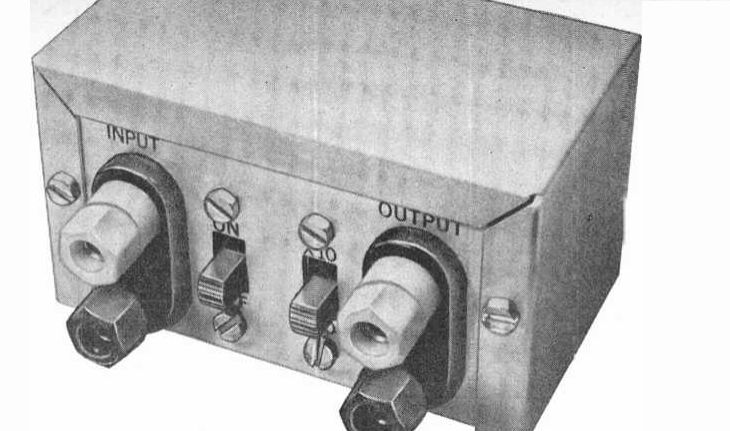
The only reason those kits look unpolished is the ugly side of the boxes were picked. Many commercial products used the same or similar boxes.
I think you are doing a disservice to commercial offerings. Many of them were made the same way as the hobby stuff back then. I think you are conflating ‘mass-produced’ and ‘commercial’. I personally would rather have something be sturdy and useful, what it looks like is secondary.
It may be well and good to have a polished look, but if it is e-waste from the moment it leaves the factory there is no point. Many people feel the same way, look at the resurgence in ‘artisan’ items. These have their own problems, many look worse than necessary as a ‘vibe’. Not sure which is worse, poor build quality due to inexperience or on purpose.
Actually, those were P-Box kits (see the link) and they were made to look like that. I am not sure what you mean by disservice. I’m saying that not all kits looked polished although many did. But very few homebrew items back then would have passed for commercial. Now days, you can put in just a little effort and make something that most people would mistake for a commercial project. By the end, though, I muse if you really want to or not? In the end, it is a personal choice.
I’m just pointing out that many commercial products used these boxes in past. If the bench tester had used a formed side and put the ‘hatch’ side down you wouldn’t be able to tell it wasn’t a commercial product. The small metal box would have similarly looked a lot more polished using a plain side instead of one busied by the folded edges (or if the folds had been inside).
This post just took me aback because in my mind putting it in a project box means it is ready to sell commercially. Back when I was re-using every zip tie that I happened to find and buying my adhesives at the dollar store a project box is a straight luxury, bizarre to think they would be looked down upon. But I suppose people look down on a stripped out pickup specification, preferring a ‘loaded’ KIA with a high chance of engine failure before it hits 10 years.
To clarify, I have vivid memories of car and RC battery chargers and train set speed controllers using similar boxes.
I remember, and still have, lots of 1950’s-60’s stuff that was a rough steel box with a curved phenolic cover that wrapped over the entire box and made it look nice. I don’t know about RC battery chargers but that was definitely the case for kids’ toys that needed or had mains power associated with them.
Commercial custom industrial control panels (for example) still look like someone put them together in a shop.
Because they did.
Standards for commercial consumer products have changed.
Some of the commercial stuff looked fairly ‘hobby grade’ back then.
It’s easier to fake an injection molded enclosure now, but stacked laser cut plastic still exists.
Just like (aluminum extrusions/plain plastic boxes/industrial panels) existed back then.
Not all kits were or are equal.
Note this commercial project from the 1970s: https://www.etsy.com/listing/1895276851/mrc-model-501-throttlepack-ho-train
I just grew up in a world where a ‘project box’ didn’t necessarily say ‘diy’. In fact this kind of product was popular through the late 90s and possibly mid 2010s for some products.
“So, most home projects were handwired or maybe wirewrapped.”
Hey, now that was fun especially if one had good tools for it.
this article sure made me appreciate my $60 drillpress and $170 3d printer. between them, i have completely stopped making enclosures out of layered cardboard with masking tape and hot melt glue
thank you chinese factories! fantastically affordable tools are such a big part of my life
I have found out recently that using cardboard and copper tape are actually awesome for circuit prototyping, because you can patch it as needed and the ground plane is solid. Meanwhile with 3D printer I always have to print a sketch and even that can take multiple hours… before I realize I was off by 2mm and have to hit the CAD again. If only physical was as easy as digital.
Why would that matter to the case? It’s easier to drill a small hole in a precise location with an eggbeater drill than with a big wobbly drill press meant for much heavier work. People think the drill press is better because it’s not your shaking hands doing the work, but the difficulty of fixing the work in the precise spot and dealing with the runout of the drill is going to be more fiddly.
Know your tools and how to use them is better than having fancier tools.
Perhaps a corollary of sorts: a good center punch is one of the most underrated and underappreciated tools that everyone should have and know how to use.
Even if you think you don’t need it because you have a nice drill press.
side note, and still a source of personal embarrassment years later: you should also know what a nice metal scribe looks like and how to distinguish it from a punch, lest you have to explain to the machinist why their extremely nice and fancy scribe is suddenly very dull.
Opinions divide on whether you’re supposed to or prohibited from using a calipers as a scribing tool.
A good alternative is a block of wood or soft metal that you’ve pre-drilled with a hole the size of your starting bit, which you place over the hole location and clamp it to the piece you’re about to drill. For drilling patterns, you can pre-drill a stencil on a piece of plastic or other soft material.
On the other hand, the collar nut on a panel switch is going to hide your crimes. An oversized hole or a bit of filing with a round file lets you nudge the switches around so they line up perfectly. That’s another thing: accuracy where accuracy matters.
I cut my teeth on Doug DeMaw articles in back issues of QST, so that’s the aesthetic that I aspire to now. Homemade aluminum boxes, spray paint, and embossed Dymo labels are part and parcel to just about everything I build. No one will ever mistake any of my projects for commercial products, and I’m okay with that.
You also had PCB masking tape – very narrow stretchy tape that you could just bend around corners – and sheets of round and square stickers for the soldering pads. And a sharpie to fill in the gaps, or a dot of nail varnish. When Xerox machines came along, you could run a copy of your hand-drawn sheet on a piece of transparency once or many times to build up the density (good luck with alignment).
One thing that was commonly available were photographic enlargers.
https://en.wikipedia.org/wiki/Enlarger
Every well equipped school had a photo lab – our public library had a photo lab – so you might draw your design on a whole big sheet of paper, photograph it, develop the film, and then expose the board with it. A bit of lens distortion didn’t matter with through-hole components and hand soldering. Developing your own black and white photographs was a popular hobby, so there were no shortage of materials and people who knew how to do it.
There were solutions that made it relatively easy – faded from memory since we haven’t needed them for a very long time now.
Also, if you were into the arts and media, that’s another way you could print stuff like your amateur newspaper or flyers with graphics if you wanted more copies or better copies than a ditto machine could handle. Whatever you could photograph, with sufficient contrast, you could etch on a sheet sized copper board and then use that to press pages.
Stencil plates, commonly sold in book and paper shops. Commonly used for engineering drafts. You had a variety of sizes and fonts, also for other shapes and symbols. It was quick and easy, especially for the engineering stencils since there were also pens and markers that fit the stencil grooves exactly, and for finer lettering and fonts you had thinner plates or sheets that let you get in the corners. The little gap or break in the letter shape that was left over was filled in by hand.
Then there was silkscreen printing, which is modestly more complicated and a bit more fiddly but still pretty easy if you’re good with a razor blade. I’ve done it myself.
Linoleum plates could be used to carve a stamp – that was also something we learned in primary school arts class. The letters could be lifted from newspaper clippings by wax copies, because the oil based ink would stick to a piece of paper rubbed with a candle and then rubbed onto the newspaper with a penny. When you took that piece of waxed paper to the linoleum sheet and rubbed on the back, it would create a shadow of the image you wanted to copy, so you could then carve around it. Or you could just freehand it.
Or, you would probably wax the linoleum sheet directly and then rub the ink onto that, because you needed the image in reverse to stamp it the right way around.
Nice article !
I still have a Dymo label gun and some label rolls from my father somewhere in the junk room…
Memories !
Came here to say the same thing, memories indeed!
I once needed a logo on a plastic box, so I put some tape on it, drew the logo on the tape with a marker and then cut the shape out with a sharp knife, then used the tape as the stencil to make the lines crisp.
I had that exact red Radio Shack AM radio kit that’s in the first picture, cat. no. 28-102 I believe, and also that exact Dymo label maker (still have it); but when I wanted professional-looking lettering on my projects, I’d use dry transfer lettering. I did get my lettering sheets out for a project a couple of months ago, and found that after sitting for 45 years, it wasn’t any good anymore.
Yep, that radio kit is on page 116 of this 1971 Radio Shack catalog:
https://www.radioshackcatalogs.com/flipbook/1971_radioshack_catalog_ver1.html
Wow the nostalgia there is powerful!
We are absolutely spoiled these days, the options available to home constructers areind boggling to someone who grew up building things into folded aluminium or ABS boxes and struggling to make them look nice.
Having said that, I’d love to be able to easily buy some of those aluminium boxes these days, they’re pretty much unobtainable and I wish I’d stocked up on them.
Hm. Maybe, maybe not. I miss the more industrial look, the elegant aesthetics of old radios (not the “bit” radios, rather 1920s) or furniture.
Because let’s be honest, a lot of “commercial grade” products these days don’t look commercial at all, anymore, but like toys. Like Fisher-Price.
It’s like with cars. In the 80s, you still had real cars in boxy shape.
While nowadays, they’re all asphalt bubbles.
Insofar, I really enjoy the industrial looking chassis used by hobbyists.
They have that prototype feel, that university/lab aesthetics..
They’re much more worthy that the cheap commercial chassis of today.
At the same time, actual arts and crafts stores have closed down all over the place and the ones that are still left standing are selling paper cups, foil balloons and soda-can tabs in bags of 200. They no longer carry the tools and materials you used to have.
That’s like fastfood vs home cooking.
Too often, making things “easy” means loss of craftsmanship.
The sad things is however, when people see it as progress.
Because life isn’t easy. And trying to making it easy all time takes away what makes ot precious.
Actual arts and craft stores? Like brick and mortar retail establishments?
Anything you could buy at CraftDepot and more is still available today. In fact there are more options available than ever. You just click and ship now instead of roaming aisles grabbing randomly.
Yeah, but it’s coming from overseas on a slow boat and the quality isn’t that great.
Like, I wanted a paper guillotine – what came back was a wobbly piece of junk that didn’t even serve the purpose. No brick and mortar store could sell that, because when you go in the store and actually handle the product, you’d leave it there and walk away. We’ve lost the ability to check for quality before we hand over the money – what good is variety when it’s just more useless crap?
And the whole aspect of browsing for stuff, having it in your hand to get an idea of what you could do with it, is lost. You just have to trust that the picture you see is the actual product you get, or that it’s actually fit for your purpose, and that fails about 70% of the time.
Dont buy the cheapest option on amazon if you arent wanting to play quality roulette. Pretty simple.
If you chose that route, accept that youll either win or return.
Most brick and mortar stores arent going to let you take the guillotine for a test ride anyway. Its going to be in a box you can only shake for weight check. You may get lucky and find a floor model zip tied out of functionality you can touch to get a vibe.
The same goes for most of the goods at the old craftmart. You werent getting hands on much of anything but the box. You were reading and deciding, and probably buying 6 things you didnt really need because with no more information at hand than the packaging propaganda the snake oil kits sounded really neat.
Research the items, their manufacturers, and models. The internet is full of people praising and cursing most everything available to purchase. Figure out the products that have the best reviews and ratings for your intended goals, and applications. Find the best retailler, reseller, or ebay auction and make your purchase.
if your fail rate is 70%, youve got pretty bad judgement. Good Luck!
“Having said that, I’d love to be able to easily buy some of those aluminium boxes these days, they’re pretty much unobtainable and I wish I’d stocked up on them.”
There are lots of companies still making them. Are we allowed to put a load of URLs here?
As far as I know, yes. I buy enclosures from Hammond (they’re not cheap here in .au) but their quality control is very good and with a nice panel it will serve for low-volume commercial work. http://www.hammond.com
If I’m in a hurry I have a local Jaycar that is open on a Sunday and sells the 1970s-style “jiffy” project boxes: http://www.jaycar.com.au
Good post with good points about the under-appreciated differences between true homebrew and kit building. I have a lot of Heathkits around me, but I never considered them to be homebrew. There is a big difference. We have been promoting and supporting the HOMEBREW construction of 40 meter direct-conversion receivers. No one would confuse these receivers with commercial, or even kit-built gear. But they work very well, and the builder earns the satisfaction that comes with building something from scratch. There are no factory made PC boards to “populate.” All four of our boards are made using Manhattan construction techniques (super glue, isolation pads, copper-clad substrate). Almost 90 receivers have been completed, in more than 15 countries. Check out the receovers. Build one if you dare: https://soldersmoke.blogspot.com/search/label/DC%20RX%20Hall%20of%20Fame BTW — I own a Dymo machine, and my SSB transceivers are in wooden boxes made from junked packing material. 73 Bill N2CQR
I was a kid on a kid’s budget trying to build things before the days of plentiful chinesium and 3d printers. I went to a lot of garage sales and picked up a lot of old CB radios. The ones that worked I either kept or gave to friends. (This was also before cellphones were common). But a lot of the CBs did not work.
There was a common design, a metal box that was open in front. And a plastic faceplate that bolted in the front opening. The faceplate would have a bezel around the outside but the middle would usually be flat except for the holes where controls and other parts stuck through.
I would gut the broken cb for it’s case. For whatever I wanted on the front panel I would use an existing hole if it fit or feel free to cut and hack as needed. I didn’t worry about looks at that stage because of the next step.
I would cut a piece of cardboard out of an old cereal box or similar to just fit inside the bevel. Also, if something came in a shiny wrapper that was big enough I would save the wrapper to wrap around the cardboard. Or if I could find a sheet of colored transparent plastic I would wrap the cardboard in aluminum foil first then the plastic.
Then I could cut just the holes I need in my shiny cardboard faceplate cover. All the original holes I wasn’t using, text, etc would be out of sight underneath. If I cut the cardboard right to just fit in the bevel before it was wrapped it would be snug once wrapped. Also, any knobs once attached to their shafts would hold this it in place too.
I don’t think I have seen many people build that way but back then it was my favorite. I wouldn’t call it professional looking but it didn’t have that plain generic look of a project box either. It was sort of it’s own thing.
These days of course when I am ready to box a project it’s off to OpenSCAD.
https://www.bhphotovideo.com/c/product/1286371-REG/midland_5001z_40_channel_classic_cb.html
Speaking of CB Radio.. The CB operators in the US of A now are allowed to use FM officially.
https://cbradiomagazine.com/fcc-approves-fm-for-usa-cb-radios/
So they have AM, SSB and FM now. All three modulation types.
The latter is useful for digital modes (once allowed).
Here in Europe, we had been doing Packet-Radio in 1200 Baud AFSK since mid-90s on FM (ch 24/25).
Some are doing SSTV, too. In FM or SSB.
It’s allowed in certain EU countries over here.
This maybe doesn’t seem like a big deal, but it’s good for international contacts.
It also helps to bring CB radio closer to amateur radio, which is good for both parties.
“You probably hand-drew your pattern on a copper board or maybe on a transparency if you were photo etching.”
In the 80’s I drew on vellum and then contact printed to ortholith film and developed that. It really wasn’t that expensive, and kinda fun. The ortho film’s ‘hysteresis’ in photosensitivity gave strong contrast and was very forgiving. Then I sensitized with Kodak KPR. KPR was a little expensive, but a quart would last a lifetime. (I suppose this is literally true since I still have over half a quart left. Developer’s long since evaporated, though. I think it was mainly xylene and maybe methylene chloride.)
Double side boards were easy by aligning the two masks and using scotch tape to fix the registration, then sliding the sensitized board in between.
I used a Sears drill press. I think all told the drill bits were the biggest expense because I certainly broke a lot of them!
I hand-drew the circuits, but the markers that were supposed to resist the ferric chloride etchant never did, so I used paint and a super tiny brush. After that, I started using the Archer 276-170 solder-type breadboards from Radio Shack that had the same pattern as the solderless breadboards, and often used a strip of copper foil down the middle for shorter ground connections. I’ve managed to get some prototypes super dense, because these boards allow two or even three leads in a hole (if the leads are small enough), and I also put parts on the back. (I also cut traces sometimes, to use the same row for two different things.) Radio Shack is mostly gone now; but replacement proto boards that are even better are from BusBoard Prototype Systems, at http://www.busboard.com/KIT-BB1660-SB1660 . If I want multiple units, I lay them out on the CAD and get them made by DirtyPCBs.
Anyone else remember Dalo etch resist pens for hand drawing your PCB design directly on the copper?
Nowdays I just send my designs off to China.
PCB’s, front panels (made from PCB), 3D printing, some CNC aluminium machining, etc. I haven’t even turned my 3D printer on for years at this point.
Although, for sheet metal parts, I use Misumi Meviy here in Japan as that is really cost effective for small run and prototype stuff.
Yeah, I remember when they ran dry so you had to “pump” them to get the ink flowing again, only for the pen to eject a huge ink blob all over your PCB.
Making lettering look professional back then had many cheap and easy DIY routes. Off the top of my head, etching the letters on the panel with Ferric Chloride would have been a simple way to do it. One could have easily sprayed on a resist agent using a stencil and then dipped the panel upside down
I once found an old issue of Popular Mechanics featuring an article entitled “Make this Ashtray out of Lead”. They really missed an opportunity to make the project just that little bit more dangerous by adding a tritium powered light source to make it glow in the dark.