3D Printed… Measuring Tape?

3d printed measuring tape

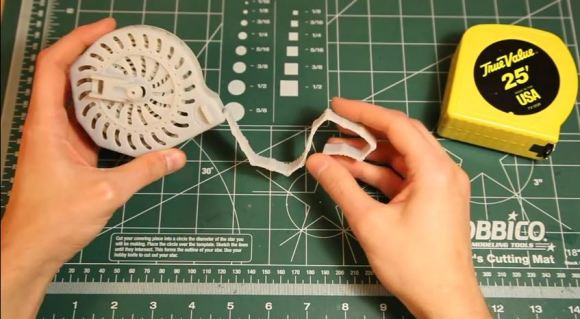
Here’s a new one to push the envelope… How about a 3D printed measuring tape?

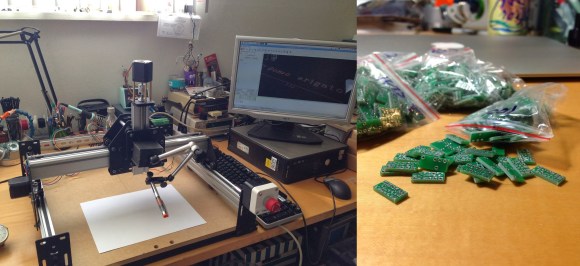
This unique 3D printed tool was designed and printed in a single job.  [Angry Monk] has been challenging himself lately with these intricate designs, having recently finished a completely 3D printed set of dial calipers, which is impressive in its own right.

Looking for his latest challenge he pondered what it would take to make this 3D printed tape measure. As he continued to think about it he realized how complex it would actually be to pull off. After designing and printing a few of the basic parts to help him solidify his ideas, he set to work. This tape measure has 114 individual parts. It includes 52″ of tape links with 1″ divisions and markings down to the 1/8th of an inch. It even features a hand crank (sorry no spring return) to roll up the tape.

Now as you can imagine, a complex assembly like this is a bit out of the realm of possibility for regular hobby 3D printers — a UV resin printer might be able to do it, but [Angry Monk] used a commercial Objet Eden 3D printer. Still though — it’s an impressive display of design, check out the following video and see for yourself.

Continue reading “3D Printed… Measuring Tape?”

Mechanical Iris Will Make You Want A Laser Cutter Even More

Mechanical irises are very intricately designed mechanisms that are mesmerizing to see in action — and if you have a laser cutter, you could make one in less than 10 minutes.

Our “Teacher of Science”, Instructables’ user [NTT] has revised a previous Instructables design on a mechanical iris to improve it. The original design used three layers of components and dowel pins for every joint. What [NTT] has done is reduced this to two layers, and eliminated half of the pins required by designing clever circular cutouts. The result is a very slick mechanical iris that is very easy and quick to build — provided you have the tools.

Stick around to see the original iris open and close — unfortunately there’s no video of the new design — but we think you can imagine the differences.

Continue reading “Mechanical Iris Will Make You Want A Laser Cutter Even More”

Humble Beginnings Of A Pick And Place Machine

beginnings

[Pete’s] invented a product called an AIR Patch Cable designed to interface with an airplane’s intercom, and is looking to manufacture and assemble them himself — unfortunately, the circuit boards are tiny, and SMD components aren’t exactly the easiest to install. So he decided to build a pick and place machine to do it for him!

It’s not finished yet, but [Pete] has reached a major milestone — he’s finished the base CNC machine aspect of it. He opted for a kit build for the major mechanical components, the Shapeoko 2 — its a solid design and if you decided to make something from scratch it’d probably cost much more and take a lot longer.

From there he began selecting his electronics individually. He’s chosen the Big Easy Driver by Sparkfun to control his stepper motors, which supports a maximum size of NEMA 17 steppers, so he bought five of those too. To control it all, he’s using LinuxCNC which is an excellent choice — and if you’re not crazy about Linux, you can actually download Ubuntu 10.04 with LinuxCNC pre-installed for you to make it super easy — you’ll just need an old dedicated PC to use.

Continue reading “Humble Beginnings Of A Pick And Place Machine”

Home Made Resin Based 3D Printer Is Incredible

Resin based 3D printers (SLA) are the next big thing, and while they may seem daunting at first, in some ways they are actually simpler than FDM machines with less moving parts! Loosely following an Instructable, [Dan Beaven] has just finished putting together his own home-made 3D DLP Printer, and it’s bloody brilliant.

He owes a lot of thanks to [Tristram Budel] and his incredibly detailed Instructables guide on building  a 3D DLP printer, but [Dan] has also added quite a bit of his own flair to the build. Most notably is his method of separating layers from the vat of resin — most designs tilt the bed slightly to counter the suction forces, but his slides the vat back and forth along the Y-axis, which seems to work extremely well.

The printer is built out of 1″ T-slot aluminum and has a NEMA 17 motor that provides the Y-axis movement along two linear rods for the vat. The Z-axis stage uses a NEMA 23 motor and has a whopping 14″ of travel. Combined with a 104mm x 204mm build plate, this thing can print some decently sized parts!

Continue reading “Home Made Resin Based 3D Printer Is Incredible”

Drilling Into A Laptop: Extreme Hinge Repair

final-2

What is it with laptop companies spending millions on design and aesthetics… and then using a cheap hinge design that is almost guaranteed to break? After [Peter Zotov] spent hours trying to find a replacement online, he decided to take matters into his own hands with this slightly unorthodox hinge repair.

The problems lies in the design of the hinge mounting to the lid. First, they’re using a non-standard screw sizes, slightly larger than an M2. Second, it’s threaded into cast aluminum — and to make matters worse, it doesn’t even look like there is sufficient thread engagement! A good rule of thumb is about 2 times thread diameter for aluminum — 1-1.5 times for steel. And it’s not just ASUS doing this, we’ve seen numerous laptops of different brands where the hinge goes after a year or two — what happened to cyclic stress tests?

Anyway, [Peter] decided to drill out the existing threads to allow for larger bolts. He threw his precious laptop up onto his CNC mill (a drill press would do just fine), and popped larger holes straight through the lid. This allowed him to put three standard M2 screws in place with a nut and washer. We admit it’s not the most elegant solution, but it’s saved him from getting a new laptop just because of planned corporate obsolescence.

It’s Not 2015 Yet But Marty And His Hoverboard Are Already Here!

Okay now this is seriously awesome. [Rodger Cleye] has made a real working Hoverboard.

You guys might remember the recent [Tony Hawk] and [Christopher Lloyd] viral Hoverboard hoax video… Well, this isn’t that. Nope, not even close. It’s real.

The Hoverboard is a quadrotor on steroids — it features four 1200W brushless motors driving 12″ props, a massive 13.4Ah 5S Li-Po battery, and a [Marty McFly] mannequin wearing the classic red vest. He’s counter-balanced [Marty] and the battery around the rotors which makes for a surprisingly smooth flight. It even has a run-time of over 5 minutes, thanks to a whopping 83% efficiency using the 12″ props.

[Rodger] designed and simulated the entire system in eCalc before construction — He had first attempted a bi-copter design, but opted for the tried and true quad-rotor instead. The frame is made of 1/2″ PVC pipe to conserve the mass budget, but altogether it still weighs an unbelievable 20lbs! How close are we to being able to give toddlers the ability to fly?

Just take a look at the following video — we’re seriously impressed.

Continue reading “It’s Not 2015 Yet But Marty And His Hoverboard Are Already Here!”

Open Source SwitchMote Promises Easy Home Automation

[Felix Rusu] is fast becoming a big name in home automation with his clever Moteino systems. His latest is called the SwitchMote which is a super easy way to upgrade your light switches for home automation, and he’s just released the source!

The SwitchMote is a drop in wireless light switch which lets you control a standard AC load, limited to 100W at this time. It uses a solid state relay (SSR) to perform the switching, but like any project involving mains electricity… MAKE SURE YOU KNOW WHAT YOU’RE DOING!

It makes use of a Moteino (duh) which is a wireless Arduino clone that operates over RF. We’ve seen it used before to control a Keurig coffee maker, operate a garage door over the internet, and even text you when your sump pump fails and your basement is about to flood!

Excited? Take a look at his GitHub repository, and check out how it works in the following video.

Continue reading “Open Source SwitchMote Promises Easy Home Automation”