Need To Reference The US Constitution Fast? How’s 6 Seconds Sound?

CONSTI2GO-Thibault-Brevet-2

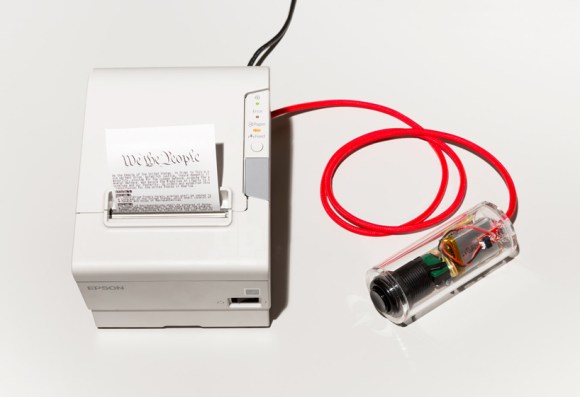
Well, unless you know exactly what you’re referencing it’s going to take you a lot longer, but this clever serial receipt printer hack will let you print the whole darn thing in just 6 seconds!

Commissioned by [Jeff Goldenson] for his LABRARY.bike (quite literally a pop-up library on a bike), it was actually shown off at SXSW Interactive — did anyone see it in person? The artist-hacker who created it is [Thibault Brevet], the guy who brought us the DRM chair that only works 8 times before it falls to pieces.

Anyway, this cool and rather suspicious looking tube with a serial cord hanging out contains an Arduino, a max232 chip and a small Li-Po battery. The Arduino communicates with the printer through the max232 chip by converting the TTL signal to RS-232. It has a single button on top, which when it is connected to the printer will send out the US Constitution over the serial interface via ESC/p language.

Did we mention how fast it is?

Continue reading “Need To Reference The US Constitution Fast? How’s 6 Seconds Sound?”

Talking Bacon Plushie Greets You At The Door

BaconMaterials

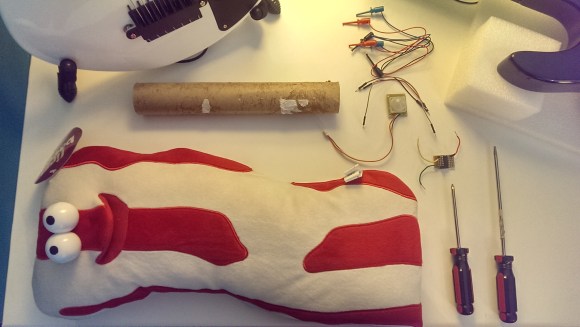
The folks over at [gTar] decided to create a motion activated talking bacon plush toy to greet visitors to their office.

They started with a toy called My First Bacon, available from ThinkGeek — it’s a plush toy that exclaims “I’m Bacon!” when you squeeze it. But then they cut him open. We can’t imagine what must have been going through this poor self-aware Bacon’s mind!

The hack itself is quite simple. They are basically replacing the “squeeze” circuit with an IR motion sensor — a PIR sensor from SparkFun to be precise. In addition to that they needed a small inverter IC. This is because the standard talking bacon module requires a positive leading edge signal in order to trigger the audio output, and their PIR sensor drives an output pin low — slap on an inverter IC (they had an old schmitt trigger lying around) and you’re ready to go!

Continue reading “Talking Bacon Plushie Greets You At The Door”

KamerMaker Begins Printing A House

kamermaker-wordpress182-1024x723-634930_610x431

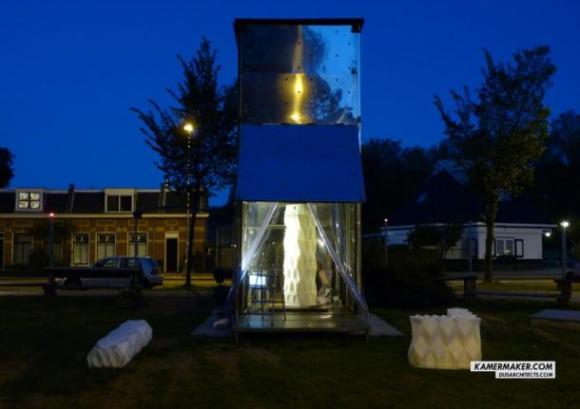
The KamerMaker is the world’s largest portable 3D printing pavilion built out of a shipping container — it has started printing an entire house out of plastic.

We first shared the KamerMaker (literally “Room Maker” in Dutch) a few years ago when it was first designed and built as a collaboration project between Utilimaker and Architectburo DUS. Their intention was the ability to print 1:1 architectural designs, and now it has begun its biggest project yet — an entire house along the canal in Amsterdam.

So far the KamerMaker has printed one corner of the Canal House, which features part of a staircase. It weighs about 400lbs and took a week to print. To increase the strength of these 3D printed parts, the company uses a honeycomb infill and before assembly will fill the gaps inside the piece with a type of foam that becomes as hard as concrete.

The project is estimated to take three years for completion, and until then you can visit it at Tolhuisweg 7, 1031 CL in North Amsterdam, where it is open to the public for a small fee of €2.50 — this is a tourist city after all! When completed it will be a design museum, although the team at DUS hope it will be only the first of many 3D printed buildings.

To learn more about the project, stick around for the following video.

Continue reading “KamerMaker Begins Printing A House”

Heated Build Chambers Don’t Have To Be That Complex

800px-HBC_open_door_view

Looking to improve the quality of your 3D prints? Worried about peeling, warping, and de-laminating layers? All you need is to do is make a heated build chamber!

The heated build chamber is one of the patents that the big 3D printer company owns (we won’t point any fingers), and that’s why you don’t see it as a feature on any of the “consumer” grade 3D printers. But that won’t stop people from making their own!

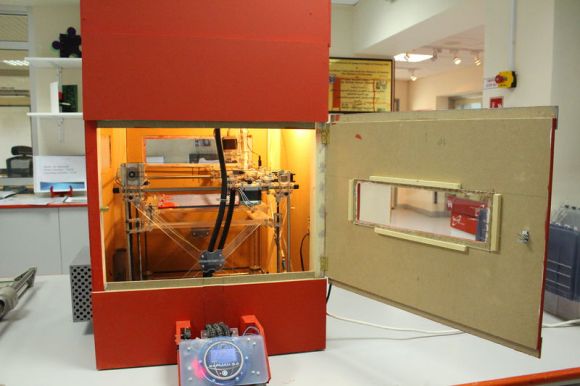
[Repkid] just finished a wiki page on this topic, and it’s a great way to build a heated chamber — if you have the space for it! He’s built a large wooden enclosure for his RepRap out of MDF sheets. Double-ply cardboard is used as thin insulation, although we imagine if you’re building something this large you might as well use some commercial insulation.

The chamber is heated by a blow dryer which is mounted off the back of the box, and the heat is controlled by changing the speed setting of the dryer. A laser cut vent allows for further adjustment. If you want to get really fancy, it would be very easy to install a thermostat PID controller that could regulate the temperature more accurately. To prevent overheating the electronics, all the control boards are also outside of the box.

Continue reading “Heated Build Chambers Don’t Have To Be That Complex”

Massive LED Display Makes Use Of Reused Soda Bottles

BcbiT1IIEAAUXFK

What better way to make a giant LED display than out of old empties and bottle crates? This is the Mate Light (pronounced Mah-Tay).

We were first introduced to the ever popular Club-Mate soda at one of the first hackerspaces we visited during our Hackerspacing in Europe Tour. It’s a soft drink produced in Germany, which seems to be the exclusive non-alcoholic drink of choice for almost all hackerspaces in Western Europe. The spaces in the Netherlands and Belgium would even make road trips to Germany just to load up a van with the drink to bring back home. Personally we didn’t really understand what was so special about it, but maybe we just didn’t drink enough!

Anyway, this impressive display makes use of 640 empties arranged in 4 rows of 8 crates for a decent 16 x 40 resolution. Each bottle is wrapped in aluminum foil and contains one RGB LED with a WS2801 driver. Each row of crates is connected to a TI Stellaris Launchpad, which has four hardware SPI interfaces — conveniently the number of rows of crates used! From there, an ancient ThinkPad T22 laptop runs the control program over USB to the microcontroller board. Their first software implementation used a Python script which was painfully slow — they’re now putting the finishing touches on using a C script instead.

Stick around to see the display in all of its awesomeness.

Continue reading “Massive LED Display Makes Use Of Reused Soda Bottles”

3D Printers Can Only Make Trinkets — What About Kayaks?

Wow. [Jim Smith] of Grass Roots Engineering has just put the finishing touches on his entirely 3D printed kayak. And it floats.

The individual parts were printed on [Jim’s] massive home-made 3D printer, which is loosely based off a RepRap — except that its maximum build volume is a whopping 403 x 403 x 322.7mm.

The kayak itself is made of 28 printed sections, and to hold it all together, he has installed brass threaded thermoplastic inserts, which then allow the pieces to be bolted together. Silicone caulking is applied before assembly to ensure a watertight seal.

It was originally based off of a Siskiwit Bay kayak by [Bryan Hansel] but [Jim] has heavily modified it to suit 3D printing. It was printed at a layer height of 0.65mm to reduce print time, which still ended up being over 1000 hours! He even optimized the design to improve performance based on his own height and weight.

Continue reading “3D Printers Can Only Make Trinkets — What About Kayaks?”

We Asked For It — An Arduino Bowel Gauge

toilet

Well, we asked for it, and [TV Miller] delivered this hilarious and surprisingly accurate bowel gauge.

Between our recent Wiping Your Bum with an Arduino feature and how to Measure Poop for a Better Sanitation Service, we guess we should have seen this coming. And you know what? It’s pretty awesome.

He’s using an Arduino Uno with a home-made resistance sensor to “hack our bowels”. After all, how can you have a proper diet without knowing exactly what is coming out of you? Two copper or aluminum strips make up the resistance sensor with a few known resistors, a capacitor and a potentiometer for adjustment. He’s even included an LCD display as well so you can see the volume of your excrement in real-time! Classy.

To see it in action (don’t worry, not that kind of action) stick around for the following video:

Continue reading “We Asked For It — An Arduino Bowel Gauge”