Plenty of materials take the heated edge of a laser beam quite well, but many others don’t. Some release toxic fumes; others catch fire easily. For all the materials that don’t cut well (PVC and FR4, we’re looking at you!) and for those that do (hello, acrylic and Delrin) they’re each reacting to the heat of the laser beam in different ways. Lucky for us, these ways are well-characterized. So let’s take a look at how a laser cutter actually cuts through materials.
But First: Why a Laser?
If we journey outside on a sunny day with a magnifying glass or, better yet, with a nice honking Fresnel lens from an old-school HDTV (thanks Jen!), we can focus the sun’s light down to a point and fry some ant–I mean–burn some leaves. Why not, then, just use a high power light source to burn through our materials? It turns out that there are two main reasons. For one, CO2 lasers emit a 10,600-nanometer wavelength that falls in the IR range. This wavelength just happens to be readily absorbed, rather than reflected, by wood and plastics, making it highly efficient for cutting since most of the light is absorbed as heat, rather than reflected and lost. However, there’s one additional reason why a laser, rather than just a humongous flashlight, is so much more effective at cutting materials.
To get into the nuts and bolts, we’ll need to take a look at some laser optics. First off, keep in mind that our laser is both collimated and of a single wavelength. A high power white-light source is neither of these, but let’s look at one variable at a time.
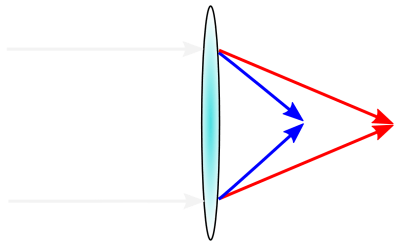
If we were to shoot a collimated (parallel) white light source through our lens, we still can’t achieve the same power density of a laser, which consists of a single wavelength, and here’s why. In the real world, no optical lenses are perfect, and the consequence of passing white light through an imperfect lens is that individual colors have slightly different focal distances. Laser light, on the other hand, consists of only a single wavelength, which means it wont experience this spectrum splitting issue that white light experiences.
The white light’s blue components focus more closely than it’s red components. The net result? Since we can’t focus all of the input light on a single point, we reduce our overall power-density.
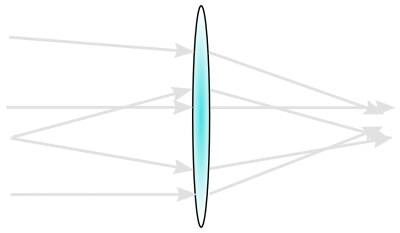
Let’s examine the next case: uncollimated white light. Here, we get a similar result as in the first example. Collimated light refers to the fact that the majority of our photons are parallel with each other. Uncollimated white light, like that of a lamp, features light rays that travel in all directions. For the uncollimated light that enters the lens, the angle of incidence determines where it’s actual focal point will be. In other words, each light ray with a different entering angle will have a different distance from the exit of the lens before it reaches the center where the ideal focal point would be.
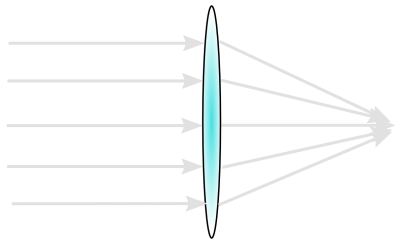
Laser light can be easily collimated, which means the light rays are traveling parallel to each other. Because this is the case, each ray that enters the lens will exit and converge at the same distance, i.e, the lens focal point.
Hence laser light, being both monochromatic and collimated gives it a higher energy density than it’s vanilla white-light contender.
Focal Length
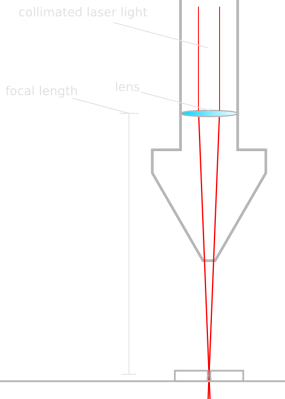 Upon entering the laser head, the laser beam reflects downwards off the final bounce mirror and into the lens, where it’s focused onto our part. From a side view, our photons exit the lens and follow the optical path we’d expect: two cones standing end-to-end. The center of these cones is the focal point where we pack the most power-per-unit-surface-area. This is the point that we want to focus onto our parts to do the actual cutting.
“But wait!” cries the budding optics engineer. “Won’t our parts have a tapered surface finish if we’re focusing our light down to a point?”
In fact, yes! As we can see in the side-view below, the part edge, smooth as it may be, is still tapered as a result of the focal length. The sad truth: while a longer focal length lens can reduce this tapering effect, it can’t remove it altogether. This is the reality of physics that we just can’t circumvent.

Nevertheless, for the dimensions that matter, we can using finishing tools like reamers to bring important features like holes to their proper size.
The Not-So-Many Ways of Punching Through Materials
Dumping a bunch of photons onto a small focused surface area might conjure up wonderful visions of complicated reactions taking place on the surface of our material. In reality, the physics of laser cutting really only falls into two categories: phase change or a chemical reaction. (For a bit more detail, I’ve split phase change into two categories.)
Vaporization
A small number of materials actually convert to gas phase when heated by laser. This list is pretty small, though, but among the list of safe materials are two heavy-hitters: acrylic and acetal homopolymer (Delrin). Vaporizing the material leaves a magnificent surface finish since we’re just changing the phase of the material that the beam hits as we move it along.
You might think, “Solid to Gas? That smells like trouble” and you’d be right! Vaporizing Delrin also releases carbon monoxide, hydrogen fluoride, formaldehyde, and carbonyl fluoride according to the DuPont Delrin MSDS. Vaporizing acrylic also releases carbon monoxide and carbon dioxide. Keep in mind vaporization also releases monomers of both of these materials.
Melting
Better known as “melt-shearing,” most thermoplastics (but not Delrin or acrylic) experience melt-shearing while being cut. Because we’re liquefying the surface of the cut, the surface finish tends to come out slightly worse than the materials that simply vaporize.
Burning
To dress this one up, let’s say that the material “experiences a chemical reaction induced by heat,” but really, we’re just burning it, plain and simple. Thin plywood, by far, is the most user-friendly material in this category since the products are mostly just soot. For all the other materials that fall in this category, though, keep in mind that burning through the material will definitely release a host of products, some which can be deadly. PVC, for one, releases chlorine gas, so that one’s definitely on the no-no list.
The Importance of Air Flow
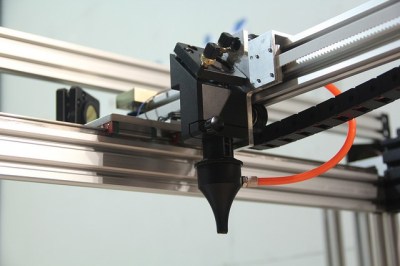 We see them on pretty much all commercial CO2 laser cutters, so it’s worth asking: “what’s the importance of having the nozzle with air shooting through it?” Preventing dust from entering the lens would seem like a natural explanation, but the air flow actually plays a much more important role. It turns out, that an axial flow of air helps redirect both any potential flames and melted material downward through the groove made in the cut.
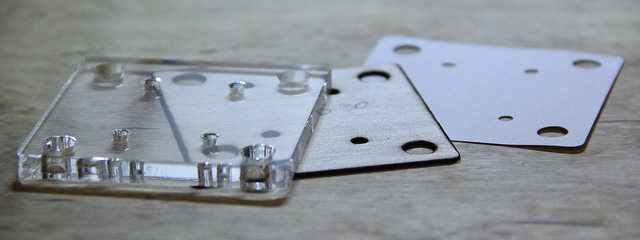
Don’t believe me? I decided to do a little investigation with my homebrew 2x_Laser, Nessie. I ran two tests cutting an identical shape out of 0.09375-inch acetal homopolymer (aka: Delrin), one with the compressed airflow on and one without any compressed airflow.


On the left, let’s examine the edges of our cuts. Notice that the surface finish on the edges isn’t as clean as the right cuts that had a coaxial airflow. I attribute this poor surface finish to the melted edges of the cut bubbling over the surface of the part and then re-solidifying. On the right, the air assist blows the flame and particulates downwards, rather than letting them bubble onto the top.
That’s all for now! If you’ve picked up a few details in the dark arts of laser cutting, let us know! We’d love to hear your words of wisdom in the comments.
References:
CO2 Laser Cutting, 2nd Edition. John Powell


Good article
Finally someone I can ask this question: “If the kerf of a laser cut isn’t perpendicular to the surface, then why can’t the laser be angled to compensate?” I realize this is adding at least one more DOF to the laser head, but if it saves secondary operations I can see where it would be wort the trouble.
Sure it can! like this?
http://bencotechnology.com/assets/2012/10/slide-3d-tube.jpg
The beam of the laser is focused to a spot that *should be* at the top surface of the material. This means that the beam is a cone that comes to a point at the surface, and spreads out below.
When you cut out a circle (or hole), the circumference of the top of the hole will be smaller than the circumference of the bottom, and if you cut out a rectangle you’ll find the sides angled in or out.
http://www.idacontrol.com/photos/laser-focus-position.jpg
Acrylic has a “focusing” property such that melted Acrylic tends to focus the beam below it, which is why the spot should be on the top surface and not in between surfaces.
There’s also the spot size, which is the “kerf” of the cut. Lenses with a short focal length can have smaller spot sizes, but the angled effect is then much greater. Using a lens with a longer spot size gives you sides which are closer to parallel, at the expense of having a wider kerf.
You might not think this has an effect, but for my project we’re laser cutting holes to be threaded for screws. The kerf can be inside or outside the path, depending on how the laser is set up. This and the angled side makes it nigh impossible to cut the correct size hole directly.
And different lasers are different in all these ways, so our best guess when we make files for others to use is “do some test cuts and choose the size that works for you, then update all our files with this new size”.
Ugh.
Re: hole cut size. Why not add code to your cut file that adds a variable to the hole size. It is just G-code, right? Add a variable and the holes should cut right with the proper number added.
That’s a perfectly reasonable idea.
The laser at my hackerspace uses completely closed-source data that can’t be modified (easily), so I can’t do it there.
CAD programs will let you specify the “tool width” in generating G-code, but our laser only imports DXF files, so that doesn’t work either.
What I recommend is for people to make some test cuts and adjust the size to what is needed. That’s pretty-much what you suggest, only done manually.
It’s a nice idea and I’d love to do it, but have to live with what I’ve got.
At lest yours accepts DXF. The Trotec we have only accepts EPS files exported from illustrator.
Luckly it converts those files to some other format, and that format is quite easy to read. So I made my own DXF to those files converter, which also does the offset and proper ordering of lines. (Something that has to be done manual with the EPS converter)
What happens if you use the laser as a drill instead of a saw? Start by using the laser to make a small hole in the center of the screw hole, then have the laser head circle outward until you get the desired diameter. Would that improve things?
The two sides of the kerf would still not be parallel, so instead of having both sides of the kerf be (about) 3.5 degrees, one side would be 7 degrees, the other would be 0. So to cut out a piece with perfectly perpendicular sides, you would have to put (at least) two actuators on the laser head. This is a lot of added weight to be moved around, compared to the current zero actuators on the laser head. It would make things a lot more complicated in terms of path generation as well.
If you are using materials which don’t cut as cleanly as acrylic, you’ll want to do secondary operations anyway. So it’s probably more trouble than it’s worth.
The consideration of weight would be a problem if one was retrofitting an existing laser-cutter. If one was making a new one from scratch, I don’t think there would be an issue. The path generation would be a bit more involved, but the math isn’t all that complicated and would be implemented in software anyhow.
A 4 or 5 axis laser would be more complicated. If the Z height was a bit off then the cut would also be off on the x or y axis. With a simple 2 axis machine the Z height isn’t all that critical – you just need to get the focus good enough.
Optical focusing is much more complicated. If the focus was of then the cut would also be off on the x or y axis. With a simple mechanical 4 or 5 axis machine the focus is not that critical – you just need to orient your beam good enough.
Are the left and right images from the air flow section back to front?
Right one looks like a better cut to me, too.
You are totally right! Looks like we missed that in some last-minute edits. (Should be fixed now.)
“In the real world, no optical lenses are perfect, and the consequence of passing white light through an imperfect lens is that individual colors have slightly different focal distances.”
No, this is an effect know as dispersion. Different wavelengths experience different refraction indexes. That’s for example why a prism breaks apart white light into a rainbow pattern.
Yeah was thinking this too.
Yea, this should be corrected. The imperfect lens comment is completely off the mark. There are few other issues with the article as well.
Yup, my thoughts as well. So-called ‘achromatic’ lenses (achromats) are not single-piece elements, rather they’re multiple lenses of different materials (differing refractive indices) bonded together. A great easy-read book is “Spectrum of Belief: Joseph Von Fraunhofer and the Craft of Precision Optics”
I interpreted his “imperfect” point to reflect properties of the real world, rather than how lenses work in theory.
Yes, but it’s not the fundamental reason why that effect occurs.
More than a dozen years ago, I was inspecting parts under an optical microscope. When I mentioned to my supervisor that I couldn’t get a decent “focus” at the 400x setting. The lines of the object being viewed were fringed by blue and red “auras” (my term). He told me that large of magnification resulted in the various wavelengths of the light being separated, that was the limitation (at least for our microscope) of optical magnification. We also had a SEM, but I wasn’t allowed to use it, just refill its head when the liquid N2 was low.
That’s chromatic aberration, for sure. It’s less a product of magnification and more of cheap optics (or, really, one lens causes the aberration and the rest magnify it). Correcting for aberrations involves aspherical lenses (hard to make), multiple lens elements (also hard), or both. At least for me, a ‘good’ lens can run $10-20k on its own. Cheap lenses can be $20 for the same magnification.
I be the same microscope was only useful in the middle of the field and fuzzy in the corners. This ‘field flattness’ is another thing that you have to correct for in microscope objective lenses.
Cameras correct for this by pairing lenses made of different materials. One material having a + index of refraction and another having a matching – index, such that the second basically reverses the effect of the first lense. In a digital camera, you can compensate for the effect via image processing, but I don’t think it is completely reversible from a data perspective. I don’t think aspherical lenses correct for aberrations, I thought spherical lens just loses focus around the edges of the image (I guess potentially magnifying aberrations near the outside of the image).
I wasn’t aware of any real-world material that possesses a negative refraction-index in the optical frequencies. Do these lenses also have negative mass?
You would be half-right. While the root cause is dispersion, the effect of there being wavelength-dependent focal length on a lens as stated in the article, is entirely correct.
That particular fault is referred to as longitudinal chromatic aberration. Here’s a nice reference.
Don’t lase PVC, but Delrin and formaldehyde gas is ok…?
*r cut.
Lase is an acceptable verb for cutting with a laser.
Can confirm, I used the verb lase earlier in the evening. Lase all the things!
I dunno, technically lasing is what happens inside a laser. It’s what a laser does in the process of being a laser. Intransitive verb, dunno if you can actually lase something. It would imply he was causing PVC or Delrin to have some sort of energy cascade photon amplification thing happen inside it. Rather than just melting, or being cut.
Technically correct is the best kind of correct!
Formaldehyde, CO, CN (from ABS) are non-reactive, easily metabolized in low concentrations (our bodies make them as well), and get blown out the ventilation system. Burning PVC makes chlorine gas, which etches the optics, electronics, and lungs. In my Makerspace, we say that cutting ABS releases cyanide gas, so be careful with it, and cutting PVC voids our warranty as well as releasing chlorine gas, so don’t do it.
It’s probably actually HCl from PVC (or any other chloropolymer, like Neoprene), not chlorine. The point still remains the same though – it will tend to void warranties in commercial machines, and potentially degrade the surface of the ZnSe lens, since this is sensitive to acid dissolving it.
Any other halogenated polymers, like PTFE for example, should probably be avoided for the same reason. HF is just as bad.
HF is really toxic while HCL ist just corrosive, you even have the latter in your stomach acid.
Your stomach is great at handling corrosives. Lungs? No so much.
Formaldehyde might stink a bit but chlorine gas is “worse” because it will corrode all the things a laser cutter is made of.
Here is a picture I saved from a cnczone thread of a laser cutter that was used to cut PVC (no word on details of the job, ventilation, etc which are significant omissions, but that it happened at all is a concern.)
http://i.imgur.com/zXw55cB.jpg
And this especially as Delrin is 25% Teflon (PTFE), according to the MSDS. Taking into account that PTFE has 4 times the amount of Fluorine per mol compared to the chlorine in PVC, you get the same amount of halogenated toxic gas, but one time fluorine which is much more toxic and the other time chlorine.
Very good intro for laser noob like me. I’m awaiting the arrival of my first 300 mW laser and I was a bit stumped about the focusing issue. Also, what recognized (N. American/European) safety glasses I can buy for 650 nm?
Did quite some research on this when I got my 500mW laser. It seems that goggles from: http://www.survivallaser.com/ are generally regarded as safe.
While some Chinese stuff isn’t up to the actual spec that they put on there.
Spend the same amount of money on the goggles as on the laser. But worth it.
Thanks.
IIRC, early lasers would turn on and off quickly to allow the smoke generated but the beam to clear out. The smoke interfered with the cutting process. The term used to describe this action of turning the beam on and off quickly was called “phasing”. Shortly thereafter, a new TV series about futuristic space travel had laser like weapons called “Phasors”.
B^)
^by the beam^, not “but the beam”
which series ?
Star Wars.
Having worked with kilowatt-range lasers for a while, here are some other thoughts.
1. Don’t overlook the composition of the assist gas. An oxygen assist can let you cut through a lot more steel than compressed air or nitrogen. Don’t overlook the effects of pressure (oxygen assists usually use less pressure) and nozzle diameter.
2. Keep the mirrors clean! Our systems had fully enclosed flight tubes with heavy filtration or sometimes even a nitrogen fill, and the mirrors still sometimes needed cleaning. Open flight paths and cutting things that put out smoke without proper fume extraction can mean you are likely to get a lot of deposits on the mirrors, and that will reduce available power a lot.
3. Get your focus dialed in correctly and use an appropriate focal length for your power and material thickness. The appropriate focal point is not always at the surface, and having the focal length wrong can make for a much messier cut.
4. Make absolutely certain you have the beam centered in the nozzle. An off center nozzle will make for a messy cut – at least in one direction.
5. Yes, a CO2 laser can cut glass – but unless you have very thin glass, use a lot of passes and cut away a tiny amount each time. Basically, you’re spalling off tiny pieces; this is neither melt-shear nor burning. Trying to melt-shear glass is possible with a high powered laser, but unless you’re using high temperature glass will probably crack it.
Maybe i’m not seeing something, but can’t a concave lens make the focused laser parallel again at whatever (theoretically) beam diameter? Making the cuts parallel?
Yes, but the beam density at the point where the laser would enter the lens would melt the lens.
qoute: “I attribute this poor surface finish to the melted edges of the cut bubbling over the surface of the part and then re-solidifying.”
The more likely reason is, that you are using cheap EXTRUDE acrylic glass which melts instead of CAST acrylic which is the one that evaporates. If you need more that 5 passes at any laser over 20W to cut through 5mm acrylic you have the wrong acrylic.
Definitely a huge difference between extruded and cast acrylic. Extruded smells much worse and doesn’t work as well in the laser cutter. It’s even worse trying to CNC mill extruded as it tends to gum up the endmill. Cast is better in every way.
I’m surprised the article didn’t mention the self focusing of acrylic. My favourite material to laser cut by far.
I’m thinking of buying one of those cheap Ebay 10W CO2 machines at the end of the summer. Wane t to do some basic thin wood/plastic cutting and maybe some glass engraving. Thoughts, concerns? I’ve read that the default software/controller is a pain, but that could be easy to replace. Even if just for the laser tube, optics, laser power supply, enclosure, ect. they seem like a good price.
You’re not going to cut too much with a 10W machine. Are you talking about one of the “40W” laser cutters that are available for a few hundred dollars?
I recently got one and I’m enjoying it. So far the engraving works great, and I can cut acrylic without any problems (except for the fumes) but plywood has proven to be tricky to cut. I probably have 40 or so hours of time running the thing at this point so I’m still very much in the learning stage. The one thing I have discovered using a laser power meter is that it isn’t a 40W laser, it’s more like 32W. I suspect the tubes are basically 40W tubes that fail QC. Overdriving a tube is a good way to shorten their life so it’s a major concern.
If you have the option get a version that runs directly of Corel Draw. If you’re looking at a K40 clone then you’re looking for something that works with “Moshilaser” (as opposed to “Moshidraw”), most of them do at this point. The software is still finicky but it’s workable. It works better on older versions of windows (Windows 7 is workable, others I know use an Windows XP VM).
The hardware isn’t too terrible if you’re willing to work on it. It really comes down to how handy you are. When mine arrived I ended up having to basically gut the X-Y stage part of the machine and rebuild it. Things were not aligned properly, parts were knocked out of place during shipping, and the belt tensions were totally off. Took me a good chunk of a weekend but once I got it working it’s been reliable. You’ll also want to make sure the electric wiring is done properly, there are horror stories about these things not being properly grounded. Once that was done I did less then $100 of modifications to make my life a lot easier. That included a pair of laser safety glasses as these cheap lasers have NO interlocks to stop you from doing something stupid. Besides that the biggest modification was the addition of “air assist”. You can buy an air assist nozzle from light source, or you can find plans to 3D print one if you have that capability. A pump can be bought at any store that sells aquarium supplies, or on Amazon. The air assist does two things, it keeps smoke away from your focusing lens, and it blows smoke out of the way of the laser path. The other major improvements I made were a better focusing lens, and a metal honeycomb bed to do the cutting on. IMO this is the bare minimum if you want to start doing anything.
After running the thing for a little while I think my next set of improvements will be safety based. Something to shut the laser off if the cooling water dies, and improved ventilation (I managed to set the CO alarm in my basement off while trying to cut plywood). These shouldn’t be too expensive.
In the long term I’m going to look at upgrading the controller and power supply so I can adjust the laser power via software. Unfortunately this is probably going to cost more than I spent on the machine, but that’s life I guess.
I like that you talked about how lots of plastics will start to melt and change the cut. I have been wanting to learn more about laser cutting for a while now. I can see how it might be easier to have other materials cut, so you don’t have to worry about the cut melting.