
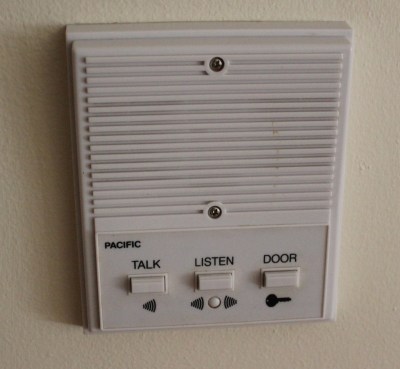
If you’ve been to an apartment complex with a locked front door, you’ve seen the buzzer systems. You press the corresponding button for the apartment you want and can talk to the resident. They can press a button to unlock the door briefly, and then you go up to their apartment and they don’t have to come down to let you in. But what if you’re the resident and you want to go for a run without your keys jingling in your pocket? What if you want to open it using just your smartphone?
I knew this was a silly problem, and everyone I told about it thought that for the amount of time and effort it might save, it was hardly worth it.
Challenge accepted.
How fast can I put this together using only parts I have around the apartment? Turns out about 2 hours.
Research
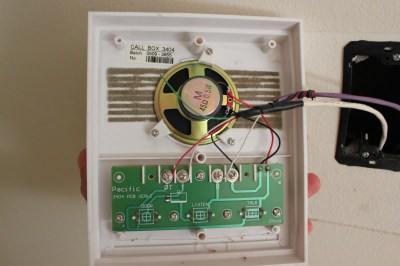
The most critical step was hacking into the buzzer system. Two screws and a razor blade later and the plate was separated from the wall. Markings on the PCB made it easy to find on the Internet. Looking at the PCB and online schematic, there was no DC power to use, but I did know that the switch connected two wires which resulted in a buzzed door. This was a job for a low voltage relay, the normal solution when you want to press a button but don’t know what the two wires do and want to interfere with the electronics as little as possible.
Wireless
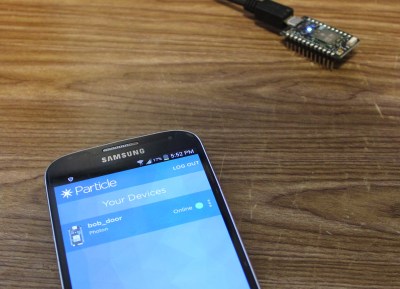
Next was the wireless component. I had a Particle Photon lying around in my box of dev boards, which was super convenient. I got that set up with the Particle app from the Play store. Then I installed IFTTT, which would let me control it eventually. Then I set up a Particle account and an IFTTT account. I plugged in the Photon, connected to it from my phone, and told it how to connect to my wireless. A few seconds later it had rebooted and was showing up online. Now I could write code in the Particle web app, flash it to my Photon over WiFi, and I was good to go.
Code
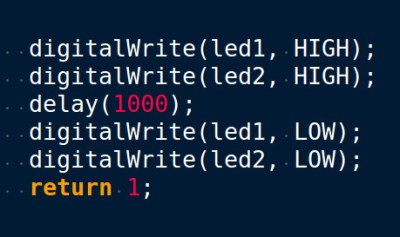
I started with an example blink app (web-connected-led.ino) and flashed it to my Photon to make sure it worked. Then I just needed to make it turn on for a second, then turn off, so I created a function to do that specifically. Done. The entire code portion took only a few minutes.
Electronics
I found a relay. Relays take a lot of power to switch, and this one switches at 5V, but the Photon GPIO is at 3.3V. I wouldn’t be able to drive the relay straight from the output pin. No problem, this is a job for an N-Channel MOSFET. I only had a surface mount one, but I also have mad soldering iron skills.
I hooked up the MOSFET and relay, and I threw in a pull-down resistor so that when powered on there wouldn’t be any weirdness and the MOSFET will stay low and not switch unintentionally. Finally, I put in a 1/8″ audio connector so that I can easily attach it to the wire from the wall plate(which was a repurposed audio cable).


Dinner and Internet Outage
For some reason my Internet went out for an hour, and it was the perfect time to get some dinner.
Integration
 Back to work, in IFTTT, I connected it to the Particle channel. I created a recipe that would call the function I had written on my Photon whenever I texted myself the word “opensesame”. It’s really amazing how well the Particle channel interacts with my code on my Photon. I could flash the firmware and the IFTTT recipe creation would immediately know what functions were available.
Then I noticed Do, which is part of IFTTT but drops off the IF part. After a quick download I had the ability to have a shortcut button on my home screen which when pressed would call the function on my Photon. No more text messages, just a shortcut.
A quick test and the process worked. I could hear the relay click on then off. I was confident that this solution would work when I plugged it into the buzzer.
Fishing wire
Unfortunately, there wasn’t power near my wall buzzer, and I didn’t want to change batteries regularly. I spent an unnecessarily long period of time figuring out how to fish the wire through the drywall and down and to the other side of the wall, where it went into another room that had close access to an outlet. I ended up making a hole in the drywall about 1/2″ in diameter at the bottom of a closet. This was the only damage to the apartment, and it is easily fixed.
Final wiring
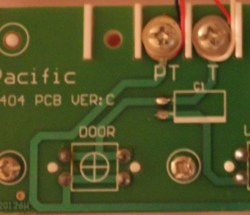
The wire fished, I just had to screw it into the terminals on the wall plate. It was the PT and T terminals, and you can clearly see that these two terminals have traces to either side of the switch helpfully marked “DOOR”.
Testing
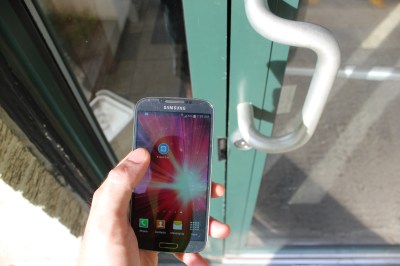
I brought my phone (and keys just in case) out to the front door, pressed the button, and after about 5 seconds, there was the buzz that let me in. The next morning, I went for my run without my jingling keys.
Final Notes
I’m not concerned about security. The Photon is connected to my home router via encrypted WiFi, and the IFTTT and Particle integration uses OAuth.
There is some delay between when I press the button and when the Photon gets the message and buzzes the door. It turns out it would probably be faster for me to just use the key to open it.
Yes, this relies on the Internet being up, so it’s a little worrying that I had an outage while I was working on the project. I won’t rely on this all the time, but it’s a good gimmick.
I’ve never used IFTTT before, so I’m really happy with how quickly this hack came together and how easy it was to do, especially with the Particle channel.
We’ve had other buzzer hacks over the years, like the morse code buzzer, but this one was an exercise in speedy implementation and integration with existing services, showing how easy it has become to make IoT out of anything.


I have the exact same buzzer wall plate in my condo and a Photon lying around. Hmmm….
Can your phone reach your WiFi from outside the front door? If so you should be able to code something up where your phone talks directly to the micro eliminating the cloud service. Then it works even during internet outages.
Or have the micro listen to audio password played back from the phone :)
Once you hook up the micro like that, it’s more convenient to use the doorbell itself and just tap the code through it, no smartphone needed ;-)
http://hackaday.com/2015/10/08/hacked-apartment-intercom-barks-at-you-or-buzzes-in/
You don’t need IFTTT at all, the default tinker sketch would let you toggle the gpio from anywhere with very little latency. Your phone doesn’t even need wifi (as long as it’s got cellular). A momentary button in a Blynk sketch is also a quick drag and drop away.
I hadn’t heard of Blynk before. Nifty!
nice tip with blynk – thanks.
You don’t need the keys to open the door to your apartment?
Meh. When I’m running I’ll just leave my apartment unlocked. I’m not far and I’m not gone too long.
Where’s the back EMF diode across the relay coil?
In his parts bin…..
Teheehee…. yeah…. I guess I should throw that on there if I’m going to have this thing hooked up for a while.
My apartment has upgraded the front door system at least twice in the last ten years. Even before that, the system they use no longer mess with your phone line nor uses internal wiring. That won’t work here. :P
The front panel actually calls the number you listed with the rental office. If you use your mobile for that, you can let yourself in. The front door uses a keyless entry system now and I suppose you could clone the RFID fob.
Done something similar last year.
I used tasker to automate a buzz when the phone connects with the home wi-fi, with an Internet backup.
I had to give two on-off cycles followed by another off, just to avoid loss of opening and/or the door relay staying on.
i wonder what the insurance company will say when someone breaks into the apartment.
“The maintenance company is on their way to replace the door they kicked in sir”.
Yes. It’s that XKCD comic again, isn’t it? (c;
“But what if you’re the resident and you want to go for a run without your keys jingling in your pocket?”
Yes, but now you’ve a mobile jingling in your pocket. (c:
Just kidding. Nice work!
I already had the phone for music and tracker. Now I can run in stealth mode. Besides, this is Hackaday. Practicality is not our priority.
“Practicality is not our priority.”
How true :-)
I had a nearly identical system in my building, but they recently replaced it with one of those phone based systems. Not having a landline, I had to come up with a way to have anyone who’s in the apartment be able to answer the door. If it just called my cell then no one else would be able to buzz anyone in. We ended up getting an obihai and attaching a google voice number. So now if I want to let myself in now I just have to have the google number go to my cellphone… they kinda made that part easy on me :P
Do you need a landline to use those systems? I’m not paying for any sort of landline, but my apartment has a phone jack that is connected to the caller/buzzer at the doors. I just plugged in a cheap phone and it serves the purpose for when guests arrive.
I guess I should test if it still opens the door if no one is calling in. That’d make it a lot easier to setup a system like this.
The one we have just calls any phone number that you had added to the system. It doesn’t have to be a landline, you can give a cell number. And I have mine set up with a google voice number.
I did this with a garage door opener years ago. That, and the fact that my apartment building had a bright red door made getting inside after a long night much easier.
I also did something similar with my garage door. I just connected the grounds and used a transistor or mosfet though. I suppose relays are bit more fail safe though.
Hope your landlord doesn’t find out! Anyway this might be something good to set up in the apartment of an elderly relative so you can get in if they can’t let you in (the super can open their door.)
Did this in college a few years back. Only trick was, I ran a wire from the buzzer to an arduino which usbed to a desktop running a flask app. When the maintenance guy saw the wire he flipped his shit lol
In many apartment buildings doing this would be a violation of the body corporate rules (and almost certainly a violation of the lease agreement if you are renting)
Indeed. The least you should do is to ask your landlord first before you even start with your little project. Usually you should be fine, as long as you make shure that the hack can be removed without a trace again once you have to return/leave the apartment.The hidden problem here is since the main door into your building can be tampered with thanks to that hack, everyone in the building is affected, so it would only be right if you would inform all the residents of your building too. Maybe they would like to benefit from this system as well? If so, it would probably be easyer to convince the landlord if all residents are OK with it.
“Your little project” sounds condescending to me.
I guess it makes sense if you were going to carry your smartphone anyway, for music or fitness tracking or whatever. Personally, I would much rather leave the phone at home and carry just one key.
I’m still waiting for the day when blinking an LED will require at least two accounts on third-party cloud servers and a functioning internet connection, plus at least three octo-core Raspberry Pi’s and a smartphone. I get the feeling it won’t be long now…
I’m still waiting for the day when smartasses will offer useful advice instead of useless critique.
Be careful if you try to replicate this. In some intercom panels there is DC/AC voltage available for powering the indoor unit (eg light that lights up when you pick up the handle, to see the buttons). Current drawn from this often goes through the opening coil in the door (pressing the open button shorts the supply). If you draw too much the door might open if someone else just takes the handset of the hook.
That was another reason I went with the relay; I had no idea how the schematic worked, so I wanted to just replicate the function of the button only and keep my circuit isolated via the relay.
It remembers me to this project (Starting in the video in min 2:21) which does not rely on IFTTT. Sure the IFTTT is laggy to open the door!
https://www.youtube.com/watch?v=B7YCGIZ6iuY
Most panel homes I saw have a terminal with buttons at the front door to visitors to dial the homeowner or ring their doorbell. These keypads also function as a pinpad for the homeowners, so they only have to enter their secret four digit number (instead of the number of a door), and it opens the door for you. Don’t you have one of these already?
It would be cleaner with a transistor and not a relay?
Possibly, but in this case after looking at the schematic I couldn’t tell if there was a common ground or common positive voltage, or which way to hook the MOSFET up, and I figured the mechanical isolation would also prevent ground loops or any other kind of interference. The transistor method is messier to me because it mixes electrons from two circuits, whereas the relay ensures complete isolation. Especially in a system where I don’t have access to the full circuit, and making a mistake could cause problems for other people.
As a kid I made a simple circuit with capacitor and relay, that briefly unlocked the front door when you rang the buzzer on the front panel.
The impluse was so short that untrained person could not open the door. If you pulled the door too early, the lock would not open. If you missed it, there was refractory period of about one minute.
I did the same thing last year with a spark core. It was pretty awesome.
You don’t need no fancy internet, Particle Photon thingy or cell phone to buzz open a door. My roommate and I did it back in college (early 70s) with an old Zenith TV remote and a solenoid. The cigarette pack sized TV remote transmitted its signals ultrasonically using tiny hammers that struck tuned metal bars, like a xylophone, and the resulting pings were then picked up by the receiver circuit which then pulsed a solenoid around a ratchet which moved the channel selector or volume control up or down. The hard part was in turning the doorknob without damaging it. For that we used a big old washing machine solenoid, the kind that usually moved gears in the mechanical assembly under the tub. Some wire, a spring and some duct tape was all it took to get the solenoid to twist the knob and open the door. It even produced a very satisfying thunk and a buzz, as well as a few quizzical looks from visitors whenever the door opened. Mind you, the remote only worked from inside our dorm room, or sometimes from outside when aimed through the crack under the door, and our room was so small we could really just yawn and stretch and reach the doorknob without even getting up, but, hey, if the alternative is to use a satellite and a cell-phone to open a door then maybe we came out ahead in this technology.
My buddy and I set something similar up a few years ago, same idea, but triggered by the ring voltage of a POTS line.
http://mehax.blogspot.com/2010/10/phone-activated-door-hax.html
Yes, I know, not very secure, but it worked great!
I am a senior in a building with a phone system at the door. My cell is all I need. Because of this, my name is not in the display. No number for people to call. An ambulance cannot get inside without difficulty. Super not always available. Surely in this electronic age cell phones can be used to allow people to enter a building. I should not have to pay $40 month for the rare occasion I should need help. Amazon deliveries etc occasionally a problem as they have the address and unit number but no name in board. I leave notes. Where is Bell Canada on this?
Could show me how to make it with NODEMCU? Is there a way to install particle proton on it?
@Bob Baddeley
Could you please share all the details? items to buy and more detailed pictures? I want to make it but i have no experience at all
So far:
1 N-Channel MOSFET
1 resistor? what value
1 Particle Photon
what do i miss?
How is the soldering? what should i solder to what?
How is the code? could you share the file?
Please, i really want to learn how to do it!
The relay I used was a EC2-5NU (https://www.digikey.com/product-detail/en/kemet/EC2-5NU/399-11052-5-ND/4291118). The key specs you’re looking for with a relay are coil current and operating voltage. Relays usually consume a lot of current when turned on (like 30mA for this particular one), so you don’t want to drive one directly from the GPIO output of the photon. Instead you use a MOSFET, which consumes almost no current from the GPIO pin. N-Channel MOSFETS are the most commonly used for switching things on and off. A good one is the 2N7000 (https://www.digikey.com/products/en?keywords=2N7000) Then you want a pull-down resistor that puts the MOSFET in a normally-off state so that if the photon is booting then it won’t put the relay in an unknown state. I used a 30k resistor, but anything between 10k-100k resistor will work, too. Finally, you’ll need to hook into the intercom. Take it apart and find the button that corresponds to the button you want to tap into with the relay. Usually buttons have 4 soldered connections, but they are 2 pairs. Figure out which two you need the relay to bridge.
To wire it up, you have the following connections:
* Photon GPIO to MOSFET gate (the middle pin of the TO-92 package).
* Pulldown resistor (10k-100k) from the MOSFET gate to GND.
* MOSFET Source (first pin of the TO-92 package) to GND.
* MOSFET Drain (last pin of the TO-92 package) to the – pin of the relay coil (pin 12).
* Photon VIN to the + pin of the relay coil (pin 1).
* One end of intercom button to center of relay switch (pin 4 or 9).
* Other end of intercom button to Normally Open (NO) end of relay switch (pin 5 or 8).
Here’s the MOSFET: https://imgur.com/0YMKA7r.png and here’s the Relay: https://i.imgur.com/zPh4xVJ.png
For a diagram of the circuit, you can see someone else did it here: https://www.electronics-tutorials.ws/blog/relay-switch-circuit.html (Scroll down to the N-channel MOSFET Relay Switch Circuit), only they put in the flywheel diode and the 1k series resistor (both are nice to haves).
I still use this system all the time, and it’s been running constantly since the article in 2016.
Can I just connect two of the three handset wires (which contains the buzzer speaker) to two of the six contacts on the door release DPDT switch? This would trigger the button whenever the doorbell rang?
I’m interested in sponcering someone to create a interface that will detect the hi voltage buzzer tone when the Intercom goes off as well as the door open. From my undeunderstanding it’s just voltage directly on the talk wire to trigger the door. I’d like to create a bridge interface to a newer ip intercom system. Allowing a new system to work with the apt older system. Found in nyc. Contact me at mcapricenyc@gmail.com if you can help