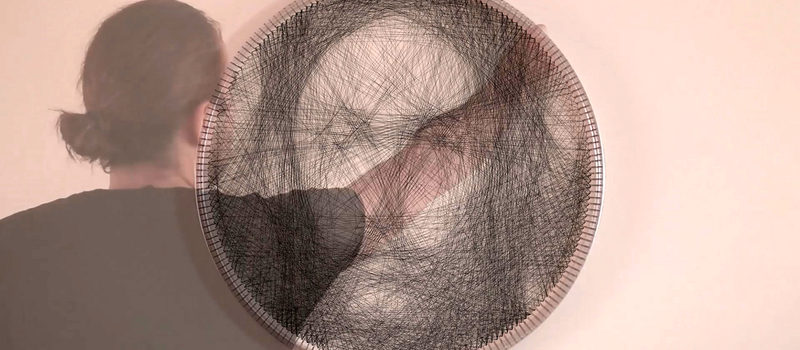
Artist [Petros Vrellis] has done something that we’ve never seen before: his piece “A New Way to Knit” lives up to its name. What he’s done is to take the traditional circular loom, some black thread, and toss some computing at it. And then he loops the string around and around and around.
The end result of following the computer’s instructions is a greyscale portrait. Where few black strings overlap, it’s light, and where more overlap, it’s darker. That’s the whole gimmick, but the effect is awesome. As you zoom in and out, it goes from a recognizable face to a tangle of wires and back. Check out his video embedded below.
There’s at least a few ways to do this, so we e-mailed [Petros] to ask. He assigned darker pixels in the original image a higher score, and ran the string to the opposing pin that maximizes the sum of the pixels passed through. With each string, he subtracted off a bit of darkness from all of the pixels along the string’s path, and repeated, starting each time at the new pin location. Each string has “only” 200 choices to make times 3000-4000 passes, so a computer should be done in no time. Tuning this algorithm to work just right, and look good with real string is probably just about as easy as it sounds. For instance, he had to include code to break ties.
Although we love the man-machine cooperation on the piece, [Petros] mentioned that he’s tempted to automate the weaving. Check out his two pendulum-based pieces (here, and here) if you like more machines in your art.
While on the topic of portraits made with black string, we have to remind you of this previous art piece that does all the work of actually laying the string out by using a modified 3D printer. Beauty is in the eye of the beholder, but we have to say that if art were judged on a difficulty scale, [Petros] would win for using only a circular loom. Never mind that he did it all by hand.


It would be a really small step to do automatically this on a CNC machine
my thoughts exactly :D
You could also use the CNC to drill the pin holes of course. and maybe even bend the pins outwards
I wonder if you could do that with laser beams…
The problem is, if you cross the beams…
Then you have the portrait cutout from your skin
What a clever idea, this is amazing work! After doing fifteen of these things, though- yep, time to automate! Just a carousel would be an immense help, where the computer turns the loom to each successive attachment point.
Polar coordinates! If the computer turned the loom (always in the same direction) so that the next attachment point was at the top, then a simple mechanism (with a tensioner) could loop the thread over that point. Much easier than any sort of XY plotter arrangement.
Maybe one of them ring of LEDs, like the clock from the other day, to tell him which pin to connect to which. Lay the portrait in the middle of the ring each time.
Thread spool attachment for 3D printer… … …
Seems like they indeed automated it since. There was a project on hackerday.io and now also here: http://www.thevelop.nl/blog/2016-12-25/ThreadTone/
Cool idea. I like the view of it.
The appearance of a portrait within the obvious constraints of a piece of string is quite captivating.
Making these things on recipie from a computer just seems a waste of human resource though.
Reminds me of the girls who were wiring ferrite (rom/ram) by hand for the first space shuttles.
My guess is he’s able to sell one of these art pieces for more than a CNC to make these things cost.
On second guess, he’s probably only able to sell these to people who don’t know what CNC is.
I wonder if he has taken the thickness of the pins into account and wrapping the wire (c)cw for higher resolution.
So it’s just string, going from X pin to Y? That’s amazing! Seems like a brand new, original idea too. Clever bloke.
I don’t think it’s properly called “knit” though.
Perhaps it is better called “thread wrapped” portraits (since he is wrapping it around the pins).
Too bad HaD bloggers have less memory than a red fish, otherwise a link to this older article would have really make sense.
You mean like in the article link to “this previous art piece”?
Too bad some HaD readers don’t read articles they respond to.
Too bad some HaD commenters feel the need to comment on other commenter’s comments.
Well, you know, that’s quite common in discussions.
Too bad HaD commenters feeling the need to comment on other commenter’s comments is common in discussions.
Blue fish?
Is an editor, not a blogger.
I thought we were talking about fishes… Can’t remember…
“Where few black strings overlap, it’s light, and where more overlap, it’s darker.”
Literally where they overlap it’s lighter but where they are close together not overlapping it’s darker. You get sort of ‘caustic’ effects. My grandmother had an abstract piece, probably 50 years old at least, that included gentle curves that were very strongly defined. I think there is a better way to work this math.
Ah, they were big in the 1970s. The car boot sales of the mid-80s will have been full of them.
That’s the same idea behind a Computerized Tomography, but in reverse.
Yes, it’s quite similar. Doing this with thread is pretty awesome; I really like the results.
I was thinking of CT back in 2013 and came up with the idea of a laser display based on the same principles. I ended up writing a simulator but never found the time to make a prototype. I just now threw what I had on hackaday.io – I think you could pretty easily make a real-time display this way.
https://hackaday.io/project/12889-mid-air-laser-display
That is a really cool concept. It has crappy contrast but it looks like it belongs on another planet. I wonder if it can work meaningfully in 3D.
Well done , I would like to see one of these done on an odd shaped frame.
incredible work of art
That is truly inspired work, a great demonstration of art and mathematics, perfect for motivating students who are having trouble “getting” the beauty inherent in mathematics.
I wanna do a negative….. black paper backing….. instead of hooks…. multicolor 3mm LEDs, obviously angled a bit…. then lace it with fishing line or similar monofilament….. use ArduPiThing to cycle colors of LEDs….
…. do one each of Elvis, Marilyn Monroe and Kramer from Seinfeld and get them in the malls for Christmas.
Do it with EL wire, if you can get a 1 km spool of it, and it wouldn’t melt, use the same software this guy used, invert the picture and Bob’s your uncle.
Anyone have code to do this? If not, shall we make it a community project? I REALLY want to make these (using the automated method I suggested above).
I gave it a quick try calculating the string’s scores by accumulating the pixel values. The simulated result is not close to what he achieved. Seems there is quite some clever tuning required. If you’re still interested, I can publish my code (C++ and OpenCV).
Yes please!! I think many of us are interested in! Thanks a lot.
Here you go:
https://github.com/christiansiegel/knitter
Feel free to request pulls, if you were able to improve the mess ;)
here’s a link for someone wanting to do this someday that might be helpful http://www.cosc.brocku.ca/~bross/JNetic/
I’ve seen your link…Not very helpful… It’s not what the artist did.
It is more closely related than you think, if you actually understand what you are looking at. With the string there are extra constraints but the process of discovering the correct geometry sequence is the dame idea. Unfortunately the source code for JNetic does not seem to be on that site so modifying it to add the required constraints is not possible therefore you would need to start from scratch and write a tool to do it for you.
Nice!
I did some experimenting:
http://www.inforaction.nl/knit/bob.png
This example has 3500 lines.
Hello Michel. Not bad at all! Missing little details still…(I think). What do you use for that? GITHUB propose by Christian above? If not, could you share please? :)
Process, simplified:
1. create a small reference image (for example 200×200 pix, a bigger one will not produce better results)
2. create a stack of all possible lines between the pins (in my example I don’t want lines between pins that are less than 30 pins apart)
3. pick a random starting point
4. try all line options from this point according to the stack, calculate which option has the lowest total pixel error compared to the reference image
5. draw the line, and remove from stack (both ways, because I don’t want the same line used twice)
6. repeat 3000 – 5000 times
Well ok for explanation. But which tool/programme/sotware do you used?
html5 canvas + javascript
Here is my attempt to reproduce the algorithm: https://github.com/wose/Strixel
https://raw.githubusercontent.com/wose/Strixel/master/doc/dinklage.png
Cool :)
Another attempt:
http://www.inforaction.nl/knit/tyrion.png
Animated 4000 lines:
http://www.inforaction.nl/knit/?linedelay=1&linesmax=4000&linewidth=.25&linevariation=10
Very nice Sebastian! Keep going! :)
Michel that is awesome. I think you have it figured out. Question – what dictates the optimal number of pins?
Is there a significance with 200?
For the images above I implemented a couple of subalgorithms, for example to guarantee even line distribution, additional focus maps for accurate representation of crucial details, etc.
I think the optimal number of pins is dictated mostly by the desired resolution and the line width.
These 2 factors together determine the maximum achievable black coverage.
A “perfect” picture is impossible because lines have to cross lighter area’s to cover darker area’s.
Obviously, images with darker colors at the edges are more suitable, but you could also use white lines on a dark canvas to create a picture with a light background:
http://www.inforaction.nl/knit/obama.png
Very interesting…
I also noticed that when I run your animated Tyrion Lannister link multiple times and compare the resulting images, each “knit” varies slightly.
Is this a variation that you purposely built into the algorithm?
I am a complete new to programming but am very interested in where to begin learning how to do this.
The variation is not in the algorithm, but in the function that displays the results.
The algorithm is not included, but the pin sequence is in the config.lineSequence array in the display.js source:
http://www.inforaction.nl/knit/display.js
Each pin has a number assigned to it: 0 – 199.
0 is the pin at the right (at 3 o’clock), the pin numbers count up around the clock.
I wanted to simulate thread in real life, which will not be perfectly straight between the pins.
Overlapping identical patterns (in this case the lines from each pin to the other pins) tend to produce secundary patterns (moiré).
These secundary patterns are cancelled out by random variation of the line curves.
So most lines are not perfectly straight, but have an almost imperceptible quadratic curve of which the maximum center offset can be set by the linevariation variable in the url.
If you set linevariation=0, the result will be exacly the same each time, but you will see moiré patterns:
http://www.inforaction.nl/knit/?linedelay=0&linesmax=4000&linewidth=.25&linevariation=0
You can contact me at michel_nospam@inforaction.nl if you want help to get started.
Simply ingenious…I wonder if moire patterns are as apparent on a physical knit, or whether it’s mostly a consequence of the limited resolution of digital renderings.
I imagine threading with some degree of slack (or anything less than fully taut) will be problematic, as slack from successive threads would inevitably accumulate until at least one loop falls off its pin.
@Harry: I don’t know, I guess we just have to try :)
I think it would help if the pins are slightly pulled back, to prevent the thread from falling off.
Maybe thread with some elasticity works better than very rigid thread, but you also have to take into consideration how the properties of the thread will change over a longer period of time.
I’m planning to build a frame and do some knitting after my holiday break.
I will post the results here for anyone who’s interested.
2 extra examples:
http://www.inforaction.nl/knit/muriel1.png
http://www.inforaction.nl/knit/muriel2.png
[Michel] those look great!
Nice job, there are quite a few people watching these threads. (Pun intended.)
I’m glad these comments are still active. I started a project to automate this, https://hackaday.io/project/13047-automate-the-art . It looks like lots of you, myself included, have successfully reproduced the software part. Now I’m working on the hardware.
Very nice project! Hope you will have a lot of support!
Inspired by all this stuff and impressed by the art, for the past month I have made my own version of software in java, it was also a learning experience not being a programmer I even learned multithreaded programming to speed up the cals required. I have also made an android app to assist the knitting process. Contrary to all I have seen on hackaday and various sources it seems I am the first to actually knit the output of my software. Find attached the resulting knit, 300 pins and 3100 stings to create. My daughter helped me with the knitting!
http://imgur.com/gallery/lbG5W
Some reason deleted the orginale Album
http://imgur.com/a/sQlwu
This is awesome! Is the app available to download? I have zero programming knowledge but I’d love to be able to make one of these. Everyone’s been playing with portraits but I’d love to see the results of landscape photos, or maybe just putting geometric patterns with different colour layers… UV reactive layers.. they’d make great party decor!
Nice idea! I cannot help you with the app, but have a look at https://github.com/christiansiegel/knitter. Just follow the instructions in the ReadMe to get it running ;-)
An update:
Last week I finally had time to build something.
My girlfriend is a huge Marley fan, so I made her a knit for her birthday.
She was over the moon with it :)
http://www.inforaction.nl/knit/results/design.png
Preparation:
For the loom I used a 80 cm laminated wooden hoop with tiny screw hooks (20 x 12 mm).
Using a large paper template with radians, the 200 pin locations were marked at the inside of the hoop.
The hooks were screwed in after predrilling 1.6 mm holes with a dremel.
Because there’s a lot of tension involved, reinforcement is needed for the woorden hoop.
So I made a back board out of 12 mm MDF with the same diameter as the hoop.
After painting it white, I screwed the hoop on top of it.
http://www.inforaction.nl/knit/results/hoop.jpg
Wiring:
I used black cotton polyester core thread on a 7500 m king spool (75 Nm ~ 0.21 mm diameter)
This kind of thin elastic thread is normally used for sails and tents, and is UV light protected.
To visualize the instructions I made an app, which also calculates the cross wire direction around the pins for consistency.
I plugged in Google translate for spoken word instructions to speed up the process :)
http://www.inforaction.nl/knit/results/instructions.png
http://www.inforaction.nl/knit/results/wiring.jpg
Results:
The final piece turned out pretty well.
Nice picture details, and the depth effect of the stacked threads is awesome!
The thread turned out to be a fraction thicker than anticipated by the specifications, so maybe next time I’ll use even thinner thread.
In total I manually processed 3844 lines.
The piece contains about 2.3 km of continuous thread :)
http://www.inforaction.nl/knit/results/result.jpg
http://www.inforaction.nl/knit/results/detail.jpg
A small video about the depth effect:
http://www.inforaction.nl/knit/results/result.mp4
Oh Michel! What a beautiful job and present! Really, the result is spectacular and the loom amplify its beauty. Congrats and thanks for the pictures!
Like Phil, you made an android (?) app, but link with translator is good idea to work easier. You calculated partern with Christian’s processing? Can you please, share with community your programme/app? :)
That is incredible, Michel. I can’t imagine how many hours that took!
I am looking to make one of these myself. But before I spend days “knitting” I want to ensure the best results by optimizing the pattern processing.
I believe your program produces the most detailed results. You previously spoke of implementing sub-algorithms for even line distribution and focus maps for accurate representation of details. Would you care to elaborate on this?
Also, do you recommend any form of image processing that can be done in Photoshop prior to feeding it into a program?
Thanks for your compliments :)
@Alex:
I implemented my own image/pattern processing as a html5 app.
I don’t have any plans to publish the code anytime soon, but maybe sometime..
@Harry:
It took about 4 hours to build the loom, and 8 hours to do the “knitting”.
Areas with important details should have more priority in the error calculation.
I use an additional grey scale image map to accomplish this. (in photoshop)
It really depends on the contents if pre processing of the reference image is needed.
The outer regions of the reference image ideally should have a dark color of at least 50% black, because this area needs to be crossed over a lot to create the darker areas of the image.
I usually optimize the contrast of important areas like the pupils/white in the eyes, mouth/teeth, etc before processing.
Michel, did you create the wooden hoop yourself or is there a place I can buy one at?
Just google for wooden gymnastics hoops :)
Unfortunately I cannot find a site that will ship to the United States. Thanks for the response!
Hi Michel, thank you very much for releasing your code I find this kind of art extremely interesting and wish to give it a go. I’ve been attempting to get a detailed tiger face into the knit and have tried editing photos in photoshop however I found that a simplistic version worked the best. This is the best I could get it looking with increased opacity and fade http://imgur.com/a/AoEqr, do you know of any other tips that would help make the details stand out within the knit?
Thanks alot,
Day.
I didn’t find any noteworthy systematic approach to get the best results yet. Just try out a lot of combinations, make screenshots, compare (maybe I should add an automation for that :D ).
Regarding the effects of the parameters: The ‘fade’ parameter usually has the greatest influence, since it determines how often a thread has to pass any pixel to account for its darkness. I found that very high values (~100) also have a nice effect on the tiger image. The ‘strings’ just limits the maximum iterations, but has no effect on the pin order (until then). E.g. I stopped my first try after ~2500 strings even through the simulation looked best with 3200. The ‘average minimal distance’ determines the distance between two consecutive pins – usually no huge effect, but worth a try to work on details. The remaining two parameters, ‘line variation’ and ‘opacity’, only affect the simulation output and have absolutely no effect on the pin order. I found the default opacity to be quite alright to simulate standard general-purpose sewing thread on a 80cm loom.
Leave a note when you finished the tiger – might be a good idea to add some tips and examples to the readme on github ;-)
/Christian
Hello Michel,
Please, can you publish your own image/pattern processing as a html5 app? It’s seems to work terribly.
I ask you on behalf of the maker community! :) Together = power limitless.
hello. I am interested in making this as my final project. Can I know what software to use for the pattern? your respond is very much appreciated.. thank you ;’)
You can try to use https://github.com/christiansiegel/knitter ;-)
thank you for responding christian! :D
is there a tutorial on how to use this software?
Did you try to follow the steps in the “How to use it” section?
Yes I did.. Em.. But how do I change the configuration?????
If you name your image “image.jpg” and place it in the same folder, nothings needs to be changed ;-)
Ooh so that’s how. Okayy. Thank youu☺️
sorry again. i have saved the image to “image.jpg” but it says that ” i can’t read the files” so, how do i overcome that? thank you for your respond. :)
Yes. On the link you will see ” How to use it “. Just follow steps. ;)
Okayy, thanks alex ????
hello Christian, i have been reading the blogs to understand the process to generate the final outcome, and have tried to use your processing code, but somehow it give me errors of not able to read the image.jpg file as you have mentioned to save it. So what do you think could be an issues ?
Nice to see so many people using it :) Is the image located in the same folder as the knitter.pde? What is the error message exactly?
hey thank for the quick response. regarding the code, yes it is in the same folder with the name you mentioned. when i am running the code its highlighting “steps.push(current);” line and says “The function push(int) does not exist.”
what do you think it could be?
Try the latest version – I just made some changes. If it still doesn’t work: which version of Processing do you use?
Hello Christian, this is great, it work perfectly now. I will share some results soon..Thanks for all the help and lets be in touch!!
it says “I don’t know how to open a sketch with the “jpg” file extension. you’ll have to install a different mode for that”
don’t open the image.jpg with processing. put it in the same folder as knitter.pde, and then open knitter.pde with processing.
ooh okayy. I get it. thank youu and sorry. but still, it is not responding. do I have to install any tools or what?
yay! okay it finally worked! thank you christian. you helped me a lot. thank you very much :)
one more question, sorry christian. why doesn’t start from string 1?
I don’t understand your question. It always picks the best next pin. Just follow the pin order printed to the processing console, e.g.:
String #1 -> next pin: 169
String #2 -> next pin: 122
String #3 -> next pin: 170
String #4 -> next pin: 124
…
I mean.. after I run the sketch, it directly states string #2500. I can’t see t at the console “string #1”. how do I fix that? sorry again, I really want to do this
Aah, I see. Please check the latest version of the sketch. I made some changes, so it saves the instructions to a text file, and additionally generates an interactive HTML page, which makes the whole process even easier ;-)
ahh I get it. thank you so much Christian! you helped me a lot. thank you in every words :)
Hi Christian. i have another question. can the number of pins and distance of pins be changed?
Have a look at lines 9 and 12 in the code ;-)
(The diameter of the circle is only used to calculate the total thread length)
Oh okay I see. Thank you ????????
how do I know the distance between each pin if my diameter is 80cm? hehe
basic geometry:
pi * diameter / number of pins
Thank you very much christian???? I have done it. Will do another????
This is a nice chrismas gift ! =)
ohh alright. so do I have to install back the software?
Your last function Christian, the pin numerotation in web browser, it’s usefull tool, thank you for making it, but very frustating!
Because not very adapted when you made a knit on your hoop. I find a voice synthesis “acapela-box.com” that
can read us the instruction.txt. Add with Excel at the end of each line \pau=xxxx\ (in millisecond) for pause.
Hope that help.
Is the knitter.pde no longer available for download?
https://github.com/christiansiegel/knitter
thanks got it figured out. What is the “Default minimal distance between two consecutive pins” how would that translate to spacing between nails when making one?
It has nothing to do with the physical spacing, which just depends on the number of pins and the loom size. The “minimal distance” prevents e.g. a string from pin 1 to pin 2. The next pin has to be at least 25 (or whatever value) pins away from pin 1.
Thanks. What is the bets method you have found to make evenly spaced nails/markings?
Afraid I’m “pretty late to the party”, but I just stumbled on this and find it really fascinating. It seems to me that a relatively easy way to automate this would be to have the hoop on the shaft of a synchronous motor which is slowly rotating, and then have a solenoid which raises (and then lowers) the appropriate pin as the hoop is rotating – Meanwhile the thread is unwinding from a stationary spool outside the circumference of the hoop, and goes around each pin as it raised. I hope this is clear – if not, maybe I can come up with a diagram. I have zero computer skills, so if someone out there understands what I’m describing, and is able to write code to do this, I (and maybe others) would be eternally grateful.
I guess I should have checked all the links in the thread before posting this comment – Shlonkin has already put together basically the same hardware that I was thinking about, and written up a nice “how to”. Thank you Shlonkin
Any idea what to add in the code to get better details? Or to manage the contrast of the lines generated according to the darkest areas ?
awesome, fantastic, incredible work you have done, I’m willing to create them and I have done primary level string arts, but I would like to learn more, please advise me.