It’s that time of the year again when you gotta start worrying if you’ve been naughty enough to not receive any gifts. Hopefully, Blinky Lights will appease St. Nick. Grab a strip of RGB LEDs, hook them up to an Arduino and a Power supply, slap on some code, and Bob’s your Uncle. But if you want to retain your hacker cred, you best do it the hard way. Which is what [roddersblog] did while building his Christmas Starburst LED Stars this year — and bonus points for being early to the party.
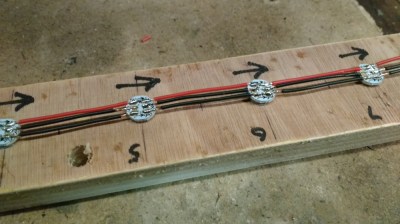 For starters, he got panels (as in PCB panels) of WS2812 boards from eBay. The advantage is it lets you choose your own pitch and strand length. The flip side is, you need to de-panel each board, mount it in a jig, and then solder three lengths of hook up wire to each LED. He planned for an eight sided star with ten LED’s each. And he built three of them. So the wiring was, substantial, to say the least. And he had to deal with silicone sealant that refused to cure and harden. But nothing that some grit and determination couldn’t fix.
For control, he choose the PIC16F1509 microcontroller. This family has a feature that PIC calls the “Configurable Logic Cell” and this Application Note describes how to use CLC to interface the PIC to a WS2811. He noticed processing delays due to C code overheads that caused him some grief. After some experimentation, he re-wrote the entire program in assembly which produced satisfactory results. You can check out his code on the GitHub repository.
Also well worth a look, he’s got a few tricks up his sleeve to improve the quality of his home-brew PCB’s. He’s built his own UV exposure unit with timer, which is an interesting project in itself. The layout is designed in Eagle, with a flood fill to minimize the amount of copper required to be etched away. He takes a laser print of the layout, applies vegetable oil to the paper to make it more translucent to UV, and doubles up the prints to get a nice contrast.
Once the sensitized board has been exposed in the UV unit, he uses a weak but fresh and warm solution of Sodium Hydroxide as a developer to remove the unexposed UV photo-resist. To etch the board, he uses standard Feric Chloride solution, which is kept warm using an aquarium heater, while an aquarium air-pump is used to agitate the solution. He also describes how he fabricates double sided boards using the same technique. The end result is quite satisfying – check out the video after the break.


@[roddersblog],
A fast glance at your source code… The BANKx macros could be improved as the PIC12F1509 is an enhanced midrange it as a MOVLB instruction so instead of:
BANK1 macro
movlw 1
movwf BSR
endm
You can do:
BANK1 macro
movlb 1
endm
I mean it’s all a matter of perspective of course, but on what scale of reasoning can buying controller-backed RGB LEDs and wiring them together be considered doing it “the hard way”? Because he didn’t buy an Arduino or Raspberry Pi? I’ll buy that, but really… I can think of fewer *easier* ways to DIY Christmas decorations.
Yes, this is definitely the hard way. He didn’t just by strips of LEDs and connect them to a uC. He made a jig, cut and stripped three wires between each pixel, and hand soldered. This is a ton of labor, not to mention the work he did to get nice animations once done. Impressive project!
The hard way is doing those without the jig ;)
Been there, done that, wish I’d had time and laser cutter at home to make a jig. Thankfully didn’t have anywhere *near* as many pixels in that design.
Writing the assembler code from scratch though is definitely the hard way, compared to rolling with a stock Arduino /w the Adafruit NeoPixel (or other) existing library. Top job. And I very much like the use of the CLC! Extra points!
On a side note, is this likely to be the same “configurable logic” that is making its way into some of the newer Atmel parts? The CCL in the SAML21 sounds familiar…
http://www.atmel.com/Images/Atmel-42419-Implementation-of-SAM-L-Configurable-Custom-Logic-%28CCL%29-Peripheral_ApplicationNote_AT03716.pdf
Looks like all the labor, and problems solved is where the “hard way” came from.
I was super-excited when I saw what looks like a propane tank in the picture – I thought, LEDs and fire! Nice fireworks code, even without the fire.
I too was looking forward to a fire/led combination, but was pleased to read im not the only one that can’t get silicone to work
Ditto (also glad to hear that the silicone issue is not just me). Usually if I have an old tube it goes off and the whole thing sets to rubber. Because this was still runny I thought it was OK. Trouble was after finding no household ‘chemicals’ that would finish it curing was how to remove the stuff (and not damage the PVC wires etc that I had spent hours making).
Silicone in a tube comes in two types, they’re both known as “condensation cure”. Why, I don’t know, because how they cure is a chemical evaporates from it to make it cure.
The common type uses acetic acid and smells like vinegar. Yup, acid, as in corrosive. DO NOT use this on anything electronic – or fish tanks. You’ll eventually end up with dead electronics and/or fish.
The type you want is called aquarium safe. It uses an alcohol instead of acetic acid. For an aquarium you still want it to fully cure before adding water and fish or other waterborne critters.
I didn’t know there was a difference! Now I need to purchase some, thanks.
Galane, thank you for your explaination; something to definately be careful of when using the acetic acid version as a cheap way to waterproof electronics.
The black silicone (that didn’t set) did not smell of vinegar so perhaps I’ll be lucky and it won’t corrode the soldered terminals in the longer term. On the later two units I built, I painted around each of the WS2812 PCBs and the soldered terminals with black gloss paint – to provide a first layer of protection against moisture. On these later two units I then covered the dried gloss paint with clear silicone (newly purchased and it definately smelt of vinegar).
I, too, thought we were going to have a Hank Hill moment…
I thank you all for your comments and glad you like the finished product – but my appologies for the ‘red herring’ …leaving the BBQ gas bottle beside the picture. One of my friends also asked the same question – “Does it run on gas ?”. I’ve ammended my Github code to reflect Jacques comments and must make a mental note to start using of some of those extra instructions.
Haha, have you seen how many projects here throw in a 555 or use an Arduino as a spacer? A little bit of fire would be nice. ;)