Lisp Runs This Microcontroller Pendant

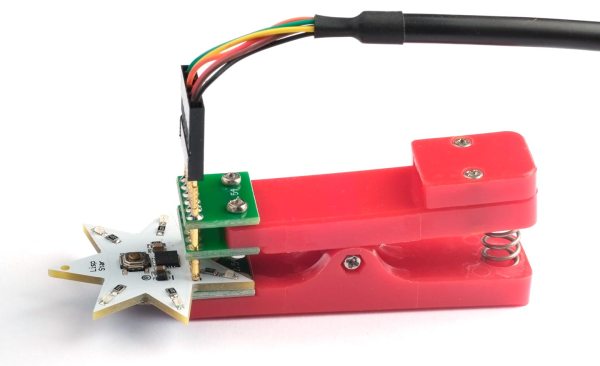
As a programming language, Lisp has been around longer than any other active language except for Fortran. To anyone who regularly uses it, it’s easy to see why: the language allows for new syntax and macros to be created fluidly, which makes it easy to adapt it to new situations, like running it on a modern Atmel microcontroller to control the LEDs on this star pendant.

The pendant has simple enough hardware — six LEDs arranged around the points of the star, all being driven by a small ATtiny3227 operating from a coin cell battery. This isn’t especially spectacular on it’s own, but this particular microcontroller is running an integer version of a custom-built Lisp interpreter called uLisp. The project’s creator did this simply because of the whimsy involved in running a high-level programming language on one of the smallest microcontrollers around that would actually support the limited functionality of this version of Lisp. This implementation does stretch the memory and processing capabilities of the microcontroller quite a bit, but with some concessions, it’s able to run everything without issue.

As far as this project goes, it’s impressive if for nothing other than the ‘I climbed the mountain because it was there’ attitude. We appreciate all kinds of projects in that same vein, like this Arduino competitor which supports a programming language with only eight commands, or this drone which can carry a human.

3D Printed Suncatcher Shines In The Light

Diffraction gratings create beautiful rainbow patterns when interacting with natural white light, and [audreyobscura] was familiar with their properties.  Thus, she set about producing an attractive 3D-printed suncatcher ornament that positively shines in the sun.

The design is straightforward, consisting of a 3D printed frame made of pieces glued together using QuickGrab glue. The pieces come together into a 7-segment star design, with a subtle 3D structure to it which helps add strength in addition to looking good.

Once assembled, sections of plastic diffraction grating are cut to size using a Curio desktop cutter. These are then glued into each segment of the star. While it’s possible to 3D print pieces with diffraction-grating like effects, using the film in this way allows light to pass through the suncatcher to create a more impressive effect.

On a cloudy day, the suncatcher looks almost entirely unassuming. However, when Earth’s nearest star shines, it projects glorious rainbows throughout the room, and letting it sway in the breeze lets the light play across the walls.

It’s a nice build, and a relatively easy ornament to make even if you’re new to 3D printing. We do like a good bit of decoration around here, especially if it’s a tiny version of a real TV. Video after the break.

Continue reading “3D Printed Suncatcher Shines In The Light”

The Xerox Star On A Desktop Near You

It is 1980-something and you see someone typing on a keyboard. The display is graphical, and they use a mouse to finish a document, send it over the network to another similar computer, where another user edits it a bit and prints it on a laser printer. Given the time-frame you might think the computer is a Mac, but you’d be wrong. The Xerox Star had all the features Apple “invented” about three years before the Macintosh arrived. If you never heard of the Star, that’s not surprising. At $16,500 each, there were only about 25,000 sold. Your chances of finding a working one now are slim, but thanks to emulation created by [Josh Dersch] you can try the Star out on your hardware today. If you want a preview, have a look at the 1982 video, below.

The machine had a surprisingly complex architecture. The main CPU was a microcoded computer with multiple registers that would run a sort of microcode program to execute different instruction sets depending on what was running. In addition, there was an intel 8085 that loaded the right microcode and serviced the keyboard, the mouse, the floppy, and the serial ports.

Continue reading “The Xerox Star On A Desktop Near You”

This Isn’t The R2-D2 Controller You’re Looking For

Who loves a good R2-D2 robot? Everyone, but especially young Star Wars fans who — frustratingly — have no problem spotting a controller and spoiling the illusion of an R2 unit brought to life. [Bithead942]’s concealed his R2-D2’s remote and re-establishes the illusion of an autonomous droid — no Jedi mind-tricks necessary.

[Bithead942] prefers to accompany his droid in traditional a Rebel Alliance pilot’s suit, so that gives him a bit of extra space under the jumpsuit to help conceal the controller. Dismantling a Frsky Taranis X9D controller, [Bithead942] meditated on how to use it while so concealed. In a stroke of insight, he thought of his unused Wiimote nunchucks, and launched into the build.

Continue reading “This Isn’t The R2-D2 Controller You’re Looking For”

I’m A Tricorder, Not A Doctor, Jim!

Machine learning and automated technologies are poised to disrupt employment in many industries — looking at you autonomous vehicles — and medicine is not immune to this encroachment. The Qualcomm Tricorder competition run by the X-Prize foundation has just wrapped, naming [Final Frontier Medical Devices]’s DxtER the closest thing available to Star Trek’s illustrious medical tricorder which is an oft referenced benchmark for diagnostic automation.

The competition’s objective was for teams to develop a handheld, non-invasive device that could diagnose 12 diseases and an all-clear result in 24 hours or less without any assistance. [Dynamical Biomarkers Group] took second place prize worth $1 million, with [Final Frontier Medical devices] — a company run by two brothers and mostly financed by themselves and their siblings — snagging the top prize of $2.5 million. DxtER comes equipped with a suite of sensors to monitor your vitals and body chemistry, and is actually able to diagnose 34 conditions well in advance of the time limit by monitoring vital signs and comparing them to a wealth of medical databases and encyclopediae. The future, as they say, is now.

Continue reading “I’m A Tricorder, Not A Doctor, Jim!”

Star Trek Desktop Viewer In The Palm Of Your Hand!

There’s building small computers — like the Raspberry Pi — and then there’s building small computers — like this Desktop Viewer from Star Trek.

[Monta Elkins] is using a Beetle for this project; it’s an Arduino clone, hosting the ATMega32U4 microcontroller, with a unique feature that allows you to twist connecting wires to secure them to the board. Instead, [Elkins] went with the logical choice of soldering them. For a display, he used a SPI serial OLED 128 x 64 monochrome screen which he has cycling through a number of iconic Star Trek TOS symbols and animations. The images were converted into PROGMEM  — which gets loaded into flash memory — before finally being uploaded to the Beetle.

Following some fine 3D print work in ABS plastic which rendered the Desktop Viewer’s case, [Elkins] used acetone to solvent-weld the pieces together and applied a quick coat of paint to finish it off. This little replica would make a great desktop gadget as it requires a micro-USB to power the device.

Continue reading “Star Trek Desktop Viewer In The Palm Of Your Hand!”

Christmas Lights Done The Hard Way

It’s that time of the year again when you gotta start worrying if you’ve been naughty enough to not receive any gifts. Hopefully, Blinky Lights will appease St. Nick. Grab a strip of RGB LEDs, hook them up to an Arduino and a Power supply, slap on some code, and Bob’s your Uncle. But if you want to retain your hacker cred, you best do it the hard way. Which is what [roddersblog] did while building his Christmas Starburst LED Stars this year — and bonus points for being early to the party.

christmas-lights-the-hard-way
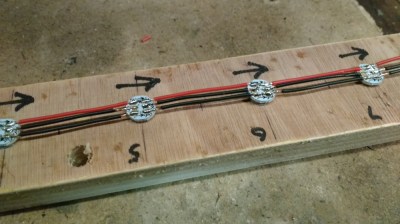
For starters, he got panels (as in PCB panels) of WS2812 boards from eBay. The advantage is it lets you choose your own pitch and strand length. The flip side is, you need to de-panel each board, mount it in a jig, and then solder three lengths of hook up wire to each LED. He planned for an eight sided star with ten LED’s each. And he built three of them. So the wiring was, substantial, to say the least. And he had to deal with silicone sealant that refused to cure and harden. But nothing that some grit and determination couldn’t fix.

For control, he choose the PIC16F1509 microcontroller. This family has a feature that PIC calls the “Configurable Logic Cell” and this Application Note describes how to use CLC to interface the PIC to a WS2811. He noticed processing delays due to C code overheads that caused him some grief. After some experimentation, he re-wrote the entire program in assembly which produced satisfactory results. You can check out his code on the GitHub repository.

Also well worth a look, he’s got a few tricks up his sleeve to improve the quality of his home-brew PCB’s. He’s built his own UV exposure unit with timer, which is an interesting project in itself. The layout is designed in Eagle, with a flood fill to minimize the amount of copper required to be etched away. He takes a laser print of the layout, applies vegetable oil to the paper to make it more translucent to UV, and doubles up the prints to get a nice contrast.

Once the sensitized board has been exposed in the UV unit, he uses a weak but fresh and warm solution of Sodium Hydroxide as a developer to remove the unexposed UV photo-resist. To etch the board, he uses standard Feric Chloride solution, which is kept warm using an aquarium heater, while an aquarium air-pump is used to agitate the solution. He also describes how he fabricates double sided boards using the same technique. The end result is quite satisfying – check out the video after the break.

Continue reading “Christmas Lights Done The Hard Way”