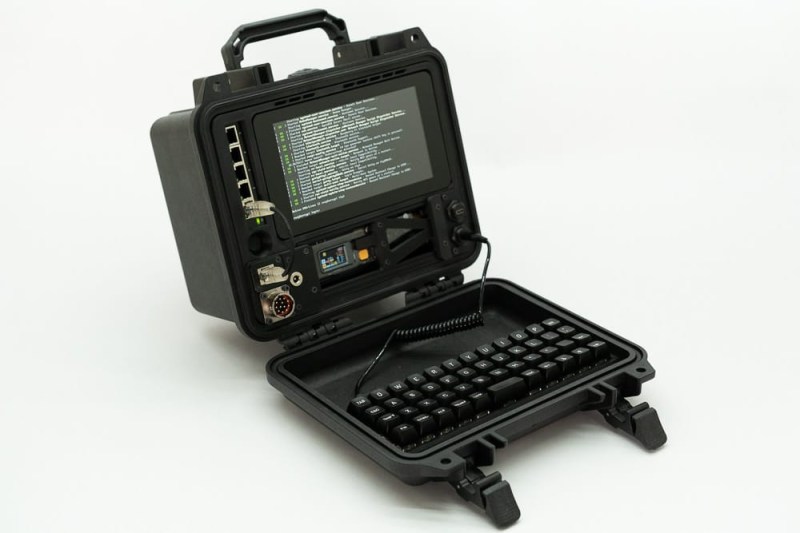
At Hackaday, the projects we cover are generally a one-off sort of thing. Somebody makes something, they post it online, we share it with our audience — rinse and repeat. If a project really captures people’s imaginations, it might even inspire a copy or two, which is gratifying for everyone involved. But on the rarest of occasions, we run across a project like [Jay Doscher]’s Recovery Kit.
To say that the Recovery Kit was an inspiration to others would be putting it mildly. Revolutionary would be more like it, as it resulted in more “Pi-in-a-Pelican” builds than we could possibly count. So it’s only natural that [Jay] would return to the well and produce a second version of his heavy-duty cyberdeck.
Now, technically, there have been a few other variants of the original Recovery Kit since its release in 2019, such as the easier-to-build Quick Kit. If you want to get really technical, even the Recovery Kit is actually a do-over of sorts from his original Raspberry Pi Field Unit from 2015. But [Jay] says none of the refreshes or revisions he’s worked on previously were substantial enough to get the official “Version 2” stamp before this one.
So, what’s changed in this new version? For one thing, it’s been optimized for reproduction by others. All the pain points that folks reported while building their own Recovery Kits have been addressed, from the time it takes to print the parts to the availability of key off-the-shelf components. Not only are the parts easier to get your hands on, but they’re also easier to assemble, with the soldered links of the original now replaced with push-on connectors.
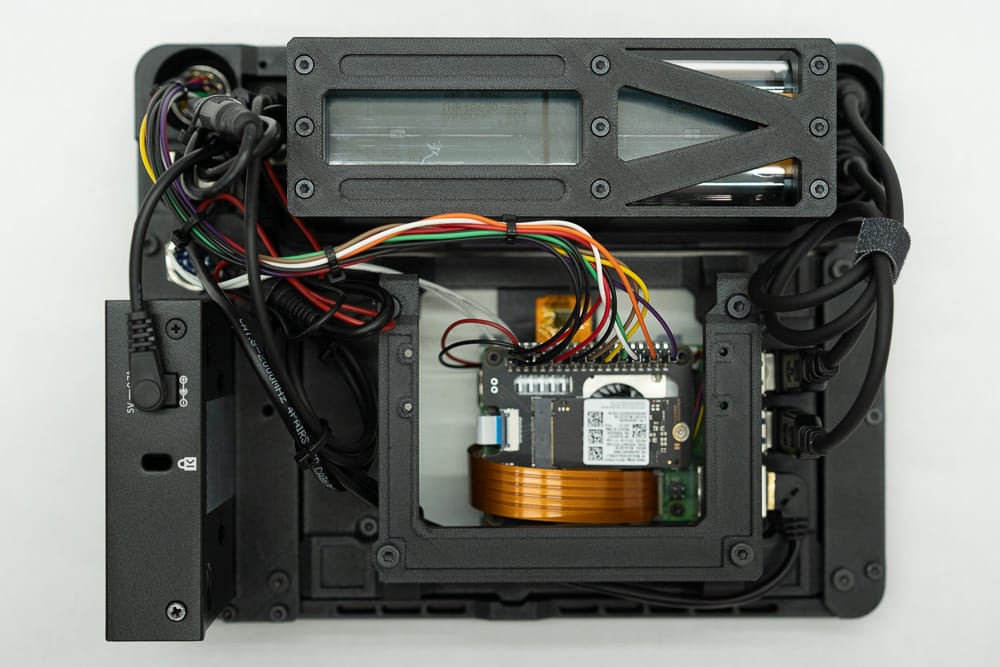
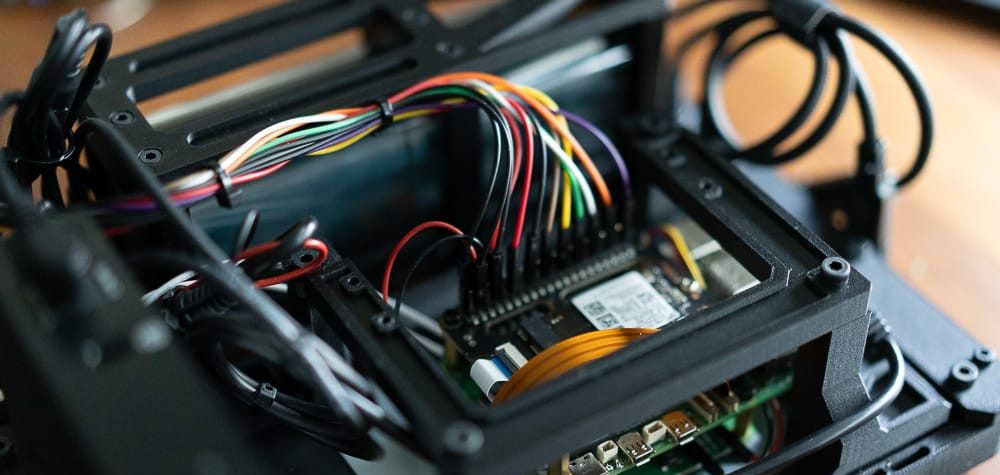
Designed around the Raspberry Pi 5, the new Recovery Kit has also received a considerable performance boost over the previous versions. This is further extended by using a bootable NVME drive rather than the dinky SD cards most Pi builds are stuck with. Despite the computational kick in the pants, [Jay] says he’s realized that the relatively low resolutions available for the type of displays that can be crammed into a build like this are pretty poor for most graphical environments, and recommends the user stick to the terminal.
In addition to the lengthy write-up about the design process behind the Recovery Kit Version Two, [Jay] has provided a comprehensive parts list with links to where you can pick up your own hardware. Having been burned by hard-to-source components in the past, this time, most of the hardware is from either Amazon or McMaster-Carr.
All in all, it’s a solid refinement of an already very well-engineered design. The only thing left now is to see if this new revision of the Recovery Kit can have the same impact on the community as its predecessor. No pressure.


With any luck, we’ll see a Raspberry Pi 5 update to https://hackaday.com/2015/06/20/the-first-pipboy-well-see-this-year/
Seahorse Cases has some custom options for removable pin in the hinge so you can take the lid off. I’m using one for a synthesizer and it’s pretty handy.
It is possible to use a higher resolution on these displays with scaling, giving you more screen real estate, at the cost of smaller text, icons, etc.
For instance, on the 7″ official Raspberry Pi touchscreen, which has a native resolution of 800×480, I’ve set scaling to 1600×900 (roughly 2x) with xrandr by doing: xrandr –output DSI-1 –scale-from 1600×900
It’s usable, especially given that this display is meant to be used fairly close to you.
I really want to know how well a Pi 5 would handle a HMD, at least for the computationally simple stuff of projecting a simple flat “monitor” into the virtual space for two eyes I’d think the hardware is more than capable. Which would allow you to sidestep the very limited size and resolution practically useable in such a small case – have a 50″ virtual display that seems to be a meter away from you with reasonable resolution instead…
Not sure if anybody has even got the basics of the VR stack running on an ARM, but its not something I’ve actually looked into – and that would then just let you connect virtually if not any headset.
What the hell is HMD? First thing that google found was Nokia’s parent company followed by articles galore about it. Adding word ‘acronym’ to the search found several list with the first item on the first list was “hold my dick”…
Hate acronyms and abbrievations from the bottom of my heart.
Head Mounted Display…yeah it’s a pretty obscure term.
An HMD is the currently popular term for a type of NED.
Does that help?
God, we really need to get out of the paradigm of giving everything a TLA (three-letter acronym) and go back to naming things after predatory animals or Greek mythology. This is so soulless and tedious and annoying
Don’t worry, when we’ve run out of TLAs we can go to ETLAs (Extended TLAs).
> Extended TLAs
Also known as FoLA.
We could just redefine TLA to TetraLetttered Acronym to keep backwards compatibility where it’s hardcoded
Sorry I thought in this context that would be clear enough – stands for “Head Mounted Display” and is a bit more all encompassing than saying something like VR/AR headset – as for this any head mounted display is good, all you want is something that projects a much larger more useful display into your eyes while in some cases being little more than chunky glasses.
I actually “got” that one, Grawp, but I feel your pain.
Could the thing just output to a third party augmented reality kit of some sort? Then the hardware could be carried in a backpack or chest rig safely out of the way while the glasses provide the visual output while you work. Bluetooth key and mouse in lieu of hand gestures would keep everything in an appreciable amount of computing power for the pi. IMHO
For a very good monitor/screen I can suggest an old Ipad 3 or 4th gen lcd with a board from the usual sources. it takes hdmi or usb-c video input and you get a gorgeous retina resolution.
I like the keyboard in the lid. I almost didn’t see it at first!
I just don’t understand the appeal of a case mod… In a world where learning and developing your own PCB or just buying a working build off an online distributer, why are people still being lazy and just shoving it all in a cut-out shipping container? Most of these builds aren’t waterproof (even when closed) and aside from the novel itx-in-a-NES that is EVERYONE’S first case mod, why are you still using such ridiculous cabling and lugging around the extra 10 lbs of copper and plastic? You can google projects with identical capabilities (or more) that fit in the palm of your hand. Every single build of these pelican cases is just cobbling together COTS products and hotgluing them into a tupperware bin…IT DOESN”T EVEN LOOK COOL!
“I put a bumper sticker on my car, so it’s modded.” /r
I think it looks cool.
You either get cyberdecks or you don’t I guess. Do you REALLY need a recovery kit for the post-nuclear rebuild of society? It’s just fun dude.
Most people don’t know what a cyberdeck even is.
That includes people who claim to build them, and publications that highlight them.
This isn’t a cyberdeck.
A cyberdeck is a computer that:
– is portable by design
– has multiple discreet parts
– is temporarily assembled at the location of use
A desktop is not a cyberdeck, even if you take it to a LAN party.
A laptop is not a cyberdeck.
This is just a portable computer built in to a case.
In this instance it should be as waterproof as the case is when closed, and unlike the ‘identical capabilities’ in the palm of your hand these builds are durable and modular – I’d far rather have something like this than most of those extra streamlined projects, as the ability to easily swap out the modules for other features or just when something ages out or breaks is a really nice features for a more general purpose machine, and the actual useablity of making something tiny… This has a real keyboard, that on its own makes it for most possible uses a massive improvement!
There is a time and place to design your own PCB, but a project with similar goals to this one that would only ever be as the very optional supplemental capabilities elements – no reason to make it more pricey and the PCB respin doesn’t actually do anything the off the shelf and already debugged HAT/breakout board doesn’t in most cases…
What is a recovery kit for?
A Faraday cage would be a required add on