Racing The Beam On A Thin Client, In FPGAs

A few years back, a company by the name of Pano Logic launched a line of FPGA-based thin clients. Sadly, the market didn’t eventuate, and the majority of this stock ended up on eBay, to eventually be snapped up by eager hackers. [Tom] is one of those very hackers, and decided to try some raytracing experiments with the hardware.

[Tom] has one of the earlier Pano Logic clients, with VGA output and a Xilinx Spartan-3E 1600 FPGA under the hood. Due to limited RAM in the FPGA, and wanting to avoid coding a custom DRAM controller for the memory on the board, there just wasn’t room for a framebuffer. Instead, it was decided that the raytracer would instead “race the beam” – calculating each pixel on the fly, beating the monitor’s refresh rate.

This approach means that resource management is key, and [Tom] notes that even seemingly minor changes to the raytracing environment require inordinately large increases in calculation. Simply adding a shadow and directional light increased core logic utilisation from 66% to 92%!

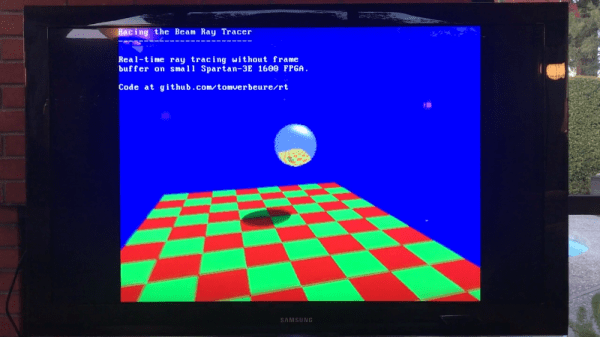
While the project may not be scalable, [Tom] was able to implement the classic reflective sphere, which bounces upon a checkered plane and even added some camera motion to liven things up through an onboard CPU core. It’s a real nuts-and-bolts walkthrough of how to work with limited resources on an FPGA platform. Code is available on Github if you fancy taking a further peek under the hood.

If you’re new to FPGAs yourself, why not check out our FPGA bootcamp?

Build Your Own Raytracing Minion

A canceled project left [Craig] with six Raspberry Pi based devices he calls “Minions”. A minion is a Raspberry Pi model A in a small enclosure with an Adafruit 2.2″ 320×240 SPI LCD. The LCD lives in a lollipop style circular housing above the base. [Craig] has found a use for one of his minions as a desktop raytracer.

The Raspberry Pi is quite capable of running Persistance Of Vision Raytracer, or POV-Ray. POV-Ray started life as an early PC based raytracer. Created as a port of an Amiga program called DKBTrace, which was itself a port of a Unix raytracer, POV-Ray first was released in 1987. For the uninitiated, raytracers like POV-Ray  literally trace rays from a light source to an image plane. As one would imagine, the Raspberry Pi’s little ARM processor would take quite a bit of time to raytrace a high resolution image. However, when targeting a 320×240 LCD, it’s not half bad.

[Craig’s] minion is running his own software which he calls ArtRays. Based upon a setup file, ArtRays can render images from several sources, including the internet via a WiFi dongle, or a local SD card. Rather than walk through the setup and software install, [Craig] has provided a link to download a full SD card image to build your own Minion. It might be worth experimenting on your own first though, rather than killing his server with a 1GB download.

We’re glad [Craig] has found use for one of his minions, now we have to see what he’s done with the other five!