Taig Mill Anointed With Ball Screws (at Last!)

Yup, we can hear a crowd full of “not-a-hack” loading their cannons as we speak, but this machine has a special place in the community. For years, the Taig milling machine has remained the go-to micro mill for the light-duty home machine shop. These machines tend to be adorned and hacked to higher standards, possibly because the community that owns these tools tends to enjoy machining for machining’s sake–or possibly because every single component of the mill is available as a replacement part online. For many, this machine has been a starting point to making chips at home. (In fact, Other Machine Co’s CTO, Mike Estee, began his adventure into machining with a Taig.)

For years, Taig has sold their machines with a leadscrew and a brass nut that could be tensioned to cut down the backlash. Backlash still remains an issue for the pickiest machinists, though; so, at long last, Taig has released a backlash-free ball-screw variant in two incarnations: an all-in-one machine pre-fitted with ballscrews and an upgrade kit for customers that already decorated their garage with the lead-screw model.

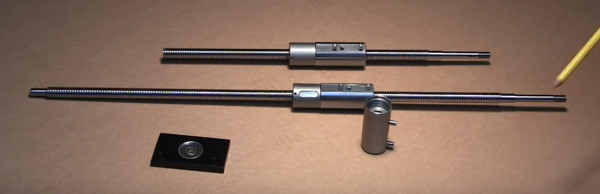
In the clip below [John] takes us on a tour of the challenges involved in cramming 3, 12-mm ballscrews into the original topology. As we’d expect, a few glorious chunks of metal have been carved away to make space for the slightly-larger ballnut. Despite the cuts, the build is tidy enough to fool us all into thinking that ballscrews landed in the original design from the start.

Confused why ballscrews are such a giant leap from leadscrews? Lend your eyes and ears a few moment to take in [Al]’s overview on the subject.

Continue reading “Taig Mill Anointed With Ball Screws (at Last!)”

Sourcing Your CNC Tools In 2016: Buy Them

Hobbyist 3D printers have had a home in the maker space for years now. Along the way, they’ve left a mark in our imaginations. They’ve tickled our fancy for watching a computer orchestrated symphony written in G-code hum away while cranking out parts. They’ve opened a door to the idea that while computer controlled machines may be decades old, having one or two homebrew setups in our garage might not be as far-fetched as we first thought. Now that we’ve seen the steppers and linear slides that go into these setups, it’s not unreasonable for many of us to start asking: What else? Perhaps a computer numerically controlled (CNC) lathe, mill, or even a laser cutter–anything that would add to the vocabulary of tools and techniques that we’re starting to build at home.

VSlot linear rail system for building multiaxis linear actuator systems

Since 3D printers have become somewhat commonplace, it’s not too difficult to find commodity spare parts spilling to the surface of online vendors’ websites. We can even find kit versions for building our own variants. Now that the notion of CNC-at-home is here to stay, the question for 2016 is: do we build our own CNC tools or buy them?

Despite the countless CNC build logs, extruded aluminum kits, and open source G-code interpreters, I’m still convinced that unless your needs are truly custom, buying the machine that fits your needs will have you putting together projects faster and with far less maintenance than you’d need if you assembled the machine yourself. In what follows, I thought I’d explore a few machines that we can find today in 2016 that make the dream of desktop fabrication a reality.

Continue reading “Sourcing Your CNC Tools In 2016: Buy Them”

Aluminum Bitcoin Keychain

mVCyX2K

Here’s a cool way to bring a physical presence to your Bitcoins: a custom CNC milled QR code Bitcoin address!

[ch00f], one of our occasional writers here at Hack a Day, has just finished this slick aluminum Bitcoin QR code keychain. He started by creating a vanity Bitcoin address using a program called OCLVanitygen, consisting of his dad’s first initial and last name at the beginning, followed by a random string of numbers. It only took his Radeon HD6790 6 hours to solve, which amounted to approximately half a trillion guesses in order to find the address! 

He then took his shiny new Bitcoin address and created a QR code from it using an web-based generator. [ch00f] then increased the resolution of the image in Photoshop and imported it into a CNC program called CamBam. A converted CNC Taig mill got to work tracing out the code with a 0.049″ carbide end. The total milling time was just over 2 hours. A bit of black spray paint, some sanding, and a few layers of clear coat later and the keychain is done!

[via Reddit]