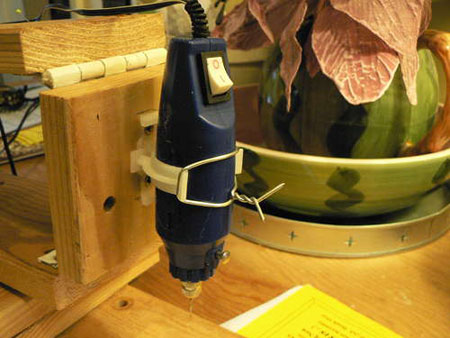
[yellowduck] took some fantastic initiative with this home made PCB drill press. Many people have a rotary tool already. Just add some scrap wood and four hinges. The drill press isn’t perfect; it pivots a little as it lowers. This shouldn’t be a problem for drilling printed circuit boards though. The PCB should be thin enough for the pivot to have little effect. After some test runs, he added a lamp for better lighting and intends to add a return spring and foot switch. It’s definitely a better solution than drilling multiple holes with a hand drill.
10 thoughts on “Home Made PCB Drill Press”
Leave a Reply
Please be kind and respectful to help make the comments section excellent. (Comment Policy)


How about mounting the dremmel to a pipe and then using a smaller vertical pipe or dowel as a guide? It will take up less space an not pivot.
Gio
@1: I don’t know, the four bar linkage looks really stable, and the movement is going to be pretty precise with minimal effort. Using pipe, you’d need two guides to get rotational stability, then you have to make sure they’re parallel or you get binding, and you also have to make the sleeves tight enough to be accurate but loose enough to slide. Obviously using a vertical guide is better if you have the time and tools to do it right, but the hardware store hinges and scrap wood get you something 90% as good for about 10% of the effort.
the rotation comes from the hinges distance. If the hinges are exactly the same distance apart, then there wouldn’t be any rotation. The 4 angles need to make a (perfect) rectangle or a complimentary rhombus. Also, I think that extending the length of one of the boards on the pivot might provide a place for a couter-balance which might be simpler than a spring. Frickin spring math is insane…
Milescraft makes a pretty nice dremel drillpress that can be had for around $30 on amazon. works pretty good for drilling PCBs in my experience.
“Frickin spring math is insane…”
F=kx…
yeah man hooke’s law is totally insane!
I suspend my Dremel from the ceiling with a bungee cord, about an eighth of an inch above the PCB which has a couple layers of cardboard behind it.
Holes can be drilled with only a couple fingers of one hand on the Dremel, and I can drill several holes without repositioning the board because the bit can move over about a square inch without becoming too far off vertical.
Ok smartass. F=-kx isn’t too tough, but he still needs to “apply” the math. how many coils per inch? What material? How long to heat it? What temp?
A simple 7-bar linkage (1 ‘bar’ being the drill, another the base stand) would provide completely linear motion (though you’d probably need two of them to prevent twisting, given that the linkage would not be flat).
http://www.instructables.com/id/$30-High-Speed-PCB-Drill-Press/
Built this a while ago; it’s probably more much more stable (only bits I’ve broken so far were when I pushed the bit WAY too deep into the material, and when I accidentally got my glove caught in the way–drills PCBs [almost] like butter) and it’s cheaper, provided that you already have a compressor and the tools to make it.
I’ve always found drill presses hard to use. You need to align the drill bit with the hole with your naked eye, which is time consuming and usually approximative. The method I use is to have a very small drill that I can hold in the palm of my hand, and drill freely. This method is very fast. The drawback is that you need a steady hand, and drill bits do break once in a while, but much less often than I need to change them because of abrasion.