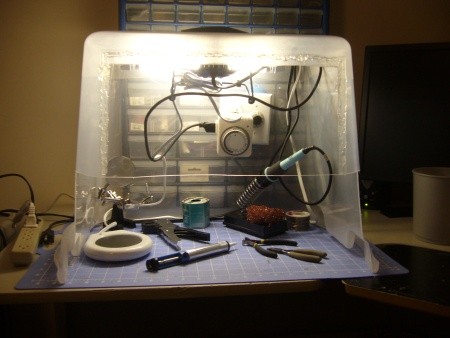
A good soldering station and fume extractor is a must for anyone interested in hacking and modding, but not everyone can afford the expensive professional models on the market. This How-To and the tips within it will guide you through the process of building an inexpensive homebrew fume hood complete with built-in time and temperature controlled soldering station and all the soldering tools you need.
We’ll begin by building the solder fume hood. Yes, we said “hood”, not just “extractor”. While there have been some nice fume extractors hacked together, this system integrates all of your soldering tools into and around the fume hood.
The purpose of a fume hood is to draw solder fumes away from the person soldering. Besides the health risks, these fumes are really annoying as they follow that pesky law of the universe: “No matter where you happen to be sitting, solder fumes will float directly towards your face.”
To start, let’s gather materials:
| Part | Supplier | Cost |
|---|---|---|
| 18 Gallon clear Rubbermaid Container (about 18″x18″x16″) | Super Store | $7.00 |
| 4″ Metal Fan | Super Store | $5.00 |
| 12″ Fluorescent Under-Cabinet Lamp | Super Store | $9.00 |
| Surge Protector | Super Store | $3.00 |
| Activated Carbon Filter | Super store or Online Electronics Boutique | $3.00 |
| Small Sheet of Acrylic (7″x15″) (optional) | Scrap | Free |
Once all the materials are gathered, we can begin cutting the plastic of the Rubbermaid container. To cut this material, use a plastic scoring tool. When you make your cuts, make sure to repeatedly score the line you want to cut until the blade goes all the way through the plastic. Do not try to score it and snap it like acrylic. This material has a bad tendency to crack in places you didn’t intend. If your plastic cracks, all is not lost. Since the plastic is soft, you can weld the cracks back together by touching it with the tip of a high temperature hot glue gun.
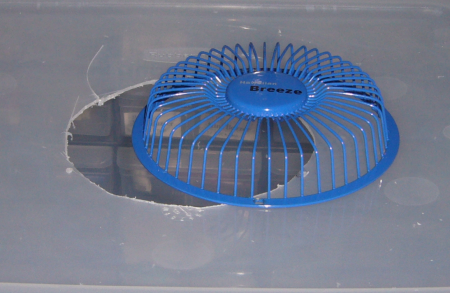
First, we need to cut a hole for the fan in the top of the hood. Take off the cover of the fan and use it to make a hole slightly smaller than the inside diameter of the fan cover in the top center of the hood. The fan is actually going to hang from the top of the hood and pull the fumes out of the hood when turned on.
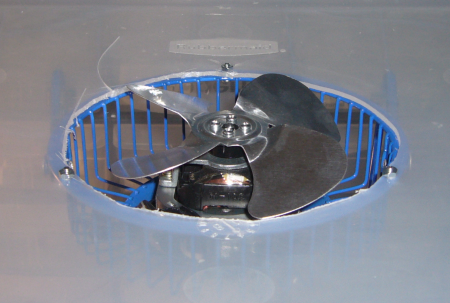
Once the big hole is made, drill smaller holes for the screws used to hold the fan together. With the nuts on the outside, screw the fan assembly to the top of the hood.
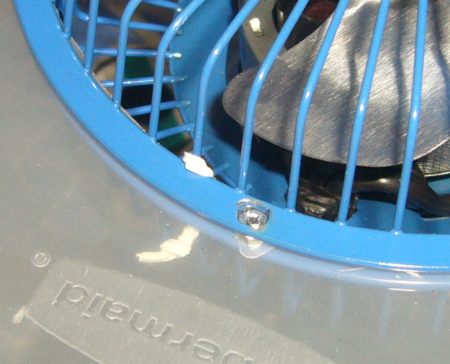
To reattach the top cover of the fan, use some scrap solid core wire or twist-ties to connect the spars on the top cover to the spars on the bottom fan assembly. We used only three twist ties as this is plenty to keep the fan cover in place.
![]()
Now we are ready to mount the light. Mark a good place to attach the light in the back top of the hood. It is likely that the mounting screws that came with the lamp are too long. Additionally, the lamp might get too hot. To prevent the lamp from melting the plastic, we cut about five half-inch spacers out of some of the plastic cut off earlier. To make life easier, pre-drill holes in the center of each of the spacers. Use a couple of the spacers on the inside to lower the lamp away from the top of the hood, and then use a few on the outside to cover the sharp points of the protruding screws. Alternatively, encapsulating the screw points on the outside of the hood with hot glue works just as well.
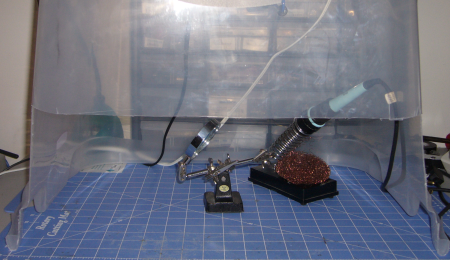
Next, cut the main window of the fume hood. Ours goes all the way across the front and is about 7 inches high. It’s a good idea to start with a smaller hole and expand it to see what feel comfortable for you to use. Make sure it is easy to reach the top back wall of the hood. This is where the controls will go later.
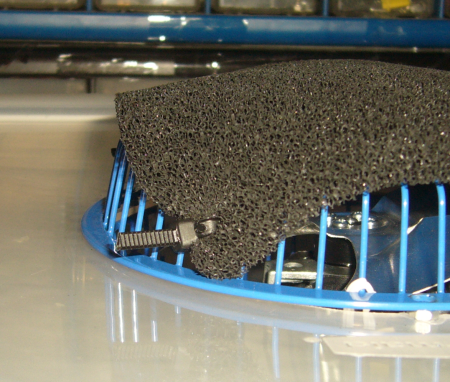
At this point, you can use zip ties to attach the active carbon filter to the top of the fan.
Plug the fan and the light into a powerstrip. Make sure the fan and the light are turned on so you can turn the entire hood on and off from the strip. Plug in the soldering iron and you are ready to go. The adjustable base of the fan is used here to hold the excess wire from the soldering iron; keeping it out of the way.
A slightly more advanced option for the front is to cut another smaller window (about 6.5 by 13.5 inches) just above the first one and add a piece of acrylic. This greatly improves visibility. Make sure to cut the acrylic about a half inch larger than the window to give yourself a surface to glue. Attach the acrylic on the inside of the fume hood with hot glue.
To improve your soldering iron set-up, you can get a professional soldering station. But why spend $50 on a temperature controlled soldering station when you can build your own for cheaper! Afrotechmods has a rough guide to building a great adjustable temperature soldering station.
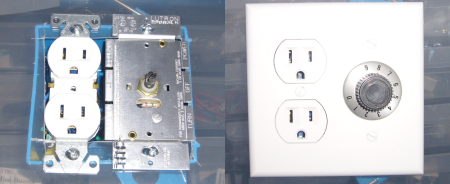
To install this soldering station into the fume hood, simply cut a hole in the back of the hood large enough to stuff the dimmer and the socket through it from the front side and small enough to make sure the mounting holes still have some plastic to mount to. The box will be attached to the back of the hood, but the faceplate needs to be on the inside.
You’ll notice that there is a different knob on the dimmer switch. We used a scrap knob with a flat bottom (comes complete with cool numbers) on the dimmer switch instead of the stock knob.
Regardless of what soldering station you use, if it doesn’t have auto turn off (which is good for fire prevention), put a grounded AC appliance timer inline with the iron. These timers allow you to automatically turn on or off any AC appliance at any time you want within a 24 hour period, but don’t rely on it to keep your iron turned off, as it will turn it back one every 24 hours. It’s better than nothing and is a cheap option, as they run between 5 and 10 bucks at local hardware and super stores. The one we use has increments of about 15 minutes. Setting it for 30-45 minutes works well.
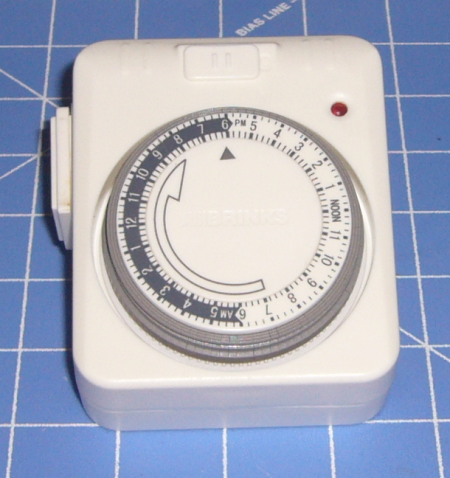
For some reason, the designers of these timers want to take up all the plug space they can by placing the plug practically in the center on the back of the timer. Luckily, the scrap dimmer knob we found has a low profile, and allows the timer to plug in with little interference to the dimmer. A better option is to get an aquarium timer. These are designed with a better form factor and generally only cover one socket.
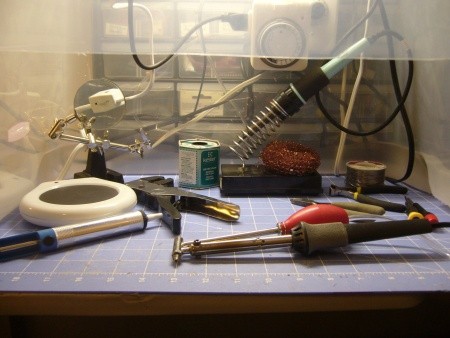
Many cheap soldering irons come with a sponge to clean the tip. If you think about it, it’s not really the best idea to use a sponge to clean your soldering iron; it works, but it also cools down the tip of the iron every time you clean it. If you are doing delicate work and clean your tip once every couple of soldering points, this can lead to cold solder joints and bad connections.
Professionals use a flux covered wire mesh to clean the tip. This method draws off the solder and uses flux to clean the tip. Every now and then, you just kind of stab the mesh with your iron a couple of times to clean it off. The problem is that this method costs around $10.
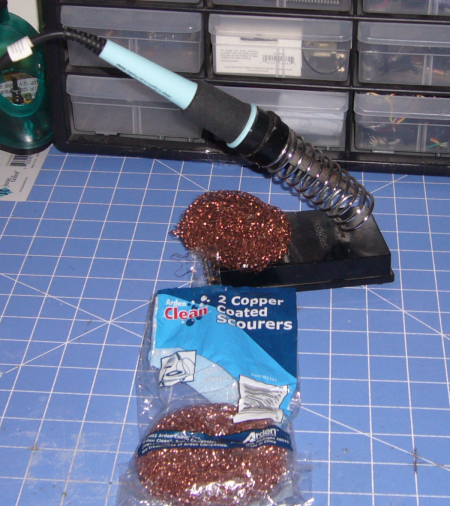
Instead of buying some job specific wire mesh, just use a copper coated scourer to clean your soldering iron tip. Usually used for cleaning pots and pans, these little guys can be picked up at your local grocery store for $1 or so a pack. The copper mesh isn’t coated with flux, but the copper itself will draw the excess solder from the tip of the iron. Do not get the steel scourers, as they are only good for cleaning dishes.

A great addition to our ti
p cleaner is the use of a simple $1 “locker organizer” picked up from the dollar aisle of the local super store. Just shove the scourer into the organizer to keep it from sticking to the iron. The magnet on the bottom will also weigh it down enough to keep it on the table when you make spastic stabs at the scourer in frenzied hacking sessions.
Surface mount soldering is becoming more common amongstl hackers and hobbyists. This work is notorious for being one of the most tedious and annoying practices known to man. Of course, having the right tools for the job helps. The cheapest surface mount rework stations cost upwards of $100. In the past, our own [Will O’Brien] showed how to make your own surface mount reflow iron.
A reflow iron or pen isn’t the only tool you need for surface mount soldering. Sometimes you’ll need a hot plate or oven.
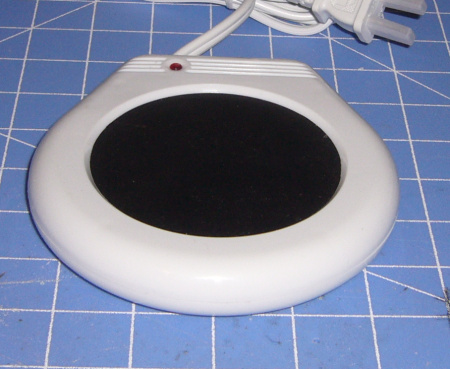
For smaller jobs we’ve found that using a candle warmer can be useful. We got ours for $5 from a super store. The plate might not get completely hot enough to melt the solder by itself, but it does help a lot when you use a soldering iron or a reflow iron by decreasing the time and effort it takes to warm the joints. The sweet spot on these warmers is usually directly in the middle of the black steel plate.
Simply place a PCB in the center of the candle warmer and allow it to raise the temp of the solder joints. Use a reflow pen or soldering iron to heat the particular joint you want the rest of the way. It will take a lot less time to melt the solder this way. This is especially useful when placing surface mount parts, but can also be useful when taking them off of a PCB.
Placing all of these components together inside the fume hood, the Hacker’s Soldering Station is complete. With this project we set out to make a simple, cheap solder fume hood complete with a time and temperature soldering station. We ended up with a great soldering station and fume extractor set up. In fact, this has now replaced one of the WLC100 soldering stations we usually use.


One of my biggest problems with this project is the too small square filter tacked onto the round fan.
the air will simply go out the gaps, rendering the filter absolutely meaningless.
I have a few others, but hey if this works for them I say more power to ya.
I love the concept. The execution isn’t terribly impressive however. I’d find it very difficult to work with just due to the limited size if nothing else, If he’d applied these concepts to a much wider and deeper unit, while also applying some serious energy to the details — like a larger charcoal filter, quieter fan, better quality lighting, and better quality transparency (tempered glass maybe?) then maybe I could use it.
Of course, my own relatively poor skills with the soldering iron itself probably contribute to the meet for a lot more elbow room when I’m working.
I think a better idea for the fume extractor would be to use a low-power, low-capacity shop-vac instead of the fan. More direct suction, and you may be able to find a charcoal filter designed for the vacuum. If not, then directing the vent of the vac to a window may work with another hose. The only problem is they are a bit noisy, but perhaps some noise insulation could help if done properly.
The little fume extractor on my Aoyue 3-in-1 works great. I don’t love that it exhausts through the hot air rework tool, but for moderate use it doesn’t seem to be much of a problem.
http://www.amazon.com/Aoyue-968-Digital-Rework-Station/dp/B000HDG0AO
exactly what is harmful about solder fumes? i thought it has been established that heavy metals in the solder (namely, iron and tin) cannot vaporize at solder temperatures.
the fumes from the rosin core will kill you.
and note, lead-free solder has extra stuff on the resin core that is even worse than 60/40
for the timer you could use one of these http://www.electricsupplyonline.com/prod/intermatic-timers/fd60mw_w001140.php they are used for controlling heat lamps in some bathrooms. they are meant to be turned on for a certain amount of time and then just turn off without coming back on in 24 hours. i wish i had one back when i destroyed my favorite soldering iron after leaving it on for 4 hours.
Is that a Digg button.. why yes it is.. WHY!?
I used to work in the US aerospace industry, and we were always told to use fume extractors because of lead and fluxing chemicals in the solder. I know there are lead-free solders available from Kester, but we never used them because they just couldn’t perform well enough.
and ironically the resin fumes they release are worse than lead based solder.
for DIY, stick with 60/40 for your own good. unless your iron can go over 1800C or whatever the lead boiling point is… i have no clue. but it’s way over what my iron can produce in a days work.
Having been in the industry for years, and around a lot of manufacturing lines, this is taking solder fume paranoia to the extreme. In an ideal situation, you have a very low airflow, pulling air away from the worker/work piece, and exhausting it outside. You rarely actually find this, and most hand assembly and rework stations simply use a low volume fan to move air away from the worker, sometimes with a charcoal trap.
The problem with too much air flow is cooling of the soldering iron, causing it to fast cycle, particularly if you have a cheap iron like a Weller that that uses a magnetic switch to turn the tip heater on and off. Better irons, like Metcals and Hakkos, don’t have this problem as they use a tighter closed loop feedback system.
There’s a lot of arguments about the dangers of solder. I’ve read storied and known people that have been doing this for 40 years in environments where they go through 100lbs or more a day in reflow lines, and others that spend 6 hours a shift in front of irons doing rework, and had no ill effects. I can’t say I know of anyone saying they’ve had issues directly as a result. Even lead poisoning is almost never heard of, and these people handle leaded solders on a daily basis.
The issue with lead is more when it leaches into the ground water and is adsorbed through drinking. As #5 pointed out, these metals don’t vaporize at solder temperatures.
In my experience, the real problem is more eye and throat irritation than anything. And good ventilation solves that. It doesn’t require extreme measures, like moving 100CFM of air through carbon filters and exhausting it to the outside.
My verdict: Massive overkill and complicated work area.
Oh, and if you do surface mount, there’s no way you’re getting a microscope under that. And I spend 95% of my soldering time under a microscope, on boards that are a lot of 0603 and 0402 surface mount.
andrew: it’s not really the vaporized metal, it’s the rest of it. flux vapors are the worst. they’re acidic and they irritate your eyes and nose.
A study from an Occupational Hygiene journal:
“Measurement of the Performance of Air Cleaners Against the Particulate Element of Rosin-based Solder Flux Fume”
http://annhyg.oxfordjournals.org/cgi/content/abstract/42/8/511?maxtoshow=&HITS=10&hits=10&RESULTFORMAT=1&andorexacttitle=and&andorexacttitleabs=and&fulltext=lead+oxide+fumes&andorexactfulltext=and&searchid=1&FIRSTINDEX=0&sortspec=relevance&fdate=1/1/1844&tdate=6/30/2007&resourcetype=HWCIT
Interestingly, “Activated carbon filters in the form of foams, used with the simpler type of cleaner, had negligible filtration efficiency against either particulates or vapours and would, therefore, offer no protection against any hazardous component of the fume.”
From the British health department, “Solder Fumes and You” : http://www.hse.gov.uk/pubns/indg248.pdf
I’ve read that solder fumes are one of the leading causes of occupational asthma, but as mentioned above, a _lot_ of people work day in and day out with no ill effects. And it appears the exposure settings governments have set are more of a guess than anything certain.
There are a couple more references and explanations in the fumes section of our guide:
http://www.curiousinventor.com/guides/How_To_Solder#select_solder
How can you get your hands, and the work under that thing? the plastic bin looks like overkill.
I just use an ordinary 120mm computer case fan behind my station to draw the fumes away from my face. Works great. I built mounting brackets with Erector set parts.
the dimmer, outlet, timer, etc all seem like a lot of work for a half-baked job. I just saved my money and got a Weller WESD51 iron.
both the WES51 and the WESD51 (digital display) are temperature controlled, and turn off automatically after 1 hour of no temperature change at the tip.
let me fix that “both the WESsomething and the WESotherthing cost $150 too many of what it should cost.”
cmon, what justify the price tag on those devices?
WES51 is $93 on Amazon. Exact same as the WESD51, but without the digital temperature readout.
The justification is a well-built soldering iron with a closed-feedback temperature control. If you do a lot of soldering circuit boards they are definitely worth it. Many hobbyists will spend $400-500 (or more) on a good soldering station.
If you are just soldering large wires a couple times a year you’ll be much better off with a $10 Radio-Shack iron.
I love this guy, keep him!
Interesting project! This is a very good hack for those of us who like our lungs. I have one or two issues I would raise with it though.
Firstly, the booth and everything about it is fine, except the filter at the top. You cannot just tape a carbon filter over it like that and expect it to do anything. It’s air resistance is far too much, and it’s the wrong type of filter. The air will just diffuse into the surroundings and convection will draw it down again and the whole room becomes at risk.
The thing would be much more efficient if you got a good seal over that fan to a duct pipe of some sort and stuck your filter over that.
Now to the filter: Carbon filters won’t help. The issue with solder fumes is they cause asthma, not the lead. A long time ago solder fumes and their effects were measured by their total aldehydes but this was pointless as it is the fine particles in the fumes that cause the asthma and this is still a mishelf belief today. Decent solder filtration systems use a mixture of many filters but you will want a fine particle filter like a HEPA one for it to be effective. The carbon will not work, and not like that. The problems would come getting such a filter that does not restrict the airflow much from that one fan. I think dyson hoovers have some sort of lightweight foam-type filters that have very good airflow, you might want to get some of that and seal it up.
Either way, you need a decent duct, and some fine particle filters instead
Hope that helps!
-HSE
Is soldering without anything for the fumes all that bad? I mean I do it all the time and it seems nothing more then a sorta bad smell to me.
If you aren’t soldering for hours at a time, I wouldn’t worry about it.
Usually your eyes/throat will get irritated if you are soldering too long. In that case you should invest in a fume-extraction system or take a break.
It sounds like hse may know more than I do on this, but I believe the risk is very minimal if you only do occasional soldering, although maybe a little worse for lead-free solder since the flux is typically more aggressive. Some of the first lead-free solders had some nasty fumes, but the ones I use now at least smell more tolerable.
I had the chance to take a soldering training class, and the teacher (who used to work on the ‘line’) said people would be fine for a long time, but then once they developed an asthmatic reaction, even the smallest amount of solder smoke would cause a severe reaction. Check out the links in my previous post for more info. I don’t think anyone has found a definite answer to the question of just how much is bad for you.
I’ve had asthma my entire life. I’ve been soldering for almost 16 years. I’ve never used any kind of fan or anything else for the fumes. sometimes it iritates my eyes but it has never bothered my lungs.
My dad has been doing electronics repairs for about 50 years. About 10 years ago he was getting a blood test for a medical aliment and asked if it could get his blood tested for lead levels whilst they were doing it. The doctor approved and the tests were done – he has no more lead in his blood than average for a person his age.
The flux fumes might be a worry as stated above, but thats nothing a small fan on the desk can’t sort out.
As for the fumes always going into your face – I think the smoke gets caught in the up-draft of the warm air rising from your body heat, at least thats what it looks like to me.
Cheers,
Luke
You could just put tape around the spaces the filter doesn’t cover, no worries strider.
I hate to be critial, and as much as this seems like a good beginner setup, I would like to make a few comments. First, the workspace seems tiny and limits your vision given the opaque nature of the hood. The carbon filter is very ineffective, and rosin fumes aren’t that bad — just don’t get the solder hot enough to vaporize it and you’ll be fine. And I worked with a standard $5 radio shack soldering iron forever till I got a cheap one off circuit specialists.. I think temperature regulation is very noncritical compared to how you solder — I like my equipment really hot, with lots of area such that when you touch a pin, it flows fast, but you don’t leave it on long enough to transfer a lot of heat to the IC. My tip is really really big, and I work on 0603 SMD parts or .5mm pitch connectors without a problem. I also find that working on clear copier paper is great as you can just ball it up and toss it rather than having to clean off your workstation.
Luke, steve, scott etc.
It’s not a question of ‘This guy I know solders lots and hasn’t been affected’ It’s a question of exposing yourself to the _risk_ of getting asthma. There’s no ‘asthma/no asthma’ situation, there’s just a variable chance that you develop it.
You shouldn’t doubt it because of one person. When you look at tens of thousands of people – The unheard sort that solder your circuits in undeveloped countries without filters or ventilation – it becomes clear these fumes constitute a risk.
But that’s where this whole thing becomes optional:
If you want to take the risk, honestly that’s fine; but if you like to play safe, or just don’t like the fumes (a more effective deterrant!) then this is something you might like.
“Nothing like the smell of solder in the morning”….
or are you a prop 65 pansy !!!go hug a tree ya hippies
Wonderfully constructive comment. /s
I agree with # 7 and I would personally just melt the thing with the “spastic stab” portion of the directions. Also, I tend to solder wherever :\ but if it works, more power to you.
Here’s another idea:
The fan could be mounted near the back of the workstation, if space allows.
That’s a dust-filter, no effect when it comes fumes. Solder unprotected daily for years and you will live to regret it. Call it paranoia, but there’s a reason why there are Health, Environment, and Safety rules.
The only symptom of lead-poisoning is the “disease” itself, not to mention the stuff they put in the flux.
you could pick up an old desk with a computer hutch for free or cheap. cut a fan hole if you want. acrylic sheets to make a hood. you have a decent station with parts drawers, etc.
I hardly even know what a soldering station is — okay, I’ve figured that it’s a station where you do your soldering — but I like the small size of this, which might even fit in my single apartment. Possibly. Anyway, thanks for posting this “hack”.
Instead of commenting on the size of this hack, or the quality, should you not take into account, that some are not crafty enough to form in their mind how to create a soldering station. This is an idea, a suggestion, an example of how one can go about making one.
Of course inhaling anything unnatural is not safe.
As much as I solder, I just can’t stand the fumes in my eyes.
Cool idea.
I have asthma. I’ve never had an asthmatic reaction to soldering but about half the times I’ve soldered for any length of time I’ve inhaled too much fumes and gotten sick. For me I usually get something like a cold except with more irritation in my sinuses, usually lasts about 2 weeks. It seems to happen only after inhaling fumes through my nose, not my mouth.
By the way, anyone with a radio shack butane iron, don’t use it for more than 30 minutes. I gave myself CO poisoning that way. The original manufacturer (who charges way less btw) has that warning on their packaging but for some reason radioshack doesn’t care when their customers die and neglected to pass on the warning.
I am new to the DIY/Modding scene, and I am looking for a way to get enough equipment to get started. I live in a densely populated area, and live in a small home. I think that I will be doing most of my soldering in the garage, and think this hack is a good place to start when looking for alittle extra ventilation. I think that a bigger bin would be helpful, and I think I will include a foot pedal that will control the fan speed, as to prevent the fan from cooling down the station. But other than that I am thankful that there are people out there that will post things like this to get others thinking.
THANK YOU for this hack, I hope to post some of my own in the future.
This thing is for pussies.
Altough an interesting idea, however you have failed to note that in the removal of solder fumes you need to utilize a HEPA filter. The cheap pre-filter pad that you are using is not going to trap the micro particles that occure during the soldering process. If you want to do something like this just use a cheap desk fan, it’s pretty much the same thing. I would recommend a professional solder fume extractor that has a HEPA filter.
Yeah, I think I’m going to build something like this. The fume hood would be VERY useful soldering near things that I have glued. Soldering iron + super glue = OH MY GOD MY EYES!!!!!!!!!!!!!!!
Probably just use a computer case fan to extract, and build it all on an old desk (may as well make it nice).
I use my cramped little desk, a cheap crappy 25W weller with a heavily worn chisel tip and a ATX PSU with a 120mm fan hooked up to the 5v rail to some decent enough effect, managing to do some surface mount work on things like modern graphics cards with caps ripped off. The only reason I use the fan at all is that I’ve suffered bronchitis and temporary loss of speech from inhaling too much of the flux fumes. As neat as this setup is, the most useful thing here for me is probably the hackish style temperature control on the iron itself.
The “temperature controlled” soldering iron isn’t. It’s “adjustable power”. This approach will give you approximately no benefit with a 15-25W pencil iron. With a bigger iron it might be nice to be able to dial down to the 15-25W range, but just buying a cheap iron in that range is the simpler, cheaper solution. The dimmer hack has been around forever—it’s probably still in the ARRL Handbook—and is just lame.
Do yourselves a favor and get a high-output temperature controlled iron. You can work much faster with essentially no danger of overheating parts or lifting traces.
Good project and well explained, now I feel moved to produce my own temperature controlled solder iron. By the way, the link for soldering oven, the http://www.ustr.net/smt/oven.htm shows a complete home made oven for surface mount components, but the AVR hex code is not published. Anyone have such code or any idea where to find it?
I know this is an old posting but just had to add a few comments.
Use a standard four outlet electrical box with motion sensor on one side wired to an dual receptacle on the other side. Plugging power strip into it.
Fan & Lighting
Bathroom Exhaust Light & Fan light
OR
AC to DC 12V transformer / converter with neg post
Computer Case Fan 80mmn – 200mm Recommend > 120mm bigger is not as noisy.
Computer Fans Grill
12v LED light strip
Why people think making a 75W iron into a 25W is the same as regulating temperature?
that’s just dumb.
This is apparently an old post. But, I still think this is useful build, It may not look as nice as the commercial product. It seems to me it does the job though.
Yes. agreed.
As a frequent user, I would prefer a commercial one.
I took the design and modified it a little.
1. Bought a larger bin 112 qt by Homz.
2. Added aluminum tape to front of container to block and reflect light.
3. Vent solder fumes outside through dryer hose attached to top of bin.
4. Left soldering iron variable plug outside of bin to allow for easy moving of bin off workbench.
http://imgur.com/a/W0cX5
Works great.
Cool build, thanks for sharing! :)
what is the name of the table cover in blue? its anti-estatica and heat resistor? where can bought one?
It is just an Anti-Static Mat. Here are some on Amazon http://www.amazon.com/s/ref=nb_sb_noss?url=search-alias%3Daps&field-keywords=anti-static+mat