DIY Kidney Machine Saves Girl


When the tool you need doesn’t exist, you must make one. That’s exactly what [Dr. Malcolm Coulthard] and kidney nurse [Jean Crosier] from Newcastle’s Royal Victoria Infirmary did two years ago.

When a baby too small for the regular dialysis machine (similar to the one pictured above) needed help after her kidneys failed, the kind doctor designed and built a smaller version of the machine in his garage, then used it to save six-pound baby Millie Kelly’s life. Since then the machine has continued to be used in similar emergency situations.

[Photo: NomadicEntrepreneur]

Vista On A PS3


Apparently you can run pretty much anything on a PS3. [mopx0] has managed to get Vista running on his PS3. He used Qemu 9.0.1 to install Vista on a PC. He says it takes “about a day or so”, after using Vlite to speed it up, so be patient. You then make an image of the install and copy it to your PS3. Don’t worry though, your hard work will be rewarded by a speedy 25 minute boot time when you’re done.

Even though it is extremely slow, to the point of being nearly unusable, its good to see people pushing the boundaries of our hardware’s intended use.

[via PS3scene]

Deogen, Tiny Monitor Tester


Deogen is a small, self contained device for testing monitors. It was designed back in 2000 to reduce the amount of space and effort required to test monitors in a computer shop. The initial design used an AT90S1200 microcontroller to generate test patterns for the monitors. Being about the size of a portable CD player, it was much easier to take to any monitor and plug in for testing.

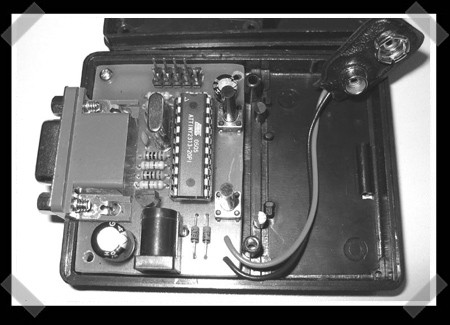
Version two of the device, pictured above, is much smaller, being about the width and height of a credit card. The depth is slightly larger than a 9 volt battery. Compared to the last vga test project we ran, this one is tiny. The unit boasts a decent set of features, such as; eight test patterns at four different resolutions, battery or DC power, and small form factor.

The processor of version two is an ATtiny2313 at 20MHz, and controls the H sync and V sync signals directly. The RGB is converted to analog using a resister network. The power circuit is custom made for low power consumption, though they note that a 78L05 equivalent unit could be used in its place.

The plans for the PCB and the software are available from their site. Head on over and check out some pictures of it in action.

[Thanks, Philip Fitzgerald]

Defcon 16: Badge Details Released


Defcon will once again be one-upping the sophistication of the conference attendee badges. Wired has just published a preview of this year’s badge. The core is a Freescale Flexis MC9S08JM60 processor. The badge has an IR transmitter and receiver on the front plus eight status LEDs. On the back (pictured below), there is a mode select button, CR123A battery, Data Matrix barcode, and an SD card slot. You can add a USB port to the badge and upload code to it using the built in USB bootloader. All the dev tools needed will be included on the conference CD or you can download the IDE in advance. The low barrier to entry should lead to some interesting hacks. In previous years, you needed a special dongle to program the hardware. There is no indication as to what the badge does out of the box. Releasing the badge early is a first for Defcon and the one pictured isn’t the attendee color, but we’re sure someone will still come up with a clone.

Now comes the fun part: What do you think the best use of this badge will be? Would Defcon be so cavalier as to equip everyone in the conference with a TV-B-Gone? I think our favorite possibility is if someone finds a security hole and manages to write an IR based worm to take over all the badges.

Defcon 14 introduced the first electronic badge which blinked in different patterns. Defcon 15 had a 95 LED scrolling marquee. [Joe Grand] will be posting more specific Defcon 16 badge details to his site after the opening ceremony. Check out more high resolution photos on Wired.

Continue reading “Defcon 16: Badge Details Released”

How-To: The Hacker’s Soldering Station


A good soldering station and fume extractor is a must for anyone interested in hacking and modding, but not everyone can afford the expensive professional models on the market. This How-To and the tips within it will guide you through the process of building an inexpensive homebrew fume hood complete with built-in time and temperature controlled soldering station and all the soldering tools you need.

Continue reading “How-To: The Hacker’s Soldering Station”