")
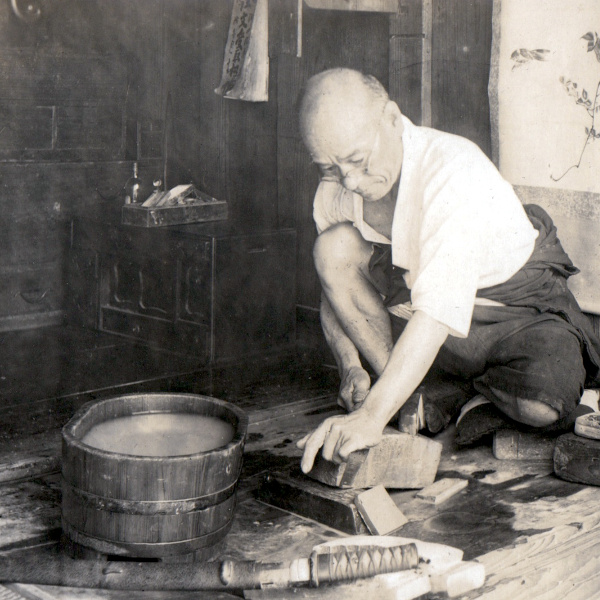
In search of a perfectly-cooked brisket, [Aaron] recently completed this DIY PID-controlled sous-vide slow cooker. Sous-vide (French for “under vacuum”) is a cooking technique in which foods are typically vacuum-sealed and then cooked in a relatively low temperature water bath for an extended period of time. This is done to minimize temperature gradients throughout the food to ensure even cooking. Precise regulation of the water temperature is the key to ensuring that the results are exactly as desired – when cooking for many hours or days, even a few degrees discrepancy can greatly influence the final product.
A few months ago we featured a similar hack that utilized a simple switching temperature controller spliced into an extension cord. Although probably sufficient for most aspiring “hacker-chefs”, the temperature was not as stable as it could be. The problem is that it takes time for the heat generated in the slow cooker’s heating element to reach the temperature probe (and food) suspended in the water bath. By the time the probe reads the elevated temperature, the element is already too hot and the temperature overshoots the target. One way to mitigate this effect is to circulate the water to minimize temperature gradients, as is done in many of the expensive commercial units. In order to achieve similar results, [Aaron] instead created a PID controller that uses temperature feedback over time to precisely maintain the desired temperature and reduce any deviations resulting from outside disturbances.
The build is covered in detail and looks great in a custom acrylic enclosure. All of the board schematics, enclosure layout files, and source code are available under Creative Commons licensing at the bottom of his blog page. A good deal of time is also spent addressing the actual PID programming and tuning – something that could be useful for many different hacks requiring precise feedback control.
The end result is a professional looking control box and a slow cooker that is able to maintain temperature within 1°F even while using a DS1820 temperature sensor that is only rated as accurate to 0.5°C (0.9°F). From the pictures it looks like [Aaron] has finally achieved brisket bliss! Now the only question remaining is: what is the best setting for reheating left-over pizza?


why shouldn’t it be accurate to 1 degree if the sensor is accurate to 0.9 degrees?
Engineers eat cold pizza, reheating it would just ruin it.
Nice work on the enclosure and good find on the thermowell.
I use/make/sell a DIY kit for all purpose temperature controller. My food grade temperature probe is a little more precise down to 1/3rd a degree, but it’s not true pid and has a +/-3 degree tolerance by default in the firmware.
http://screwdecaf.cx/yatc.html
I’m surprised more people don’t add a generic wall plug to their controllers so they can run any appliance from freezers to hot plates along with the obvious crock pot applications for sous-vide.
WAIT?!? Why would you want to reheat leftover pizza. It’s best room temp the next morning!
I agree with cold pizza.
It’s a nice hack, I just don’t like the idea of evenly heating food, particualy meats. The temperature variation from the outside to the center over the time it is cooked is a large part of what gives a fresh hot meal that fresh hot meal experience. This seams a lot like making left overs the first time.
Food cooked this way isn’t “leftover” quality.
But how is this much different than taking a $30 PID / RTD thermister sensor combo and marrying it to a heating element?
We have done this on several machines but never considered it much of a hack as just the practical application of a PID.
The enclosure and display are neat but the units we bought for $30 or $50 or so were standard DIN sized and have membrane buttons on them and a temperature display and other common controls (set point, etc) already built in. It was literally all you needed except a relay and a heating element.
@CutThroughStuffGuy:
I recently built a sous-vide cooker with one of the $40 Chinese PID controllers and a solid-state relay. I believe these are the components to which you refer in your post.
The cheap PID controllers only output an ON or OFF signal, whereas Aaron’s (quite impressive) project has 256 levels of power. I believe this allows him to use different equations for determining the starting guesses for the P, I, and D values.
Aaron does a good job of explaining the basics of PID control, and even includes the transfer function he based upon which he based his design.
@everyone else:
I used a $20 submersible aquarium pump in my sous-vide cooker to provide better heat transfer and also to help minimize temperature gradients in the bath.
With a PT-100 resistive temperature device my rig maintains a temperature within 0.2F of my setpoint.
You would be amazed at how tender cheap cuts of meat get after 48 or 72 hours in the bath. Finish off with a blowtorch (I highly encourage cooking with a blowtorch) and you’ve got some good eats.
Yes, I believe you are correct that the ones I have experience only turn on and off only and are unable to regulate the degree of “on”. That may be the “B” curve method he talks about.
That leads me to believe that his method is superior at tight temperature control but the method I am using is extremely cheap and easy to integrate and probably holds less than +/- 5 degrees vs +/- 1 degree.
I don’t fault his design – it is solid. It just seems like crazy overkill for only a slight gain but that is usually how it goes!
For bonus points he could use peltier and heat sink(cold sink?) as the heat source. (perhaps some added insulation) for “environmentally friendly cooking”.
Double bonus, High rate (10hz) PID control the peltier with a close coupled temperature sensor (ie mounted on the hot side of the element itself)
Then vary the set point with a second PID with a sensor in the water.
Good job. I did a similar project using a crappy, Chinese PID controller on my crockpot. The only advise I would have is to try and make everything into a single unit so you don’t have a lot of wires running around, but I have to say that the case is very nice looking.
Oh, and don’t use a crappy, Chinese PID controller. Turns out they lack a certain something we like to call “calibration”.
@Valen:
“with a close coupled temperature sensor (ie mounted on the hot side of the element itself)”
Correct me if I’m wrong, but isn’t that the opposite of what you should be doing? You really want to control the temperature of the food/water, not the heater itself.
Having tried the chinese PID controller + SSR + PT100 + crock pot method, I found the results less than impressive, with a lot of overshoot in the temperatures and not much stability.
This was all fixed when I switched from a crock pot to a deep fat fryer (filled with water, not oil) as the heating element instead of the crock pot. Temperature control is now ‘perfect’ taking about 2 minutes to get up to temperature and I’ve never seen it deviate from the setting on the pid (0.1C resolution).
I believe crock pots are less than ideal because of the underpowered heating element and the separation of the water from the heat source by the thick ceramic pot which makes control difficult. Switch to something with more power and the heating element in direct (or close) contact with the water, you’ll be a lot happier.
FWIW the autotune on the chinese PID is great, but it lacks the ability to record the temperatures which would be possible with an arduino.
@r_d
It depends on what you want. The key to a stable feedback loop is to keep the loop delay small — changes in the control output should be reflected in the measurement input as fast as possible. The slower the response time, the lower the gain you can have, and the less good you are at rejecting transients. Therefore, for extremely stable temperature control you actually want to put the sensor near the heating element, as long as you have a nice heat spreader (such as a metal can). It will take longer to warm up to the initial setpoint — it won’t “over-drive” the heater as much to get up to the operating point, but it will be much more stable once it is going.
In a completely enclosed chamber like a slow cooker where the walls have good thermal conductivity this is often enough — if all the walls are at a constant temperature, the inside can’t help but track properly. For absolute stability and accuracy, you would put a temperature sensor near the heating element with a fast responding PID, then put a sensor near the food with a much slower PID that adjusts the setpoint of the fast PID.
“environmentally friendly” and peltier heater should not appear in the same sentence. Peltiers (TECs) are heat pumps; hugely inefficient ones at that. Just use a heating element.
Something smells good, but wires all over the counter yech. The classy box has the wires coming out the front running all over the place. They belong on the back! The sensor wires aren’t even in a single jacket, white. At least take a few seconds to twist them together.
2 questions
What is PID (xxxyyyzzz)
What is the vacuum (inches-water or Hg) and sealing lid wire pass-thru etc.
None of this apparent on the link.
@Pedro
Given a good enough heat sink on the cold side Peltiers give out almost twice as much heat on the hot side than they consume in power making them almost 200% efficient. This is because they pull heat in from the cold side whilst also heating resistively. The problem with using a TEC would be the operating temperature which is usually 125 deg C.
@echodelta:
“What is PID (xxxyyyzzz)”
PID stands for Proportional/Integral/Derivative. It is a class of control algorithms that attempt to hit the desired control point, in this case temperature, using a feedback control loop.
The Proportional/Integral/Derivative part simply refers to the fact that there’s a constant or “gain” associated with the temperature error, the time-derivative of the temperature error (how fast your temperatures are changing), and the time-integral of the temperature error (this corrects for small errors over a long time period).
PID is set up so once you’ve chosen your PID “type”, all you have to do is adjust those three gains to fit your specific needs.
reheating cold pizza…Sacre’bleu!
@Meurig:
That is interesting that the deep fat fryer is so much more responsive, especially avoiding overshoot. With no active cooling, even low overshoot tends to take a long time to cool down in my experience.
With my turkey oven (think large crockpot without ceramic walls) I have to manually correct overshoot by adding cold water for the first hour or so…but after that it’s completely hands-off for the duration of the cooking.
I am slowly working on adding a datalogger to my PID so I can chart time and temperature.
@CutThroughStuffGuy:
In cooking, 5F can be a big difference, especially after 72 hours. Most professional sous-vide cookers tout (incorrectly) that they are accurate to 0.1C (.18F) degrees.
@Dan Afonso:
Your unit may be different, but my $40 chinese PID has an adjustable temperature offset (in lieu of calibration). It’s not nearly as good as a calibration curve, but given the small range of temperatures at which I cook (130F to 160F) I just calibrated at 145F. The temperature error (less than 0.2F) at the extremes are negligible for me.
@echodelta:
This setup is not a true sous-vide setup because there is no vacuum. It is more accurate to call it a low-temperature water bath.
@eric
I feel your pain with the overshoots, that’s the exact behaviour I was seeing. It became especially bad when I tried to insulate my crockpot (wrapped in in towels) this just amplified the overshoot.
@Evan might be on to something with using two sensors, one on the heating side and one in the water. In lieu of trying that, putting the heating as thermally close to the water as possible seemed to do the trick.
Hey guys,
I am not too much of an engineer, more of a software guy :)
But I am really puzzled by how this works, and in particular about the home made Sous Vide bits ;)
* Will this design be applicable to a 240V mains?
* Is this thing essentially a PID that varies the output from the mains power, and regulate that supply to the crock pot?
* I also presume you need a “dumb” crockpot without any fancy LCD controls and all that might fail to work when you feed the crockpot anything between 0V to what it is supposed to receive?