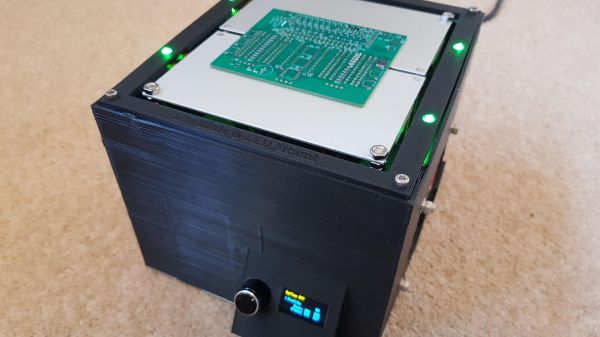
Start Your Semiconductor Fab With This DIY Tube Furnace

Most of us are content to get our semiconductors from the usual sources, happily abstracting away the complexity locked within those little epoxy blobs. But eventually, you might get the itch to roll your own semiconductors, in which case you’ll need to start gearing up. And one of the first tools you’ll need is likely to be something like this DIY tube furnace.

For the uninitiated, [ProjectsInFlight] helpfully explains in the video below just what a tube furnace is and why you’d need one to start working with semiconductors. Perhaps unsurprisingly, a tube furnace is just a tube that gets really, really hot — like 1,200° C. In addition to the extreme heat, commercial furnaces are often set up to seal off the ends of the tube to create specific conditions within, such as an inert gas atmosphere or even a vacuum. The combination of heat and atmospheric control allows the budding fabricator to transform silicon wafers using chemical and physical processes.

[ProjectsInFlight]’s tube furnace started with a length of heat-resistant quartz glass tubing and a small tub of sodium silicate refractory cement, from the plumbing section of any home store. The tube was given a thin coat of cement and dried in a low oven before wrapping it with nichrome wire. The wrapped tube got another, thicker layer of silicate cement and an insulating wrap of alumina ceramic wool before applying power to cure everything at 1,000° C. The cured tube then went into a custom-built sheet steel enclosure with plenty of extra insulation, along with an Arduino and a solid-state relay to control the furnace. The video below concludes with testing the furnace by growing a silicon dioxide coating on a scrap of silicon wafer. This was helped along by the injection of a few whisps of water vapor while ramping the furnace temperature up, and the results are easily visible.

[ProjectsInFlight] still needs to add seals to the tube to control the atmosphere in there, an upgrade we’ll be on the lookout for. It’s already a great start, although it might take a while to catch up to our friend [Sam Zeloof].

Continue reading “Start Your Semiconductor Fab With This DIY Tube Furnace”

Internal Heating Element Makes These PCBs Self-Soldering

Surface mount components have been a game changer for the electronics hobbyist, but doing reflow soldering right requires some way to evenly heat the board. You might need to buy a commercial reflow oven — you can cobble one together from an old toaster oven, after all — but you still need something, because it’s not like a PCB is going to solder itself. Right?

Wrong. At least if you’re [Carl Bugeja], who came up with a clever way to make his PCBs self-soldering. The idea is to use one of the internal layers on a four-layer PCB, which would normally be devoted to a ground plane, as a built-in heating element. Rather than a broad, continuous layer of copper, [Carl] made a long, twisting trace covering the entire area of the PCB. Routing the trace around vias was a bit tricky, but in the end he managed a single trace with a resistance of about 3 ohms.

When connected to a bench power supply, the PCB actually heats up quickly and pretty evenly judging by the IR camera. The quality of the soldering seems very similar to what you’d see from a reflow oven. After soldering, the now-useless heating element is converted into a ground plane for the circuit by breaking off the terminals and soldering on a couple of zero ohm resistors to short the coil to ground.

The whole thing is pretty clever, but there’s more to the story. The circuit [Carl] chose for his first self-soldering board is actually a reflow controller. So once the first board was manually reflowed with a bench supply, it was used to control the reflow process for the rest of the boards in the batch, or any board with a built-in heating element. We expect there will be some limitations on the size of the self-soldering board, though.

We really like this idea, and we’re looking forward to seeing more from [Carl] on this.

Continue reading “Internal Heating Element Makes These PCBs Self-Soldering”

Stewart Platform Keeps Its Eye On The Ball

Although billed as a balancing robot, [Aaed Musa’s] robot doesn’t balance itself. It balances a ball on a platform. You might recognize this as something called a Stewart platform, and they are great fun at parties if you happen to party with a bunch of automation-loving hackers, that is. Take a look at the video below to see the device in action.

If you want to duplicate the project, there’s a bit of expense, but the idea behind it is explained in the video. Much of the robot is 3D printed with threaded inserts. Even the ball is 3D printed in two parts along with a cubic connector to hold the two hemispheres together. The acrylic platform was cut with a water jet, although you could just as easily have cut it with hand tools.

Continue reading “Stewart Platform Keeps Its Eye On The Ball”

This Found-Sound Organ Was Made With Python And A Laser Cutter

Some readers will no doubt remember attaching a playing card to the front fork of their bicycle so that the spokes flapped the card as the wheel rotated. It was supposed to sound like a motorcycle, which it didn’t, but it was good, clean fun with the bonus of making us even more annoying to the neighborhood retirees than the normal baseline, which was already pretty high.

[Garett Morrison]’s “Click Wheel Organ” works on much the same principle as a card in the spokes, only with far more wheels, and with much more musicality. The organ consists of a separate toothed wheel for each note, all turning on a common shaft. Each wheel is laser-cut from thin plywood, with a series of fine teeth on its outer circumference. The number of teeth, as calculated by a Python script, determines the pitch of the sound made when a thin reed is pressed against the spinning wheel. Since the ratio of teeth between the wheels is fixed, all the notes stay in tune relative to each other, as long as the speed of the wheels stays constant.

The proof-of-concept in the video below shows that speed control isn’t quite there yet — playing multiple notes at the same time seems to increase drag enough to slow the wheels down and lower the pitch for all the notes. There appears to be a photointerrupter on the wheel shaft to monitor speed, so we’d imagine a PID loop to control motor speed might help. That and a bigger motor that won’t bog down as easily. As for the sound, we’ll just say that it certainly is unique — and, that it seems like something [Nicolas Bras] would really dig.

Continue reading “This Found-Sound Organ Was Made With Python And A Laser Cutter”

PET Bottles Diligently Turned Into Filament

While the price of 3D printers has come down quite a lot in the past few years, filament continues to be rather pricey especially for those doing a lot of printing. This has led to some people looking to alternatives for standard filament, including recycling various forms of plastic. We’ve seen plenty of builds using various materials, but none so far have had this level of quality control in the final project.

What sets this machine apart from others is that it’s built around an Arduino Nano and includes controls that allow the user to fine-tune a PID controller during the conversion of the recycled plastic into filament. Different plastic bottles have different material qualities, so once the machine is started it can be adjusted to ensure that the filament produced has the exact specifications for the printer. The PCB is available for download, and the only thing that needs to be done by hand besides feeding the machine to start it is to cut the plastic into strips for the starter spool. There is also a separate 3D printed tool available to make this task easy, though.

Not only could this project save printing costs, but it also keeps harmful plastics out of landfills and other environments. Recycling plastic tends to be quite difficult since producing new plastic is incredibly cheap, and the recycled material can’t be used as often as other materials such as aluminum. But there are still plenty of people out there trying to reuse as much of it as they can.

Continue reading “PET Bottles Diligently Turned Into Filament”

Mini Falcon 9 Uses NASA Software

[T-Zero Systems] has been working on his model Falcon 9 rocket for a while now. It’s an impressive model, complete with thrust vectoring, a microcontroller which follows a predetermined flight plan, a working launch pad, and even legs to attempt vertical landings. During his first tests of his model, though, there were some issues with the control system software that he wrote so he’s back with a new system that borrows software from the Space Shuttle.

The first problem to solve is gimbal lock, a problem that arises when two axes of rotation line up during flight, causing erratic motion. This is especially difficult because this model has no ability to control roll. Solving this using quaternion instead of Euler angles involves a lot of math, provided by libraries developed for use on the Space Shuttle, but with the extra efficiency improvements the new software runs at a much faster rate than it did previously. Unfortunately, the new software had a bug which prevented the parachute from opening, which wasn’t discovered until after launch.

There’s a lot going on in this build behind-the-scenes, too, like the test rocket motor used for testing the control system, which is actually two counter-rotating propellers that can be used to model the thrust of a motor without actually lighting anything on fire. There’s also a separate video describing a test method which validates new hardware with data from prior launches. And, if you want to take your model rocketry further in a different direction, it’s always possible to make your own fuel as well.

Continue reading “Mini Falcon 9 Uses NASA Software”

Building Reaction Wheels With Python And LEGO

Reaction wheels are useful things, typically used by satellites to keep themselves oriented the right way up in space. Turning the reaction wheel creates an equal and opposite torque in the spacecraft, allowing it to point and rotate itself accurately. The same technique also works here on Earth, and [Brick Experiment Channel] decided to build one out of LEGO to control an inverted pendulum.

The initial design using a small LEGO wheel on an inverted pendulum was only able to work reliably over a 4-degree angle from the vertical. Upgrading the wheel to a larger, heavier one enabled the wheel to instead work over a 28-degree range instead.

A MPU9250 inertial measurement unit was pressed into service for control of the reaction wheel, fitted to the base of the pendulum and read by a Raspberry Pi. The Pi takes accelerometer and gyroscope readings, and then controls the motor on the pendulum with a PID controller to keep the inverted pendulum upright.

The video goes into a great deal of detail on what it takes to make the pendulum run smoothly. From changes to the control coefficients to measuring the motor’s back EMF, [Brick Experiment Channel] demonstrates everything required to make the pendulum robust to outside perturbances.

The inverted pendulum is a great way to learn about control theory, as we’ve seen time and again.

Continue reading “Building Reaction Wheels With Python And LEGO”